Add Columns in SQL ServerA table column is a group of cells that contain text or numbers. Each column can store one value for each row in the table. SQL Server allows us to add the column whenever we need them. It must ensure that we have ALTER permission on the object before adding the columns in a table. This article gives a complete overview of how we can add columns to an existing table. Limitations and RestrictionsWhen we use the ALTER TABLE statement for adding columns, we will see that those columns are automatically added at the end of the table. We can use the Management Studio whenever we want to add columns in a specific order to the table. However, adding columns using SSMS is not a best practice in terms of DBA. It's the best practice to return columns in a specific order at the application and query level. In our queries and applications, we must define the columns by name in the order we want to return. We can add table columns in SQL Server using mainly two ways:
T-SQLSQL Server provides the ALTER TABLE ADD COLUMN statement for adding new columns to an existing table. We can use the below syntax to do this: In the above,
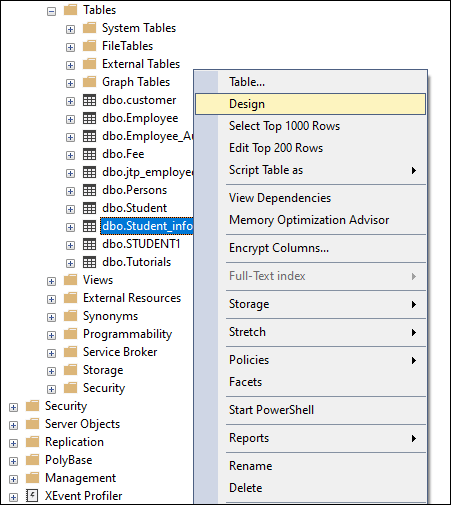
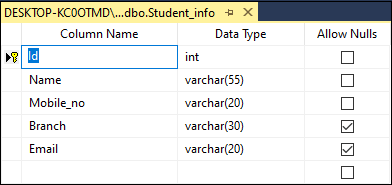
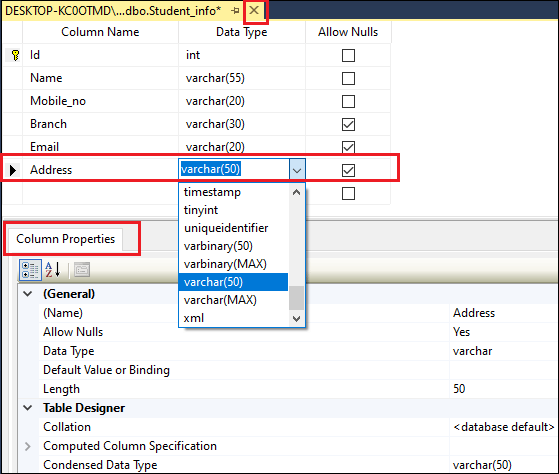
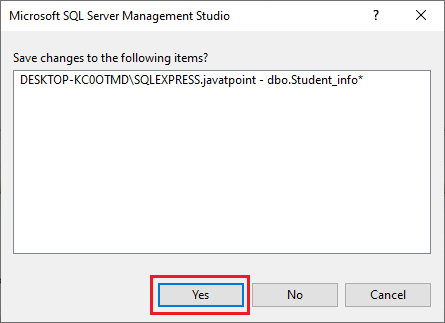
SQL Server also enables us to add more than one column into the existing table within a single query. We can do this by specifying a list of columns separated by a comma that we would like to add to a table after the ADD clause. The following syntax explains it more clearly: ADD COLUMN ExampleLet us understand how to add columns to the existing table with the help of various examples. First, we will create a table named "Student_info" using the below statement: Our table structure looks like the below image where we have only two columns:  Suppose we have mistakenly not added one important column after creating a table. In that case, we can use the below statement to add a new column to the table: This command will add the newly added column at the end of the table. When we see the table structure, the mobile_no column is added as the last column of the table.  If we want to add multiple columns (for example, Branch and Email) in the table, we need to run the statement as below: When we see the table structure, the Branch and Email columns are added successfully to the table.  SQL Server will through an error message if we mistakenly add a new column with the same column name that exists in the table. For example, executing this command will issue an error because the 'Mobile_no' column is already available in the table: We will get the following error message.  SQL Server Management Studio (SSMS)SSMS is a windows software tool used to connect and work with our SQL Server from a graphical interface instead of using the command line. The management studio allows us to add the columns into the table using the Table Designer option. The following steps are used to add new columns with Table Designer: Step 1: In Object Explorer, go to the Databases -> Tables menu and expand it. Step 2: Select the desired table in which you want to add new columns, right-click on it, and choose the Design option from the context menu.  Step 3: Once we select the Design option, we will see the table in design mode like the below image.  Step 4: Write the new column name in the first blank cell in the Column Name column. Step 5: Select the Data Type column and select the desired type from the menu list. If we do not choose the data type, SQL Server will assign the default value. We can change this default value by navigating to the Database Tools -> Options menu. We can also specify other column properties in the Column Properties tab. For example, we are going to add the 'Address' column in the below image:  Step 5: To save the changes you made in the design window, click the Close button and then the Yes button in the displayed pop-up window.  We can save the changes made in the design window in another way by navigating to the File menu and choosing the Save table name or press CTRL+S on the keyboard.  Step 6: We can verify the newly added column in the table definition.  Next TopicDrop Column in SQL Server |