GUI Calendar using Tkinter in PythonIt is exciting to build Projects in Python. Python provides different modules and libraries to make the projects interactive. One such attribute is the Graphical User Interface (GUI) which can be added to the projects using the Python libraries like Tkinter, PyQt5, Kivy and more. The Tkinter library is among the most common libraries for designing interactive GUI applications. It is lightweight and easy to use. We can operate this library on different platforms or Operating Systems like Windows, Linux, and macOS. In the following tutorial, we will learn how to build a Calendar based on GUI with the help of the Tkinter library in the Python programming language. So, let's get started. Building the GUI Calendar using TkinterIn order for us to start building the GUI Calendar in Python, we will consider following the procedure shown below: STEP 1: We will import the required libraries and modules. STEP 2: We will then define the necessary functions for the execution of the application. STEP 3: We will then create the main window for the application. STEP 4: We will add the widgets to the main window and apply the event Trigger. Let us now understand the steps mentioned above in detail. Importing the required libraries and modulesFirst, we will import the necessary libraries and modules, including the tkinter library to add GUI to the application, ImageTk and Image modules from the PIL library to add images to the application, the calendar module to get the year data and the date module from the datetime module to get the current month and year. Let us consider the following snippet of code demonstrating the same. File: guiCalendar.py Explanation: In the above snippet of code, we have imported all the methods, classes, and widgets from the tkinter library. We have then imported the ImageTk and Image modules from the PIL library. We have then imported the calendar module. At last, we have imported the date module from the datetime library. Defining the Functions of the applicationOnce we have imported the required libraries and modules, we will add some functions to the program to perform specific functions and interact with the application. These functions will display the data to the users, reset the entries, and close the application. We will start by defining the first function to display the calendar. Let us now consider the following snippet of code demonstrating the same. File: guiCalendar.py Explanation: In the above snippet of code, we have defined a function as displayCalendar. This function will allow us to print the calendar for the month and year. We have gotten the month and year data from the spin boxes and stored them as the integer values in the different variables, namely month and year. We then used the month() method from the calendar module to retrieve the month details and store them in another variable, output_calendar. We have then deleted the previous output in the text field using the delete() method. At last, we have inserted the resultant calendar in the text field with the help of the insert() method. Let us now define another function to reset the values and the result in the application. Here is the snippet of code demonstrating the same. File: guiCalendar.py Explanation: In the above snippet of code, we have defined a function as reset. Within this function, we have used the delete() method to delete the output in the text field. We have then set the values of the IntVar objects to the current month and year. We have then used the config() method on the spinbox objects and set the values of their textvariable parameters to the above IntVar objects. We will now define another function to close the application. Let us consider the following snippet of code demonstrating the same. File: guiCalendar.py Explanation: In the above snippet of code, we have defined a function as close. Within this function, we have used the destroy() method with the object of the Tk() class to close the application. Creating the main window of the applicationWe will now create the main window of the application to display all the widgets and the output for the users. We will start by creating an object of the Tk() class of the Tkinter library. We will then set the title, size, position, background color and bitmap icon to make it look attractive. Let us now consider the following snippet of code demonstrating the same. File: guiCalendar.py Explanation: In the above snippet of code, we have created an object of the Tk() class that will represent the main window for the application. We have then used the title() method to set the title for the main window. We have also set the size and position of the main window using the geometry() method and disabled the resizable option by setting the parameters of the resizable() method to 0. We have also set the background color using the configure() method and the bitmap icon with the help of the iconbitmap() method. We have used the ICO file to import the icon image in the application. Adding widgets to the main window and applying the event triggersWe will now add some widgets to the main window, including the frames to provide a proper structure to other widgets, the labels to display information in the application, the spin boxes to enter month and year details, a text field to display the output and some buttons to trigger the specific events. We will start by adding the frames to the application. These frames will help us provide a well-defined structure to hold other widgets. We will use the Frame() widget to create one. Let us consider the following snippet of code demonstrating the same. File: guiCalendar.py Explanation: In the above snippet of code, we have created some frames with the help of the Frame() widget and set their master parameters to the object of the Tk() class, i.e., guiWindow. We have set their background colors in the bg parameters to #B0E0E6. We have then used the pack() method to set the positions of the frames in the application. We have set the expand parameter to True and the fill parameter to both so that the frames can expand on both sides of the space is provided. We will now add different labels to the application. We will start by creating a label displaying the heading on the main window; we will then create another label to display an image. We will also add two more labels to display the month and year information. We will use the Label() widget to create these labels. Let us consider the following snippet of code demonstrating the creation of each label. File: guiCalendar.py Explanation: In the above snippet of code, we have used the Label() method to create a label to display the heading. We have set the master parameter for this label to header_frame. We have also set the text, font style and size, background color and foreground color. We have then used the pack() method to set the position of the label. File: guiCalendar.py Explanation: In the above snippet of code, we have used the open() method of the Image module to import an image from the directory. We have then used the resize() method to resize the image so that it can fit in the application. We have also used the ANTIALIAS filter for the image. We have then made the imported image compatible with the Tkinter using the PhotoImage() method of the ImageTk module. We have then created a label using the Label() widget to display the imported image. We have set the master parameter of this widget to the header_frame frame. We have also set the image parameter of this label to the imported image. At last, we have used the pack() method to set the position of the label on the main window. File: guiCalendar.py Explanation: In the above code snippet, we created two labels to display the details for the spin boxes to enter month and year using the Label() method. We have set the master parameter for these labels to the entry_frame frame. We have also set the text, font size and style, background color and foreground color. We have then used the place() method to set the position of these labels on the main window. Now that we have added all the labels required in the application, it is time to create some spin boxes to enter data. We will use the Spinbox() widget to create the spin boxes. But first, we will create the objects of the IntVar class. These objects will store the value of the current month and year and display them in the spin boxes when the application is executed. Let us consider the following snippet of code demonstrating the same. File: guiCalendar.py Explanation: In the above snippet of code, we have created some objects of the IntVar class and set their master parameter to the entry_frame frame. We then used the today() method to retrieve the current date and the month and year attribute to get the current month and year and stored them in separate variables. We have then used the set() method to set these values in the objects of the IntVar class. We have then used the Spinbox() widget to create spin boxes to enter month and year. We have set the master parameter to the entry_frame frame. We have also set the range for these spin boxes along with the width. We have also used the textvariable parameter to set the initial value of these spin boxes to the current month and variable stored in the objects of the IntVar class. At last, we have used the place() method to set the position of these spin boxes. We will now create a textbox with the help of the Text() widget. This textbox will display the calendar. Let us consider the following snippet of code demonstrating the same. File: guiCalendar.py Explanation: In the above snippet of code, we used the Text() widget to create a textbox displaying the calendar. We have set the master parameter to the result_frame frame and the widget and height parameters to 20 and 8, respectively. We have also set the font style and size for the text. We have also set the type of the border to RIDGE using the relief parameter and the borderwidth parameter to 2. At last, we have used the pack() method to set the position of the textbox. We will now add some buttons to the applications that will allow us to display the calendar, reset the entries and the output and close the application. These buttons can be created using the Button() widget. We will also use the command parameter in this widget and call the functions we created earlier. Let us consider the following snippet of code demonstrating the same. File: guiCalendar.py Explanation: In the above snippet of code, we have used the Button() widget and created some buttons for the application. We have set the master parameter of these widgets to the button_frame frame. We have also included the necessary text, background color and foreground color. We have then used the command parameter and set their values to the functions we defined earlier, which we eventually are called whenever clicked. At last, we have used the place() method to set the positions of the buttons. We will now use the mainloop() method with the object of the Tk() class to run the application. The following is the snippet of code illustrating the same. File: guiCalendar.py Explanation: In the above snippet of code, we have used the mainloop() method along with guiWindow, the object of the Tk() class. Hence, the project code is now completed. We can save the file and run the following command in a command shell or terminal to see the output. Syntax: Before we see the output, let us consider the complete code of the "GUI Calendar" project in Python. The Complete Project CodeThe following is the snippet of code of the "GUI Calendar" project in the Python programming language. File: guiCalendar.py Output: 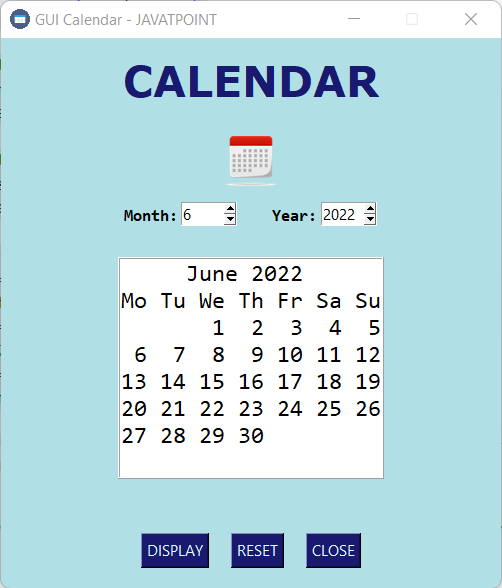 Next TopicPython Program to Rotate an Image |
We provides tutorials and interview questions of all technology like java tutorial, android, java frameworks
G-13, 2nd Floor, Sec-3, Noida, UP, 201301, India


