| |

How to Create Test Cases for Exceptions in JavaIn Java, creating test cases for exceptions is not a difficult task. The JUnit testing tool of Java provides a way to track the exception handling of code. We can write the test cases to check whether the code throws a desired exception or not. In order to write and run the test cases for an exception, we need the JUnit jar file in the system, or we need to set up the JUnit environment in our system. To test the exceptions, we should follow the following steps:
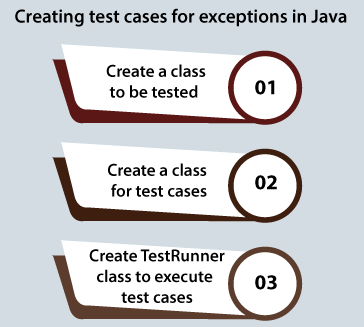
Create a Class to be TestedWe first create a class that needs to be tested. We will create class ShowMessage class. In this class, we will create two methods, i.e., show() method and the finalMessage() method. Using the constructor, we set the value to the message property. In the show() method, we will print the message and generate the divide by zero exception. In the finalMessage() method, we will concatenate the given message with the "Hello!" string. The code of the above theory is given below: ShowMessage.java Create a Class for Test CaseNow, we need to write the Java class for the test case name TestShowMessage.java. In this class, we will create a msg property with a default string message and create the object of the ShowMessage class by passing that default string. We will create a testshow() method in which we will add the expected exception ArithmeticException. In this method, we will call the show() method of the ShowMessage class by using its object. We will create another test method, testfinalMessage(), in which we will concatenate the "Hello!" with the default message. In this message, we will check the actual result with the expected result using the assertEquals() method. The code of the above theory is given below: TestShowMessage.java Create TestRunner Class to Execute the Test CaseNow, we need to create a Java class TestRunner by using which we will execute our test cases. This class contains the main() method in which we run the testShowMessage class using the runClasses() method of the JUnitCore. In this method, we pass the class file of the code that contains the test cases. The result returned by the runClasses() method will store into the result variable of type Result. The result contains the failure and successful result both. There can be more than one failure, and to print each failure, we can iterate the result using the loop. The code of the above theory is given below: TestRunner.java Output: In order to run the test cases in Java, we compile all the Java classes associated with it using the javac command. After that, we run only that class which contains the main method, i.e., TestRunner.java. When we run the TestRunner.java file, it will give result true like: 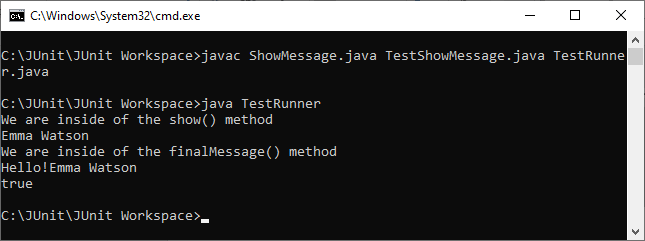
So, in order to write the test cases for the exception class, we need to add the exception class to that test case by using the expected keyword. |
 For Videos Join Our Youtube Channel: Join Now
Feedback
- Send your Feedback to [email protected]
Help Others, Please Share


