| |

Java Flight RecorderJava Flight Recorder (JFR) is a powerful performance monitoring and profiling tool. It diagnoses, collects, and monitors a running Java application on a continuous basis even in catastrophic failure. It is integrated into JVM. The tool provides a powerful GUI for application performance analysis. It is used in heavily loaded production environment applications such as profiling, black-box analysis support, and debugging. In this section, we will discuss the Java flight recorder in detail. Along with this, we will also understand its concepts, uses, architecture, JMC, and basic commands of JFR. What is Java Flight Recorder (JFR)?It was first introduced in JDK 1.7. Its functionality has been written in Java. It is an application diagnosis tool that captures both JVM and application data. The data includes garbage collection, synchronization, compiler, CPU usage, Exceptions, I/O, etc. It also provides a sampling-based profiler. With the help of a profiler, we can get accurate data and low overhead. It uses a circular buffer to store data. 
The above figure depicts the concept of circular flight recording buffer. New data continuously added to the buffer and old data is removed. The JFR tool cannot be used standalone. So, it is used with Java Mission Control (JMC). The JMC tool contains a plugin that allows us to visualize the data gathered by the JFR. Apart from JFR, there are some other tools provided by the JDK for monitoring and profiling:
Note that Java VisualVM was part of the Oracle and Open JDK distribution in past. Since Java 9, Java VisualVM has been removed. The following figure depicts the evolution of JFR. 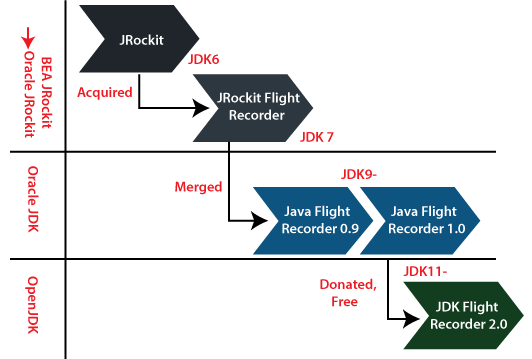
Note: If we want to use JFR tool in production, a commercial license is required to use.Benefits of Java Flight RecorderSimilar to JFR, there are some other tools also available. But JFR has some advantages over them that are as follows:
Uses of Flight Recorder
Architecture of JFRJFR architecture consists of the following things: JFR contains a runtime engine that produces the recordings. The runtime engine has two components i.e. Agent and Producers. The work of the agent is to handle the buffers, disk, and MBeans, etc. It provides a dynamic library that is written in C and Java code. Producers write up data into the buffers. The JFR plugin enables us to work with JMC. We can easily start, stop, and configure recording through GUI. 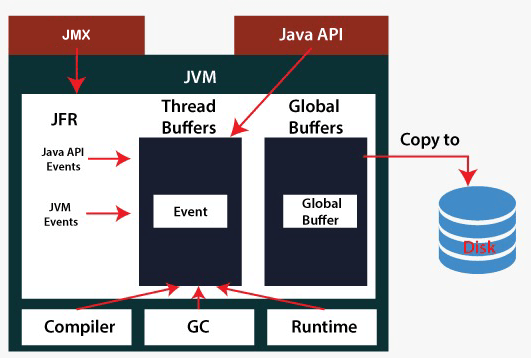
JFR ComponentsThere are two main concepts of JFR i.e. Event and Dataflow. Let's briefly discuss each. JFR EventsIn JFR, everything is an event. It collects events that happen in the JVM along with application logs. Events represent the state of the JVM and application. The information collected by JFR is divided into two parts i.e. Header and Payload. 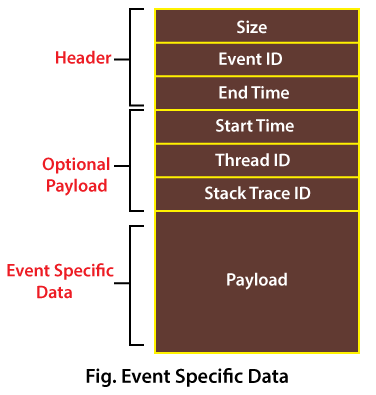
The header includes Size, Event ID, and End Time. The payload contains the event-specific data. Besides this, it also includes Start Time, Thread ID, and Stack Trace ID but these are optional payloads. While recording events, must define the following two things:
The content-type describes the semantics of a value. It correctly represents the value in UI.
Therefore, events gathered extremely high-level data of an application. We should always record those events that are actually required because it minimizes the overhead. We can also filter out the events by their type, name, and duration. Types of EventsJFR collects the following three types of events: 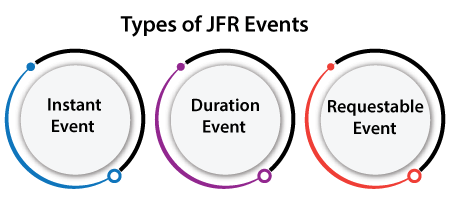
Creating Events We can use the following code snippet to create our own event. Let's create an event for some constants. In the above code, we can also do some additional things that provide some useful hints about the application. For this, we use annotations. JFR Annotations In the following table, we have enlisted some useful annotations. There are some other annotations that can be found in Javadoc.
JFR DataflowEvents gathered the data in bulk from JVM and Java applications. It collects data from both and stores it into a small thread-local buffer. Further, data is flushed into the global buffer (or in-memory) when the thread buffer is up to the neck. Similarly, when the global buffer is up to the neck, the older data is discarded. After that, the data is flushed to the repository. 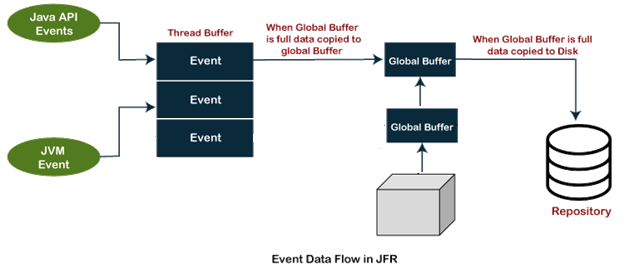
For this reason, its design is fast enough that does not suppress the program. The data of all events stored in flight.jfr file because disk I/O operations are more expensive. The mechanism is more complex because at the same time application might have multiple registering processes with different options. Note: It is not possible to get data at two places. It means that chunks of data will be available either on disk or in-memory (buffer), but not in both places. It avoids overlapping of data.Hence, using JFR we get more data in the JFR file than requested. Remember that data may or may not be in chronological order. The following figure depicts the dataflow of events in JFR. Running Java Flight RecorderConfiguring JFRBefore enabling the JFR tool ensure that you are using javac, java, JFR, JMC, and jcmd tool of the same JDK distribution. It may provide wrong data if you have installed different versions of Java. Enable JFRWe know that it is a commercial feature. So, before running it, we need to unlock the commercial features. It can be unlocked by using the following flags: Where DemoApp is the application name. Note: If you are using Java 11, you need not to activate its commercial features.Start JFRor Advanced Configuration
There are three ways to run JFR:
Using JFR plugin in JMCWe can use the JFR plugin to create a recording. It is already integrated into JMC. Follow the steps to create a recording:
Using Command-Line OptionsWhen we use the java command to launch our application at that time, we can also enable JFR, configure it, and start recording.
Note: The command-line options are available in the commercial license of JDK. If you want to use it, you need to enable it by using the following option:Using Diagnostic CommandsThe following four diagnostic commands are associated with JFR:
JFR.start: The command starts the flight recording. The following table describes the parameters that can be used with the command.
JFR.check: The command checks the running JFR recording(s). The following table lists the parameters you can use with this command. The following table describes the parameters that can be used with the command.
JFR.stop: The command stops the running flight recordings. The following table describes the parameters that can be used with the command.
JFR.dump: The command copies information of flight recordings to a file. The following table describes the parameters that can be used with the command.
Recordings SessionsThe recording session specifies exactly which information to collect. There are two pre-configured settings:
We can also configure our own setting in Mission Control. In order to use JFR, we need to activate it. We can activate it either at starting up or during the running time of the Java application. JFR provides two ways to record sessions.
Using Startup FlagsThe following command is used if we want to do continuous recording at startup: In the above command, the settings parameter accepts either path to or the name of a template. The templates are stored at the location jre\lib\jfr folder. If we want to get more information, change the log level as follows: Using JCMD ToolIt is used if we are controlling JFR through command line. Start Recording Check Recording Dump Recording Unlock Commercial Feature We can also create a recording while exiting from the JVM. We need to start our application by using the following option: Recording can also be done using triggers. A trigger is a set of rules that executes whenever a specified condition is met. If you want to use trigger to create a recording, define the trigger on the Triggers tab presented in the JMX console. At regular intervals, JFR creates checkpoints in a recording. It consists of events, constant pool, and event meta-data. It can be found in the .jfr file. Types of RecordingJFR allows us to record two types of recording:
Time Fixed RecordingIn time fixed recording, events are recorded for a fixed time. After that, it dumps the recording to a file. Mostly, it is used to profile a Java application for a specified time. Continuous RecordingIn the continuous recording, there is no fixed time for an event. Since recording continuously runs. We need to explicitly dump the recording if we want to stop it. So, when we execute the dump option, we get the most recently captured data available in the buffer. Download and Install JMCIf you want to use JFR, you need to install JMC. If you are using Eclipse IDE, you can download it from the Eclipse Marketplace presented under the Help menu. Let's download and install JMC explicitly by using the following steps: Step 1: Go through the link for downloading the JMC. The link will land you on the following page. Click on the link and download JMC according to your OS. Here, we are downloading JMC for Windows. It starts downloading the jmc-7.1.2_windows-x64.zip file. 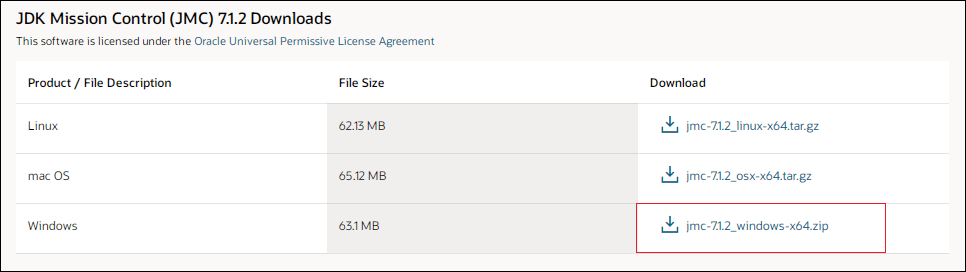
Step 2: Extract the zip file and access the location jmc-7.1.2_windows-x64\bin. We get the following list of files and folders. 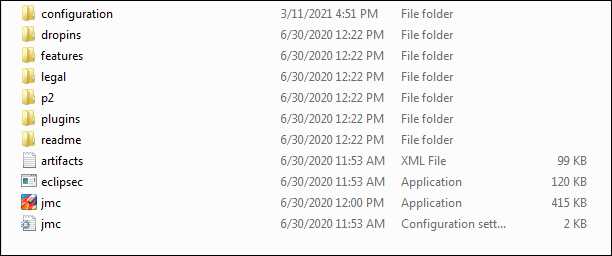
Step 3: Open Command Prompt and execute the jmc command. 
Step 4: It shows a Windows Security Alert, click on the Allow access button. 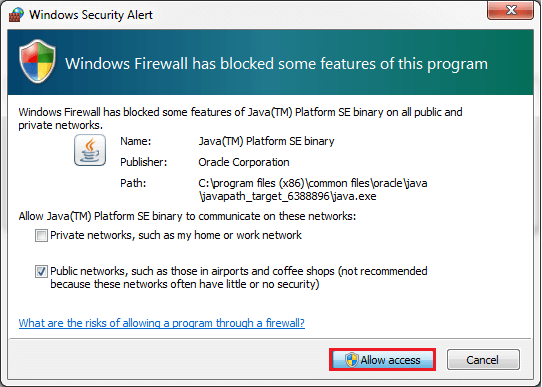
After that, JMC starts running. 
The following JMC window ensures that JMC is running successfully. 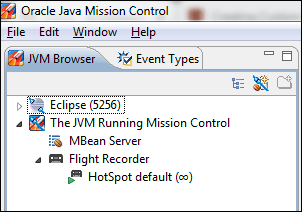
JFR in ActionLet's create a Java program and monitor that program in real-time. The following program sorts the random series of integers. Main.java After running the program, the program starts working when we press a key because we want to execute the program only when Flight Recording is live. In order to execute code with flight recorder, it is required to start the JFR. So, first, we will compile the above program. 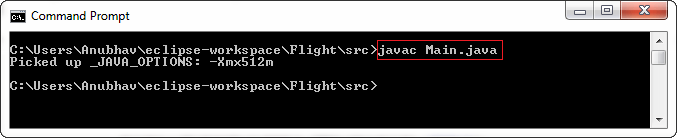
Starting JFRBefore the application, ensure that it is profiled. There is a special way to run the application. We will use the following command to run the application. In the above command, we have unlocked its commercial feature, as we have discussed above. After that, we have written the class name i.e. Main. Next to the class name, 10000 denotes the length of the array. Another argument that we have passed is mode i.e. sorted. It denotes that in what mode 10000 elements will be inserted in the array. Let's run the application. 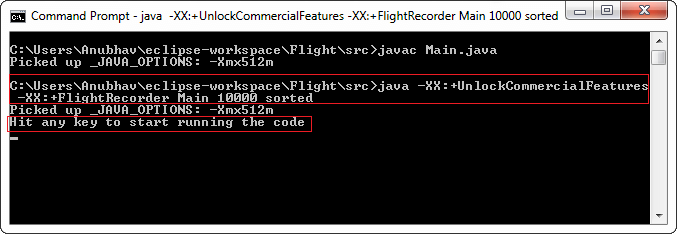
Now the application is executing. But waiting for a key hit. Note that at this moment, we will not hit any key because Flight Recorder is not started and the process ID is also not known. So, before running the program make sure that you have process ID and JFR is running. In order to know process ID, there is another command named jps. Open another Command Prompt and type the command. 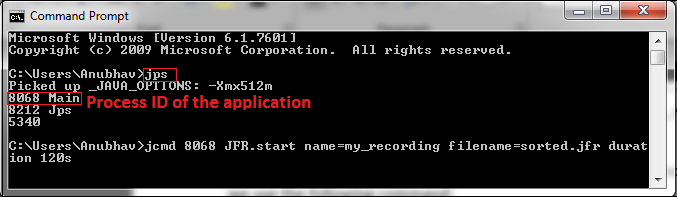
We see that it shows the process ID of the running application. Note that every time we run the application, we get a new process ID. Now, we will run the Flight Recorder for the process ID 8068. In order to run the recorder, we use the following command: In the above command, the recording name is my_recording and the file name that we will get after recording is sorted.jfr. It records the monitoring for 120s. 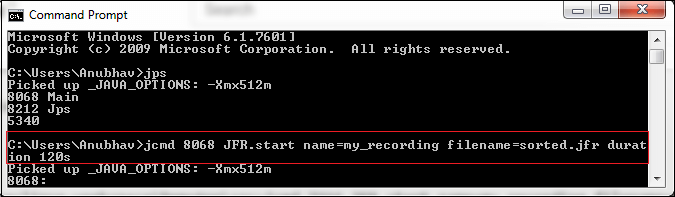
Now Let's start the Java Mission Control. In the command prompt, type the start command that opens a new prompt window. 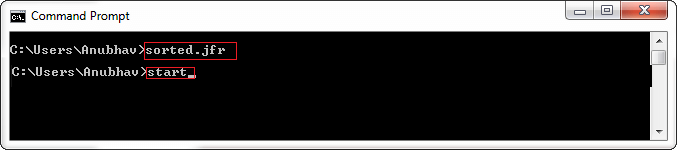
In the new prompt window, execute the command jmc that opens the Oracle Java Mission Control. 
Now we can start the recording. The application can be seen with process ID in the left pane of the JMC window, as shown below. 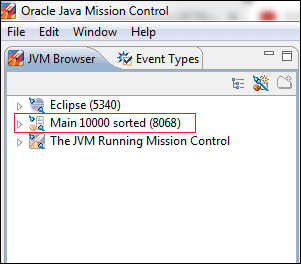
Visualize JFR DataNow we can visualize the data by accessing the .jfr file in JMC. Or we can drag and drop the application in the JMC to see the statics of the Java application. the following window represents the overview of the application. 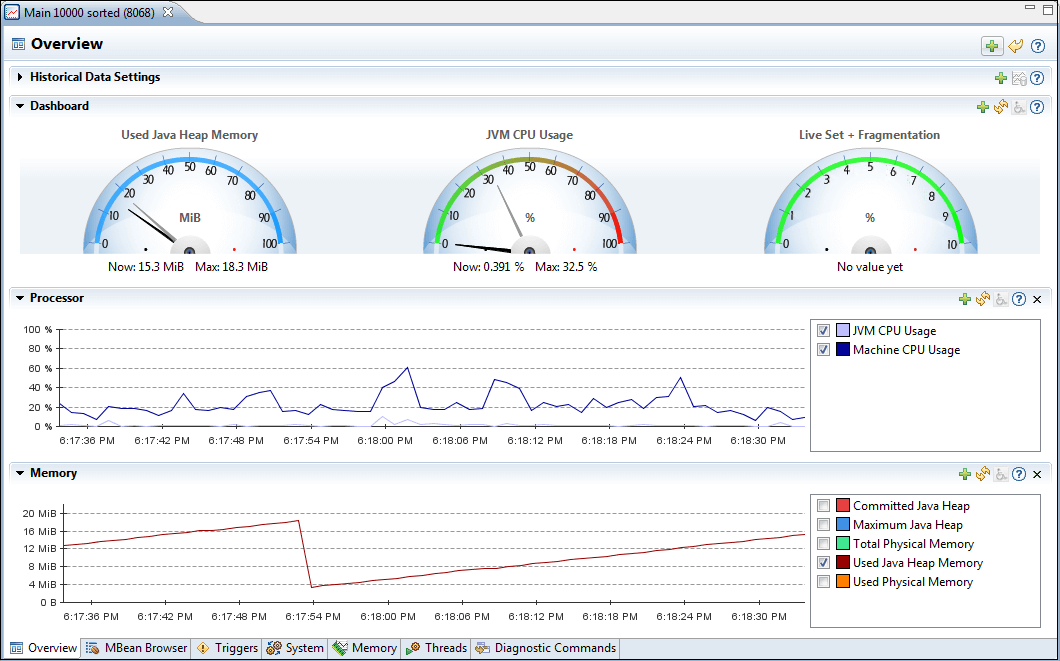
Now we can see the real-time data. If we closely look at the Processor statistics, we observe that it records the application data at every 6 seconds. 
You can set timestamps accordingly. Similarly, memory usage is also recorded at every 6 seconds. 
It also provides the information about Memory Pool. Inside it, we can do the analysis of ClassLoading, Memory, Operating System, Threading, Compilation, and many more. 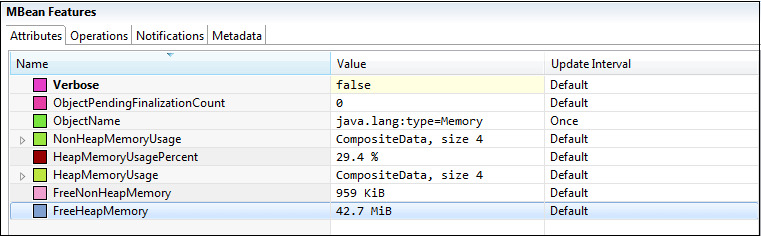
The following snapshot represents the thread-related information like thread count, thread connection monitoring, current thread CPU time, etc. 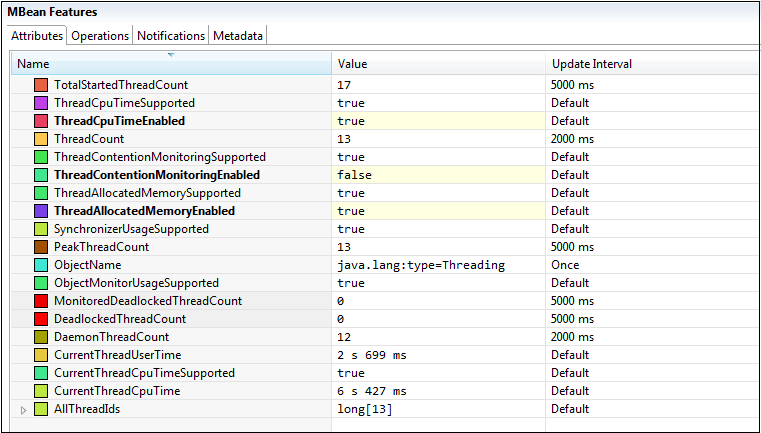
System-related information includes connection, OS, OS architecture, VM version, etc. 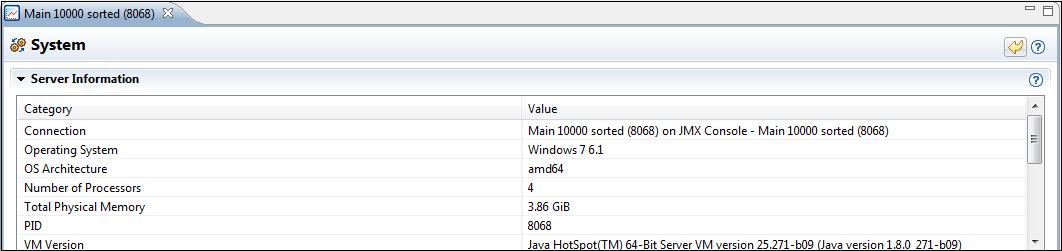
A detailed description of the garbage collector. It includes collection time, GC start time, GC end time, GC duration, GC ID, etc. 
Memory pool includes the detailed description of heap like Code Cache, Metaspace, Eden Space, Old Gen, etc. 
In JFR a lot of things to explore. It is too difficult to explain everything here. So, we suggest try it yourself. Here, a point to notice. Yet, the recording is not started. In order to start recording, right-click on the Flight Recorder and then click on the Start Flight Recording option, as shown below. 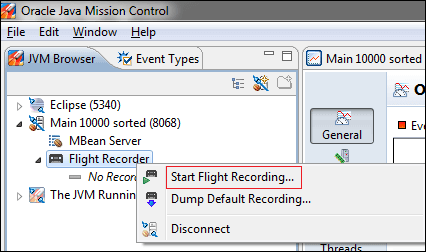
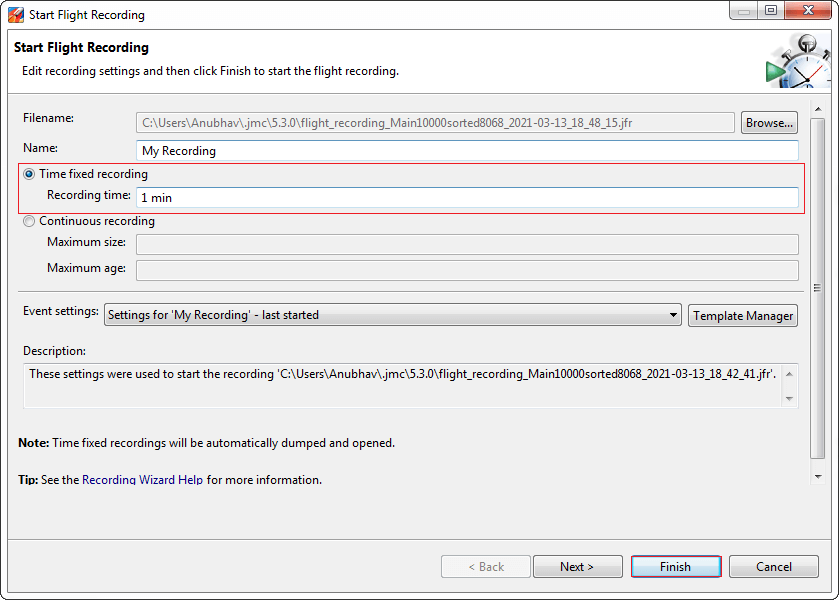
It opens the Flight Recording dialog box. In this dialog box, we can set recording-related parameters. For example, we can provide the recording time. Here, we have specified 1 min recording. As we click on the Finish button, the recording is started. At the bottom right corner, we can see the progress of recording. 
When the recording is completed, it already opens in JMC, as shown below. 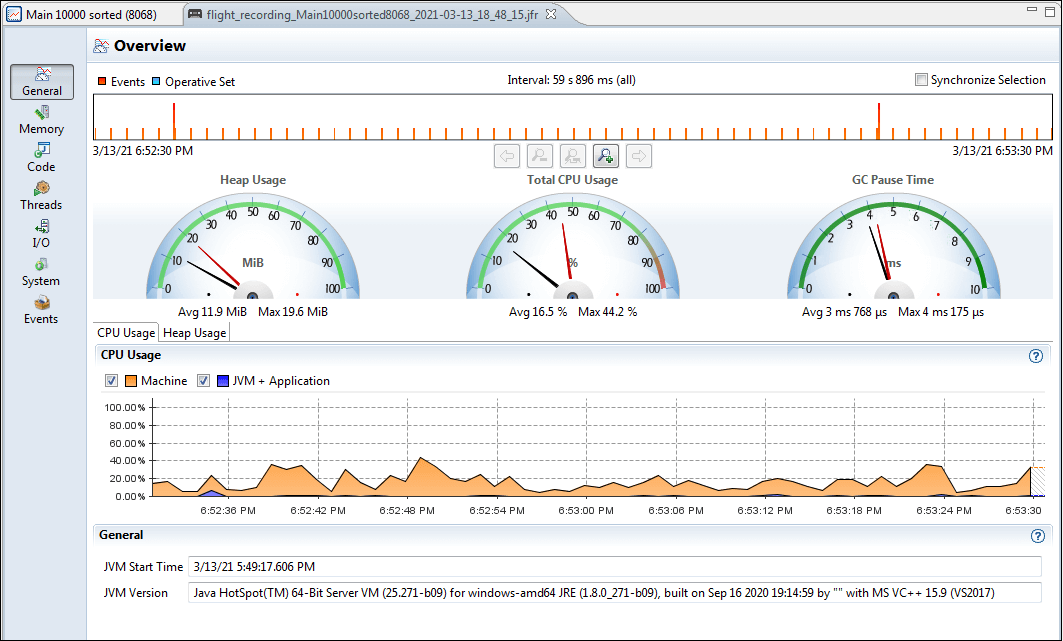
Note: Do not close any application (like command prompt, application, eclipse, etc.) during the recording process otherwise you will get a corrupted .jfr file. The generated JFR is used to do the analysis of an application. So, it is bad practice if we close or interrupt the application during the recording process. We can also filter and sort the data for analysis.
Next TopicBucket Sort in Java
| |||||||||||||||||||||||||||||||||||||||||||||||||||||||||||||||||||||||||||||||||||||||||||||||||||||||||||||||||||||||||||||||||||||||||||||||||||||||||||||
 For Videos Join Our Youtube Channel: Join Now
Feedback
- Send your Feedback to [email protected]
Help Others, Please Share


