PySpark Dataframe SplitWhen we get a huge number of datasets, then it will be quite beneficial to speed through the datasheet into an equal chance and then process each data frame on an individual basis. This will be only possible when the operation on the data frame is independent of the rows. Here each and every chance, or we can say the equally split data frame, can be processed parallel by making use of the resources in a very efficient manner. We are the medium of this article. We will discuss and learn how we can split the pie Spark data frames into an equal number of rows and even columns. Well, here in this article, we will basically cover the rows. Let us Create the DataFrame for the Demonstration Purpose. Here, Firstly we will import the required modules. Thereafter we will import the Spark session from the Pyspark.sql module. Subsequently, we will create the Spark session and give the app name. After that, we will put column names for the data frame and then put the row data for the data frame. At last, we will create the dataframe by using the above value that we have put in the row, and thereafter, we will view the dataframe. CodeOutput: 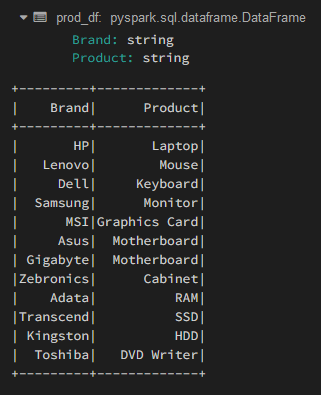 Well, in the above code block, we are able to see that the schema structure has been defined for the data frame, and the sample data is also provided. It is notable that the data frame consists of two string-type columns, which have 12 records. Now let us take some examples to understand this Pyspark data frame splitting. Example 1: Splitting of data frames by using 'DataFrame.limit()'In this Example, we will make use of the split() method and then create the equal data frames 'n.' Syntax: Here the limit is the result count to the desired number, which is specified. Here in this code, we will first define the number of splits that we want to split. Thereafter we will calculate the count for each data frame raised and create a copy of the original data frame. Subsequently, we will eat a rate for his data frame and get the top of each length of rows and truncate the copy definition to remove the contents that are fetched for the temp_df. Subsequently, we will view the data frame, and then, at last, we will do the increment to split the number. Code Output: 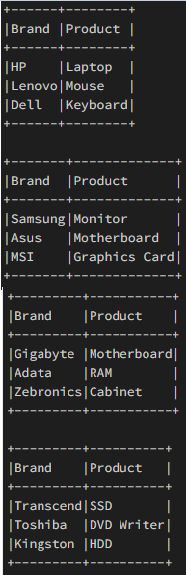 Example 2: In this Example, we have split the data frame and performed the operation for concatenating the result. In this Example, we will split the data frame into equal parts and then perform the concatenation operation on each and every part of it in an individual manner. We will concatenate the result to the result_df. Well, this is the demonstration of how a user can able to use an extension of the previous code for performing a data frame operation in a separate way for each data frame and then append those individual data films to produce the new data frame, which has a particular length, and that length is equal to the original data frame. Here initially, we have defined the number of splits that we want to do and then calculated The count on each data frame row. Thereafter we created a copy of the origin data frame and did the function for modification of the column of each individual split. Subsequently, we created an empty data frame for storing the concatenated results and then iterated for each data frame. Thereafter we did the same steps that we have done for the above code Vishal like getting the length of each row or truncating the copper definition. Lastly, we performed the operation on the newly created data frame and then concatenated the data frame, and finally incremented the split numbers. Code Output:  ConclusionHere in this article, we have gone through the PySpark split data frame and know for which cause it is used. Basically, it is used for huge data sets when you want to split them into equal chunks and then process each data frame individually. Here we have created the data frame for the demonstration and taken two examples. In which the first Example, we split the data frame using dataframe.limit, and in the second Example, we split the data frame by performing the operation and concatenating the result. Thereafter we got the respective output. So this is all about this article; here, everything is explained in such a way that anyone can take help from it with ease. Next TopicSciPy CSGraph - Compressed Sparse Graph |
We provides tutorials and interview questions of all technology like java tutorial, android, java frameworks
G-13, 2nd Floor, Sec-3, Noida, UP, 201301, India


