Centralizing Excel File Metadata
In this section, we will learn how to centralize Excel File Metadata in Talend Studio for Data integration platform.
Before going further in this chapter first, we will understand why we will use Excel Files.
If we want to connect to an Excel File, we will centralize the connection and schema information in the Repository for reusability.
To create the Excel File connection form the beginning:
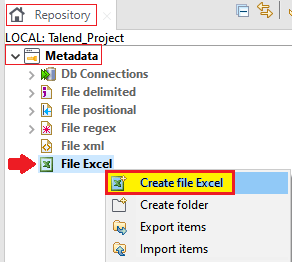
- Go to the Repository panel.
- Then expand the Metadata and right-click on the File Excel, then select Create File Excel option in the popup menu, as we can see in the below image:
Repository → Metadata → File Excel → Create file Excel
Note: To use the centralized Excel File in our job, go to the basic setting view of the necessary components with its property typeset as build-in for opening the File Metadata setup window.
Then New Excel File window will open where both the File connection and schema definitions are completed in four steps:
- Define General properties
- Defining File path and Format
- Define File Parsing Parameters
- Checking and customizing the File schema
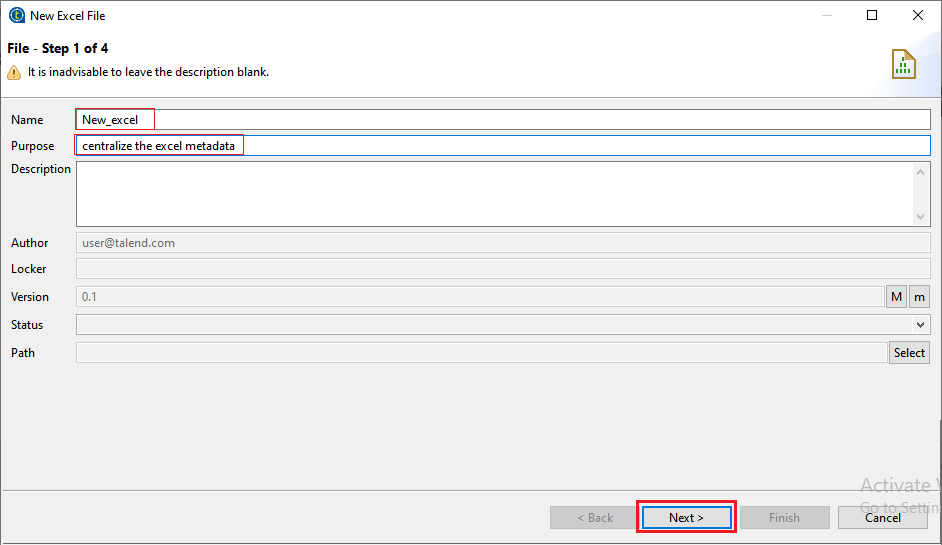
Step1: Defining General Properties
In the first step, we will fill all the necessary details like Name, Purpose, and Description.
We can also manage the version and status fields of a Repository item in the project setting dialog box.
Click on the Select button next to the Path field for selecting a folder under the File Excel node to hold our newly created File connection.
Note: we cannot select a folder if we are editing an existing connection, but we can drag and drop it to a new folder whenever we want.
After filling all the details of general properties, click on the Next button.
Step2: Defining File path and Format
In the next step, we will click on the Browse button to locate our File from the local system.
Note: if we are saving an excel File connection that is defined in a component, the File path will be automatically in the File field.
For example, we will select the New_Excel.xlsx File from our system.
- Ensure that the Read excel2007 file format(xlsx) checkbox is selected if the uploaded file is an Excel 2007 File.
- If the uploaded xlsx File is extremely large, then select Less memory consumed for large excel (Event mode) from the Generation Mode list to stop out-of-memory errors; otherwise, the Memory-consumed (User mode) is selected by default.
- We have the File Viewer and Sheets setting area, where we can see the file content and the one or more sheets.
- We can select the sheet which we want to view from the Please select sheet dropdown list, and the Preview table shows the content of the selected sheet.
Note: the File preview table shows the first sheet of the File, by default.
- We can also select one or more sheets, which we want to upload from the Set sheets parameters
- The resulting schema will represent the combination of the structures of all the selected sheets if we choose more than one sheet.
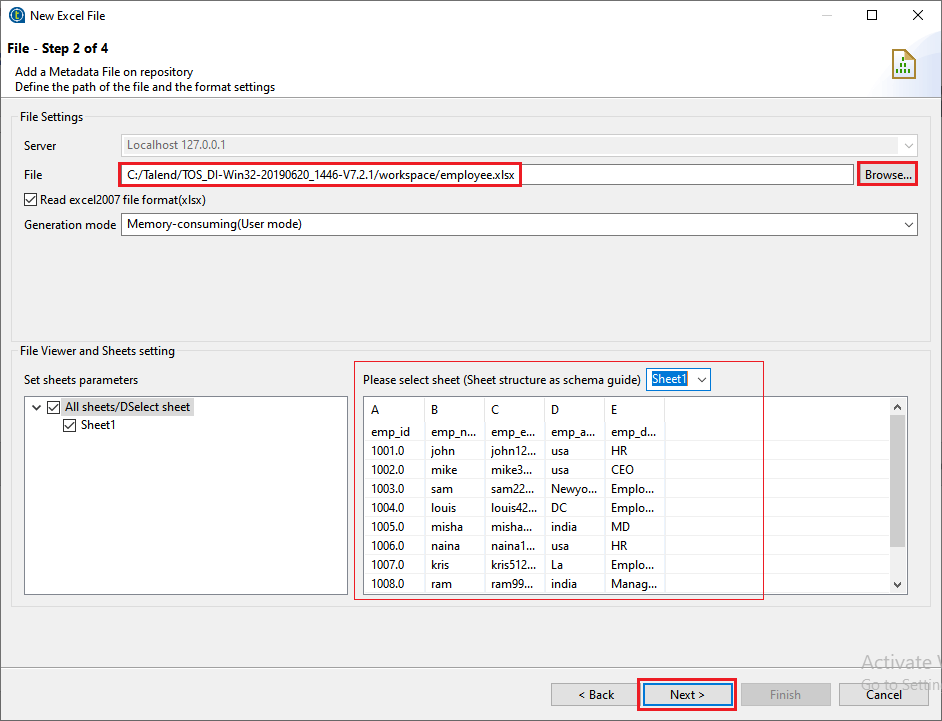
- After that, click on the Next button to process further.
Step3: File Parsing Parameters
In this step, we will describe the multiple settings of File parsing to recover the File schema properly.
- In the File Settings area, we can set the Encoding type based on the uploaded file.
- In the Rows To Skip section, we can skip the row if the Excel file has the Header or Footer as we can see in the below screenshot:

- The Metadata column setting area represents the columns, which has to be read in the file by filling the First column and Last column fields with integers.
For Example: if we want to skip the First column as it may not have the correct data, which has to be processed, put 2 in the First column, and to set the second column of the file as the first column of the schema.
But in our case, we put 1 in the First column, as we can see in the below image:

- We did not need to parse all the rows of the file, mainly when we have uploaded a large file while retrieving the schema of an Excel file. We can set the desired number of rows by selecting the Limit checkbox in Limit Of Rows section.

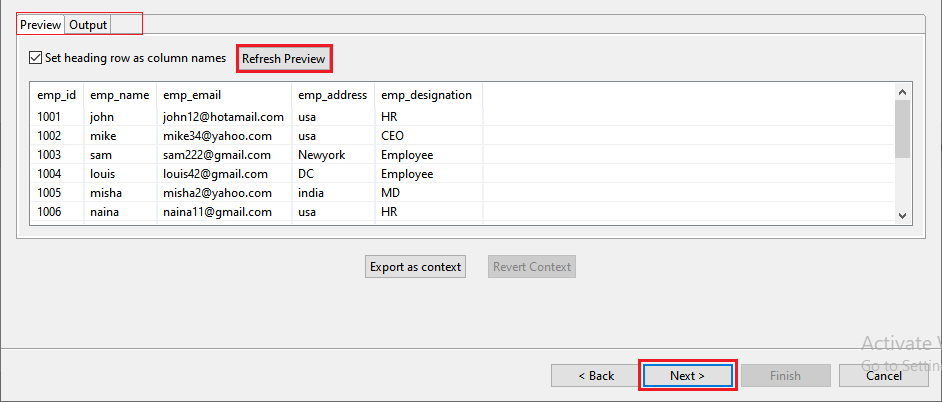
- If our excel file has the header row, select set handling row as column names checkbox to take into account heading names.
- To see the effect and result view, on the viewer, click on the Refresh Preview button as we can see in the below image:
And, click on the Next button.
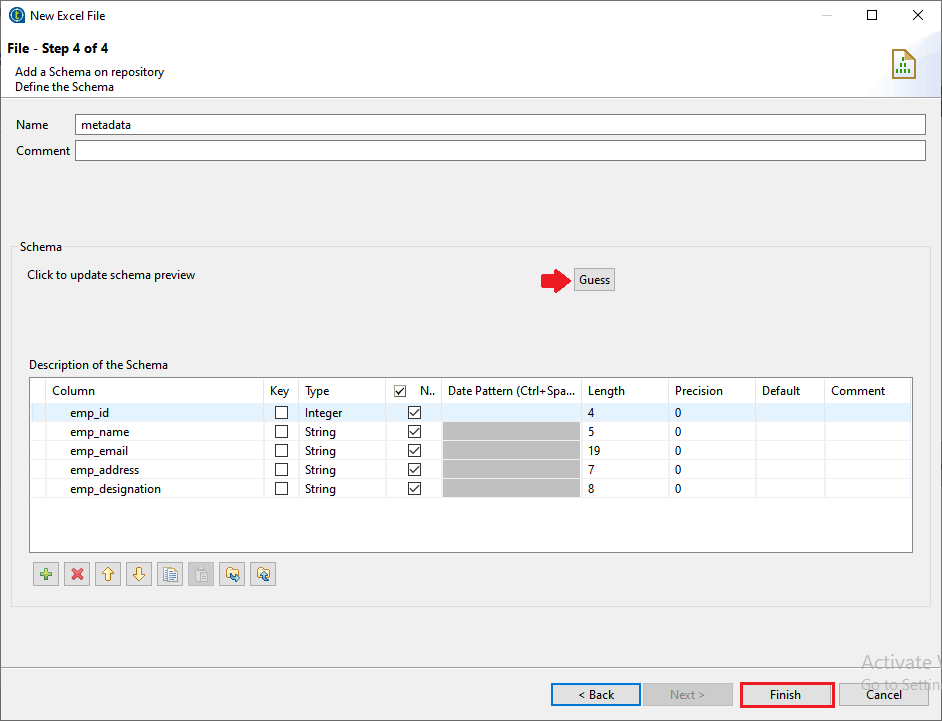
Step4: Checking and Customizing the File schema
In the last step, we will check and customize the File schema.
- To customize the File schema, check the data type in the Type column, which is correct or not.
- The Guess button is used to update and recover the Excel File schema.
Note: If we have customized schema, the Guess feature does not keep these changes.
- After that, click on the Finish button to complete the process, as we can see in the below image:
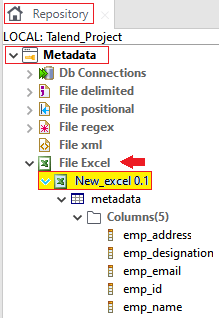
To see the newly created Metadata in the Talend studio:
- Go to the Repository panel, then go to Metadata.
- After that, expand the File Excel node, and select the New_excel metadata, as we can see in the below screenshot:
Repository → Metadata → File Excel → New_excel
To reuse the Metadata as a new component or the existing component, simply drag the File connection or schema from the Repository's Metadata node and drop it to the design workspace window.
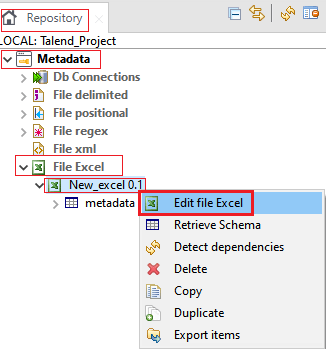
For modifying the existing File connection:
- Go to the Repository panel, then go to the Metadata node.
- After that, expand the File Excel, and right-click on the schema and select Edit File Excel as we can see in the below image:
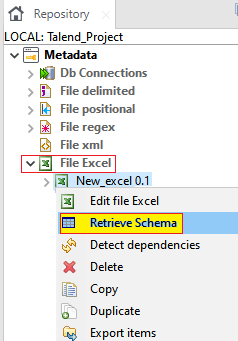
For adding a new schema to an existing File connection:
- Go to the Repository panel, and right-click on the File Excel.
- Select Retrieve Schema from the popup menu in the Metadata, as we can see in the below image:
|

 For Videos Join Our Youtube Channel: Join Now


