| |

Selenium Python Tutorial
In this tutorial, we will learn how to run a Selenium test script using Python Programming language. Generally, the testing process is termed as the crucial phase in the software development lifecycle. Because, the main objective of this phase is to ensure the given process is having any errors, bugs, etc and bug-free software that can meet the expectations of the customer requirements. Testing process is very much complicated because there are many manual executions takes place at the same time. But if this process become automated then testing process will be easier and this can be done using selenium tool. Before starting the tutorial, we will know what are the essential points of the selenium and how to implement a selenium test script using Python. Below are some important points to implement the selenium test script.
What is Selenium?Selenium is a testing tool that is used for the testing purpose. It is an open-source testing tool, which means the testing tool is available in the internet and we can directly download it from it and we don't need to spend anything for this tool. Selenium is a free automated testing framework which is used to test and validate web applications across various platforms and browsers. We can utilize any programming language like Python, C#, Java, etc for the creation of selenium test scripts. In this tutorial we will be discussion the creation of selenium test script using Python. For further information about Selenium, refer the below link: https://www.javatpoint.com/selenium-tutorial Why we use Selenium for automation testing?As we discussed above it is one of the most popular automated tool for testing purpose. The process of automation testing is it is used to convert any manual test case into the test scripts by taking the help of automation tools i.e., selenium. Following are some aspects that, why we prefer Selenium for automation testing:
What is Python?Python is a programming language which is used for soft coding. Using python we can develop any games, application in an easier manner when compared with the other programming languages. Because, Python provides inbuilt packages that can be used directly without any efforts of writing the separate code for them. So, most of the programmers choose Python for designing any application, games, etc. Main advantage of the Python is it supports the Object-Oriented Programming approach to establish the applications very easily. Python is an open-source language i.e., we can learn and implement the program at free of cost by simply downloading the IDLE of the Python. It is simple and easy to learn and provides lots of high-level data structures. Python is a high-level language and also it is termed as interpreter scripting programming language. The main advantage of using the Python language for development is it makes the development very fast by debugging the given codes fastly because in Python there is no compilation step will be present like other languages. For further details about Python language, refer the below link: https://www.javatpoint.com/Python-tutorial Why is Python useful for automation testing?
Selenium with PythonWe can implement the Selenium test scripts using Python in following two ways:
Let us see how we configure Selenium with the help of Python programming language: Configure Selenium using PythonIf we want to configure the Selenium using python then we must follow some set of rules or steps given below:
Download and install Python for WindowsHere, we will get to know how we can download and install the latest version of Python for window platform through internet. Download the Python To download the latest version of Python for Windows Platforms, refer the below link: https://www.Python.org/downloads/ Using the link provided above we can directly go to the page where we can find the various versions of Python. From that we have to choose the latest version, as we can see in the below image the latest version is Python 3.8.1 version, when we click on that we will be directed to other page: 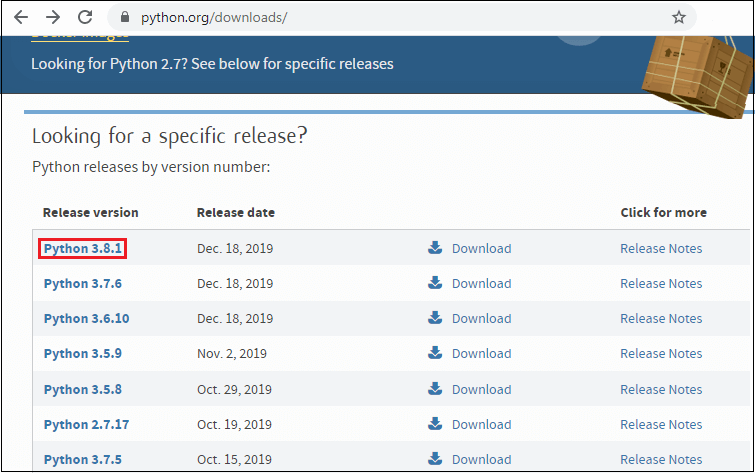
A separate window will be appeared on screen for the Python-3.8.1 version, after that we have to scroll the page little-bit down and search for the file section, finding that we will get some options for downloading it based on the compiler like Windows x36-64 web-based installer, x86-64 web-based installer. So, we have to choose the version that is good for our system as shown in the below image: 
Install the Python After downloading the Python for Windows-64 bit, we will be ready to install the Python. To install the Python, follow the below process: After successfully downloading the latest version of the Python we will see a executable file, we have to double click on that file then a window will be appear on the screen for Python 3.8.1(64 bit) setup, then the window will display two options for installing the Python that are:
Firstly, we will click on the customize installation button and then we will select Add Python 3.8 to the path checkbox as shown in the below image: 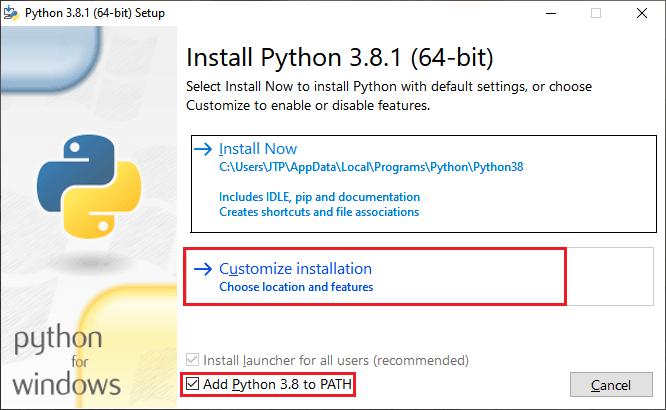
After, click on the customize installation, there we will find some optional Features on the screen here, we can select the features that are required and the rest can be deselected according to our requirements. After selecting all the appropriate features then, we have to click on the Next button, to proceed further as we can see in the below image: 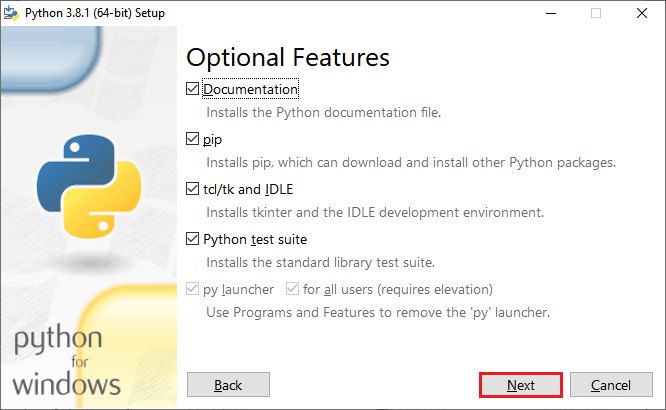
Once, we clicked on the Next button; then we will find some list of advanced features options here, same as the above we have to select the required and rest deselect them. And important thing is that we have check that install for all users is selected or not, if not we have to select it. Not only installing the required features we can also customize the install location according to our requirements by clicking on the Browse 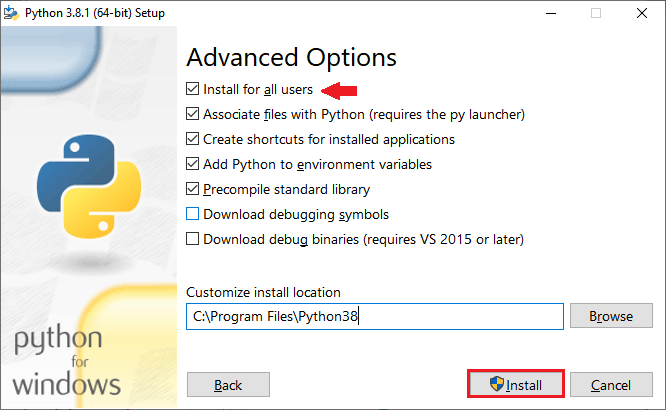
After done with the all features then simply click on the install button then the installation of the Python will begin as shown in the below image. 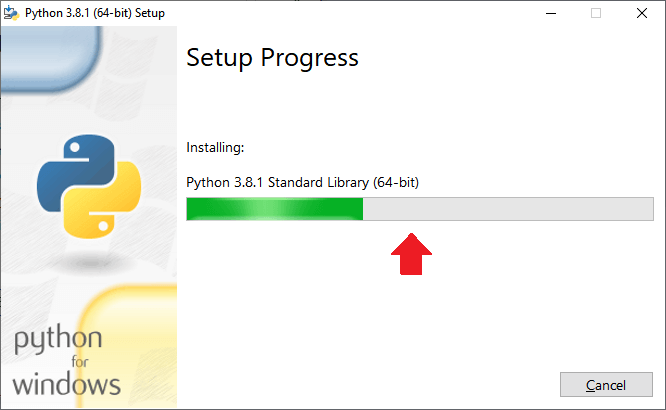
After done with the installation successfully, the system will show give the confirmation message like setup was successful, after getting this message we can conclude that the Python was successfully installed into the Windows operating system. Then, click on the Close button, to close the setup window as we can observe in the below screenshot: 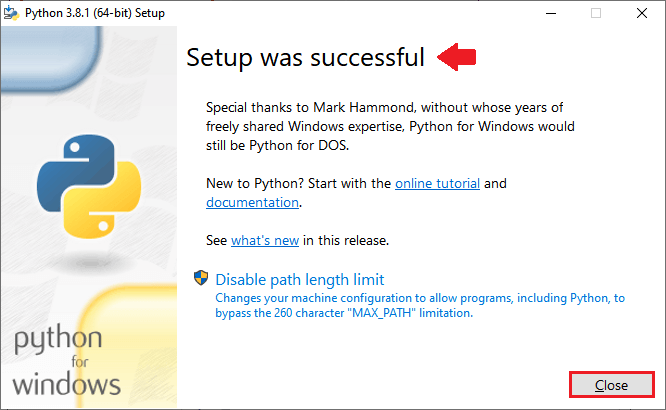
Then we will check that the Python is installed successfully or not, and we will also check weather, it is working properly or not. For checking this we have to open systems command prompt, then we have to give the command as "Python" and press the enter button, if the Python interpreter is present in our system, then this command will directly open the interpreter where we can implement and run the Python programs as shown in the below image: 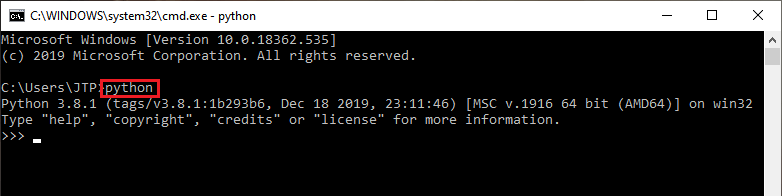
Installing the Selenium libraries in PythonOnce we successfully install the Python in our operation system, we will install the Selenium libraries. To install the selenium library in our system we can install it directly in to the operating system using the command prompt. We have to use pip for installing the libraries into the system. By using the below command, we can install the selenium library: The above command will check for the latest version available in the internet and then command prompt will download and install the library. We can see in the image below that the latest version of selenium is selenium-3.141.0. S, this will be installed into the system. 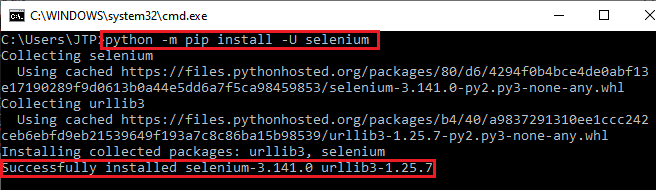
After that executing the above command, directly one separate folder will be created for selenium which contains all the Selenium libraries as we can see in the below screenshot: 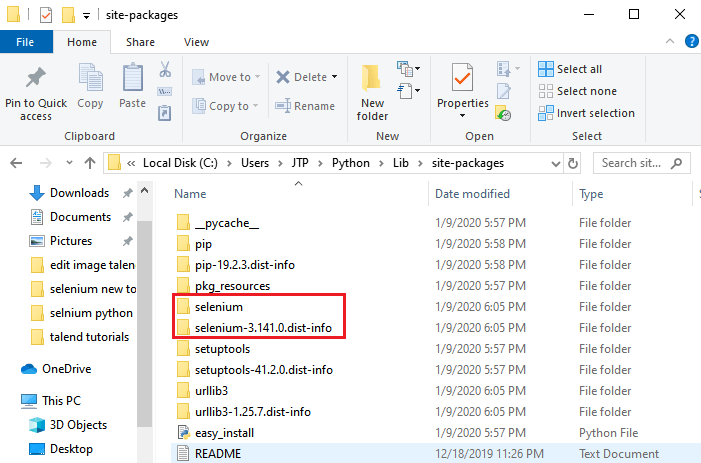
Download and install PyCharmWe have to download and install the PyCharm once the selenium libraries is installed successfully into the Python. To install PyCharm we have to download and install the Python IDLE into the system. To download the PyCharm, follow the below process: Refer the below link, to download the PyCharm https://www.jetbrains.com/pycharm/download/#section=windows Using the link provided above we can directly go to the page where we can find the various versions of Python PyCharm. From that we have to choose the latest version, as we can see in the below image the latest version is PyCharm is 2019.3.1 version, there we will find two options for downloading PyCharm i.e., Professional and community. At, first we have to select the option of operating system like Windows, Mac, Linux, etc. Then we have to select the community option for downloading the PyCharm. 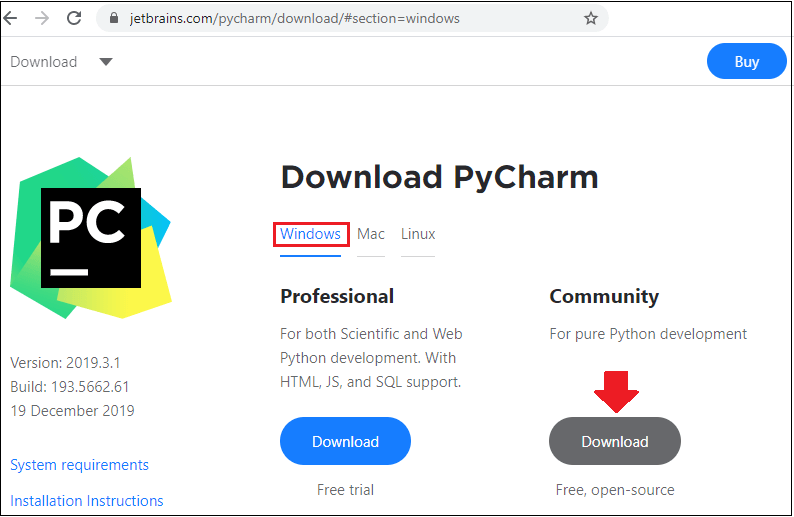
After successfully downloading the latest version of the PyCharm we will see a executable file, we have to double click on that file then a window will be appear on the screen for PyCharm community Edition setup, then we have to click the button next to proceed the installation of PyCharm as shown in the image below: 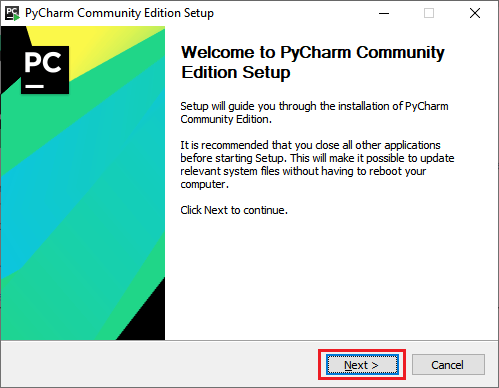
After that we have to select the location of the file to install by clicking on the browser button then we have to click on the Next button to process the request of installation. 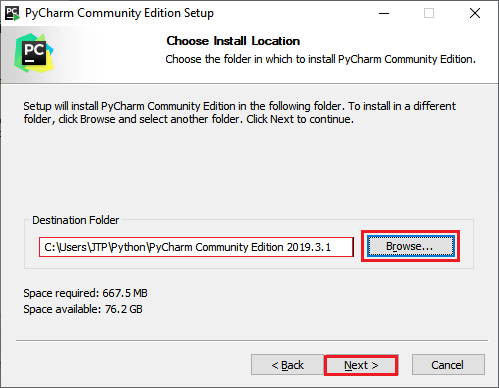
In the next step, we will find some list of advanced features options here, same as the above we have to select the required and rest deselect them. And important thing is that we have to update the path variable and create the Desktop shortcut button and click on the next button based on our requirements. After that, click on the Next button as we can see in the below image: 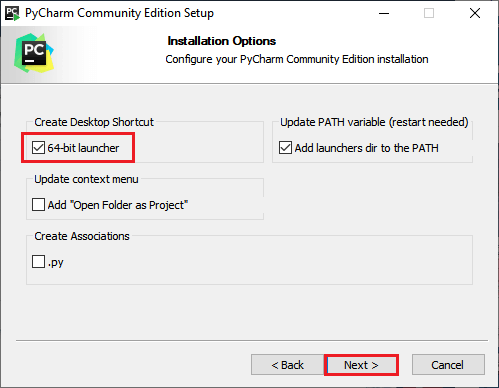
Then, click on the Install button to install the PyCharm, as we can see in the below screenshot: 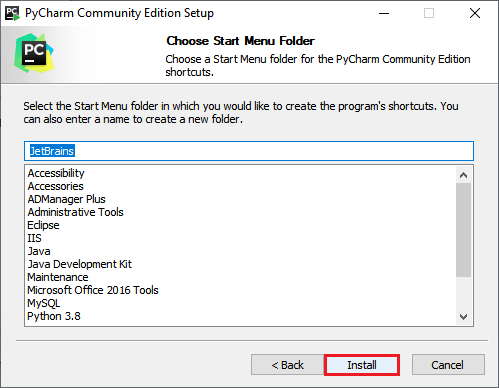
As we can see in the below image, the installation process is getting started. 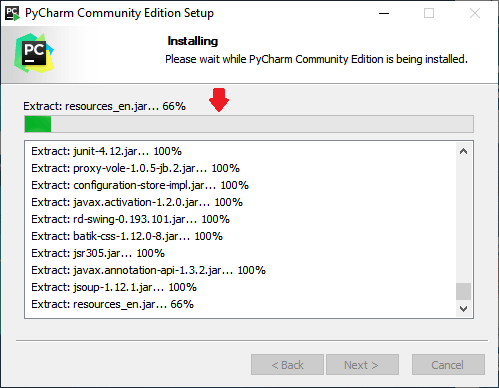
Then, click on the Finish button to finish the installation process as we can see in the below image: 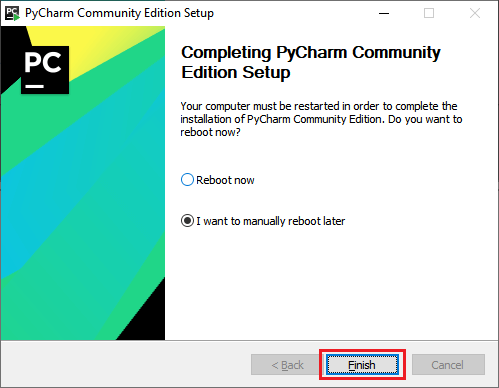
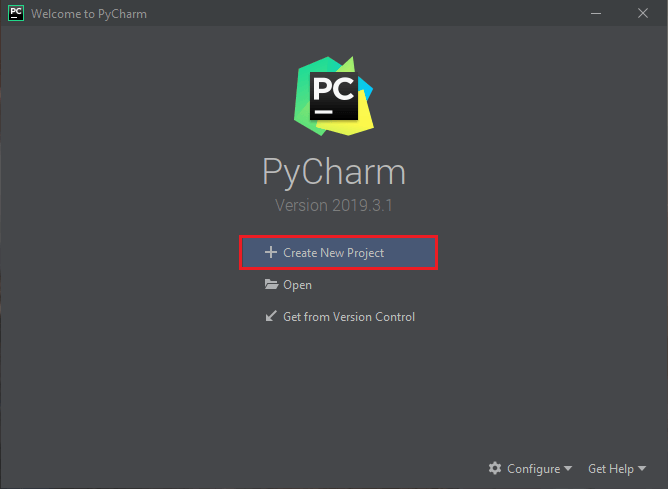
Create a new project and write the Selenium test scriptOnce the PyCharm is installed successfully, then we have to open the PyCharm IDLE then we can see the below interface then we have to click on create new project by which we can create a new selenium script using it. Create a New Project in PyCharm Follow the below process, to create a new project in PyCharm:
After clicking on the new project button, we will see the interface as shown in the below image, here we have to give the title or name of the project i.e., Selenium test. We have to declare the location of the file while creating the new project. Then we have to click on the create button. 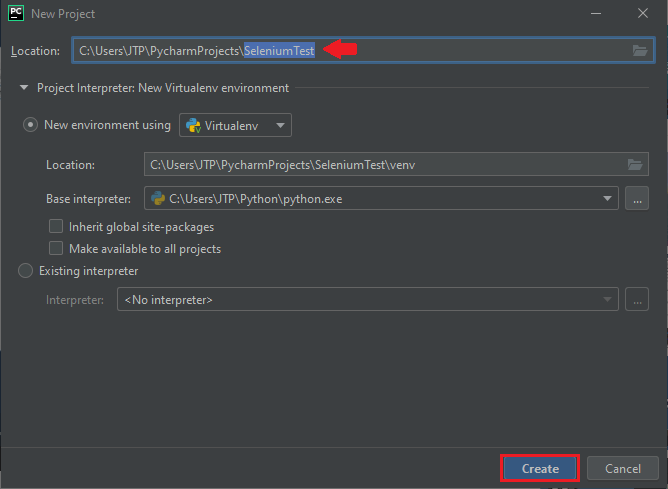
Once we are done with the giving the name and location of the file we will click the create button then we will get the window as shown below image: 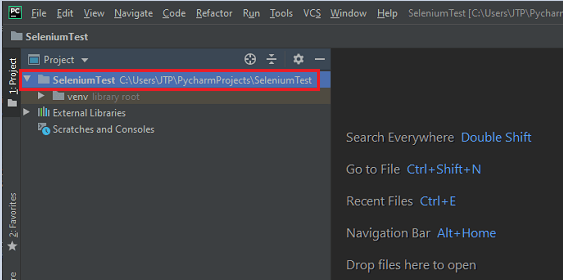
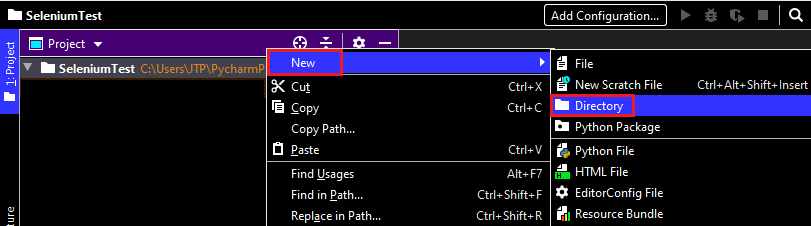
Adding Selenium Test Scripts Let us discuss how to add the Selenium test scripts into the PyCharm using the process below: Firstly, Right-click on the Selenium Test project created previously, there we can find some options from it click on the New, when we click on the New it will show some options like file, New Scratch file, Directory, and more as shown in the below image. From the list we can add the required options based on our requirements.
we have to add the Directory name to get the access easily, in this case we will name our directory as Demo. After done with all the above process then press enter to continue as shown in the below image: 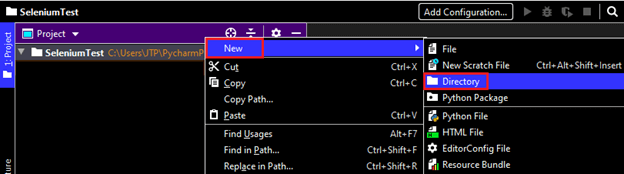

Here also we have to follow the same process as previous like we have to give a name to the Python file and we declare the Python file as sample1. After done with the naming of the file simply press enter to continue as shown in the below image: 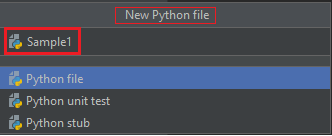
Write the Selenium test script For our testing purpose, we will first go to the Google Home page and search javatpoint from there. Here we are providing the whole process of creating the sample selenium test script step by step for better understanding of how selenium test script is developed using the Python Programming language. For this, follow the below steps:
Step1 When we write any programming language firstly, we are import all the required modules into the program. In the same way, we are importing the Web driver from the selenium package.
Step2 After importing the web driver then we will open the Google chrome browser when we try to open the browser here, we will have multiple options as shown in the image like chrome, Edge, fire fox, Internet Explorer, opera, safari, etc. From the list of above browsers, we will open the Google Chrome browser. 
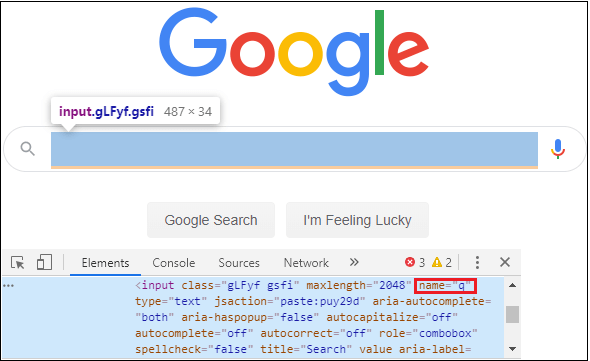
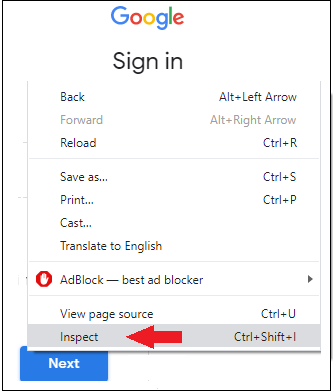
We can directly open the Google chrome browser by using the below sample code: Step3 If we want to maximize the window size of the browser then use the below code: Step4 Then, we will navigate to the given URL. The sample code is as below: Note: As we see in the above lines of codes we didn't write many lines of code, but we have used the pre-defined methods this is the main advantage of using the Python programming. Whereas in other language we have to write many lines of statements to perform the same task in Java, C, C++.Step5 In this step, we are trying to locate the Google search text box with the help of its Name attribute value. To do such thing we have to right-click on the Google search text box, then we have to select the Inspect option in the pop-up menu as we can see in the below image: 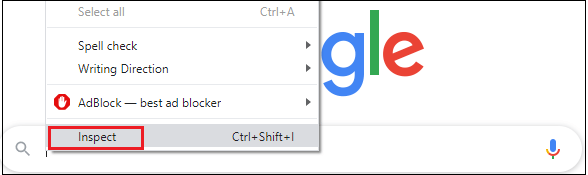
Here the sample code: Step6 Once we identify the Google search text box, and we will identify the Google Search button. So for this, follow the below process: To do such thing we have to right-click on the Google search button, then we have to select the Inspect option from the given pop-up menu as we can see in the below image: 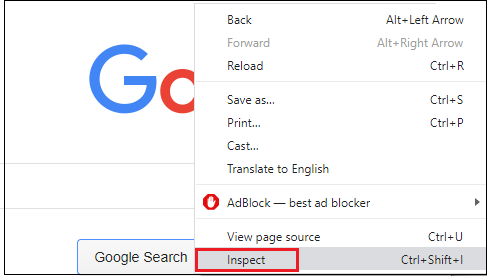
The developer tool window will be launched with having all the specific codes used in the development of the Google search button. After that we have to copy the name attribute value i.e., "btnk". It should be done in the way as shown in the image below: 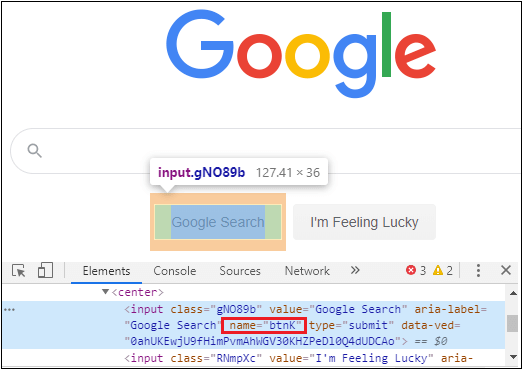
And, the sample code is as following: Step7 In the last step, we have to closing the browser. To close the browser we have to write the sample code which closes the browser, we can use the close() method directly in Python to close the browser. Our final test script will look like this, after completing all the above steps: Note: In the program we imported the time module as Import time. Time is a Python module, which is used to handle the time-related tasks such as time.sleep().from Selenium.webdriver.common.keys import Keys: The above code of the line represents adding keys libraries from the package selenium.webdriver, like in this scenario we are not using the click() method instead we are using the Enter key to perform some specific tasks. Run and validate the test scriptsAfter the completion of writing the selenium test scripts, we have to run the test scripts. Here we will run our test scripts in two ways:
Run in Python IDE The first way to run our selenium test scripts is by using the Python IDE. When we are in the Python file where our code is present then right-click on the code, there we will find a popup will be shown in which various options will be present, from that search for the option run 'sample1' and select it as shown in the below image: 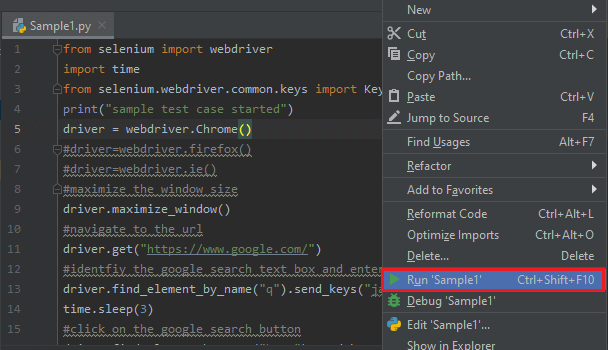
After clicking on the option our test script will start compiling the code line by line and checks for any errors or exceptions are present in the code or not. If any error or exception is present then it will raise the exceptions to the output screen. In the test script after the compilation is done, it will raise the exception 'chrome driver needs to be in path' because we don't have the Chrome driver executable file as we can in the below image: 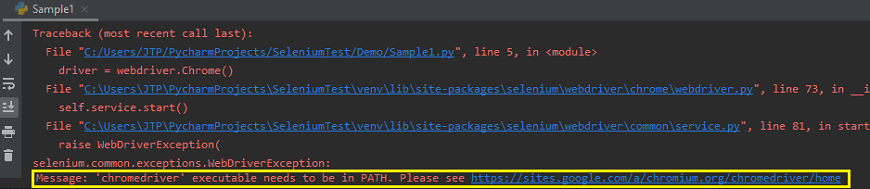
To solve the error raised in the code we have to download the chrome driver executable files using the link below: https://chromedriver.storage.googleapis.com/index.html?path=79.0.3945.36/ Once we click on the above link, we will find some zip files with various operating system like Windows, MAC, Linux, etc. we have to choose the zip file based on the operating system used in the system. If we are using the Windows operating system the select the file that is marked in the below image and directly download the chrome driver executable file. 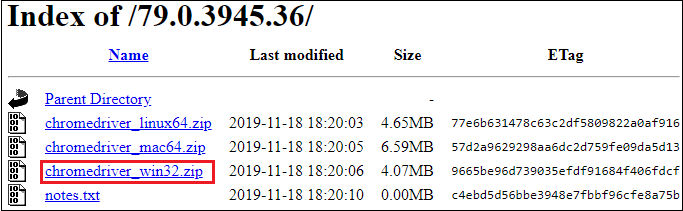
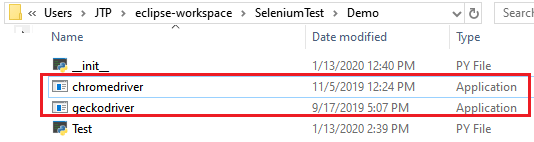
We have to download and then the downloaded exe file should be pasted to the Python folder file and then we have to unzip the folder. Then, we will create one more folder called libraries as Browsers in the Python IDE. Right-click on the Project(SeleniumTest) → New → Directory as we can see in the below screenshot: 
After the directory is successfully created, we will add all the driver's executable files in the Browsers folder manually. To do this we have to copy the chrome driver exe file that was downloaded previously from the Python folder. Then we have to paste the copied file to the Browser folder which is shown in the below image: 
Then open the PyCharm IDE and we have to copy the Absolute path of cjromedriver.exe file from it as shown below: 
we have to change or replace the statement that is previously declared i.e., "driver = webdriver.Chrome()" with a statement given below which contains the path of the chrome driver exe file: Note: In the above statement you must have a doubt that why we have used the "r", because it is used to overcome the Unicode errors.Take a scenario like remove the r in the chrome driver exe file path and run the code then it will raise an syntax error shown in the below image: 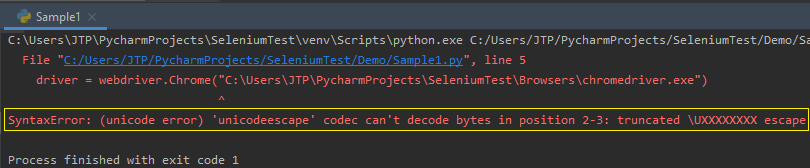
Now, we have rectified the error occurred i.e., "chrome driver exe file not found". Now we have to run our sample1 code again to check is there any error in the code or it will execute successfully, and the code runs successfully without errors as shown in the below image: 
The above test script will launch the Google Chrome browser and automate all the test scenarios. 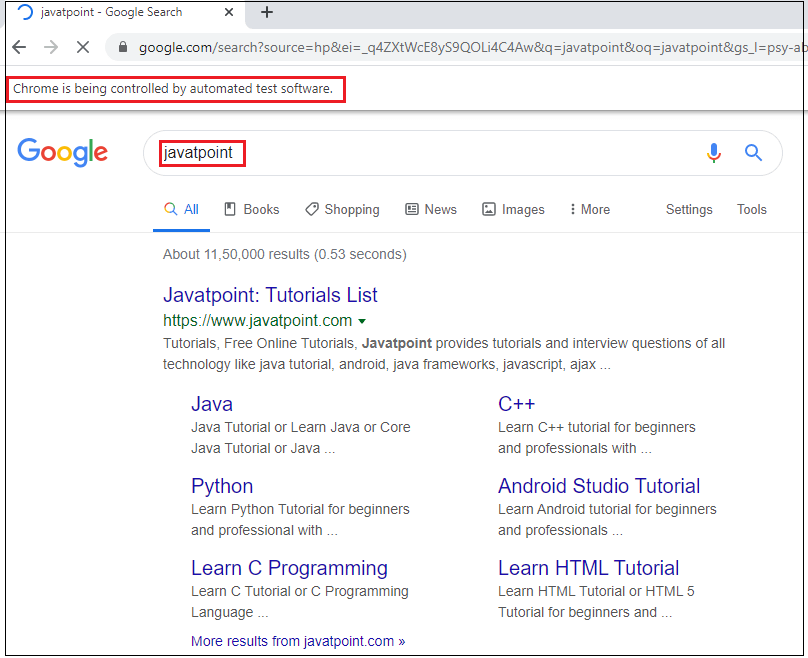
Run in Command Prompt This is the second way that can be used to run the selenium test script in the Command prompt, to run the test script we have to follow the below process: Firstly, we have to copy the location of our selenium test script file i.e., Sample1.py as shown in the below image: 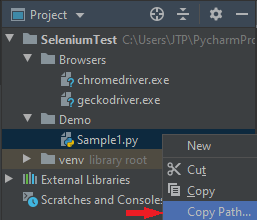
After successfully copied the location open the command prompt and paste the path directly in the command prompt, we have to go to the folder in which it is present i.e., Demo after opening the folder we have to give the command given below: Python Sample1.py Then press the Enter button to start the process. Here we can say that the program is running by seeing the message in the command prompt as "sample test case started". Here, the command prompt will automatically runs all the scenarios, and after done with the compilation it will show the message as "sample test case successfully completed". 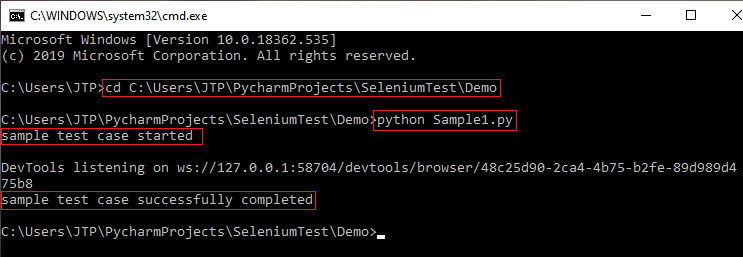
Configure PyDev in EclipseThis is another way to execute the Selenium test script using Python. We can also execute our selenium test scripts with the help of PyDev in Eclipse. Firstly, we have to download and install the Eclipse then execute the selenium test script. We can install the PyDev in Eclipse using the below process:
Install PyDevTo install the PyDev in Eclipse, follow the below process:
PyDev InstallationThe PyDev is only an extension that is available in the Eclipse IDE, if we want to install the PyDev then we have to make sure that we have the latest version of the Eclipse IDE.
Then, the eclipse will be opened and there we will see some options like search, project, run, window, help. From the options select the help and then press "Eclipse Marketplace" from the given pop-up menu as shown in the figure: 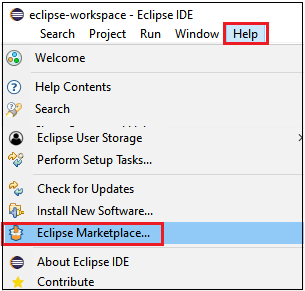
Here, we will find the PyDev latest version then, press on the install button and the installing will start as shown in the figure: 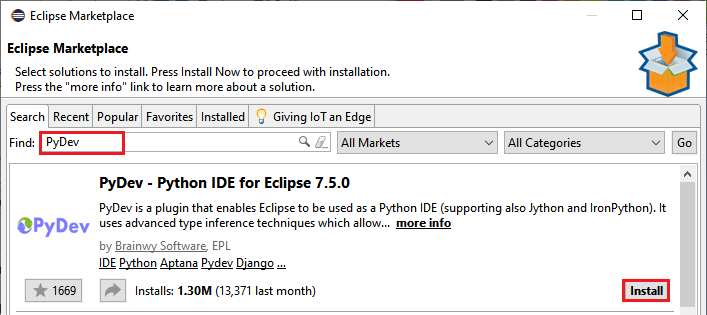
Once the installation is in progress we will find some features there select the required features from it and click on the confirm button to process and complete the installation as shown in the below image: 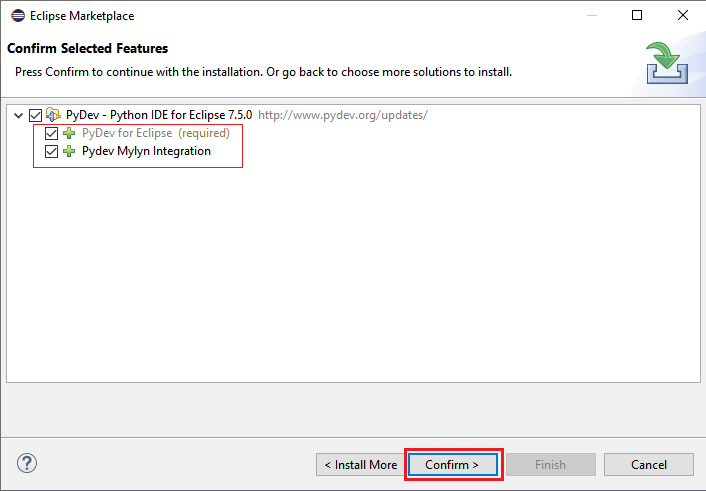
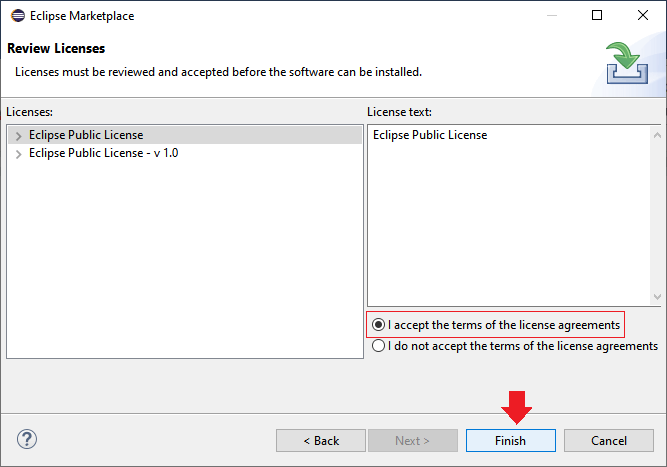
After done with the installation we have to restart the Eclipse IDE, we will see an interface as shown in the below image to restart the IDE: 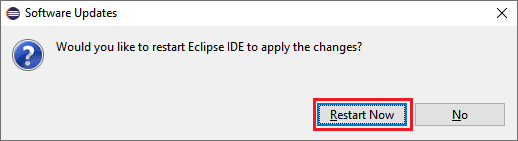
Set the PreferenceTo set the preference, follow the below process: In the Eclipse IDE toolbar, we will find the option of Windows and here many options will be present from that select the preference option from the list of options as we can see in the below image: 
The Preference Window will open where we will expand the PyDev then again expand the Interpreters here we will find some options like IronPython, Jython interpreter, Python interpreter. From that select the Python interpreter. Click on the Browse for Python/pypy.exe option as we can observe in the below image:
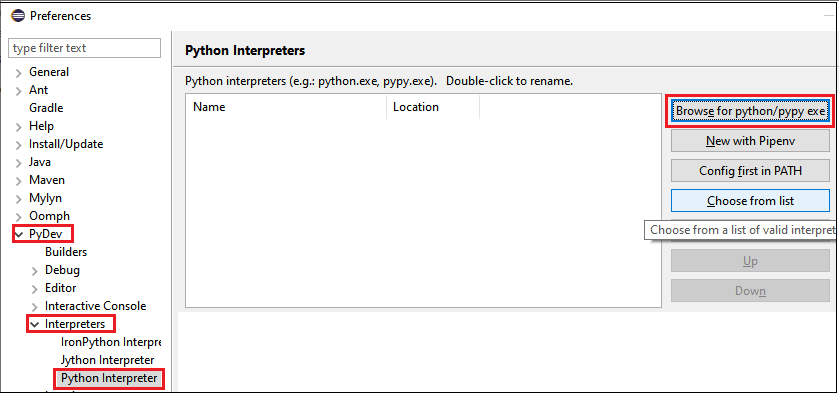
Here we will see an option on the top right corner like "Browse for Python/pypy.exe". Once we click on that button a new interface will appear on the screen in that we have to provide the Interpreter Name and the interpreter executable file path of Python. After successfully provided the name and the executable path we have to click on the browse button and it will browse the executable file path from the local system and then click on the ok button as shown in the below image: 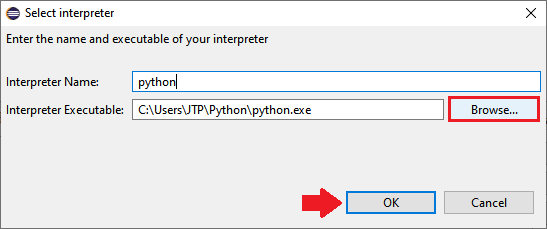
Then we have to select all the folder present in the executable file folder, simply click on select all button present to select all folder at a time and then click on ok button present at the bottom as shown in the image below: 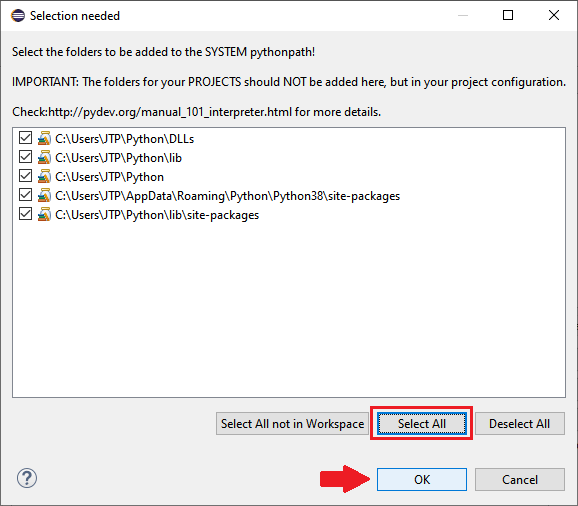
Once we are done with all the setting part then we have to click on the button Apply and Close to complete the setting up of the preference process. 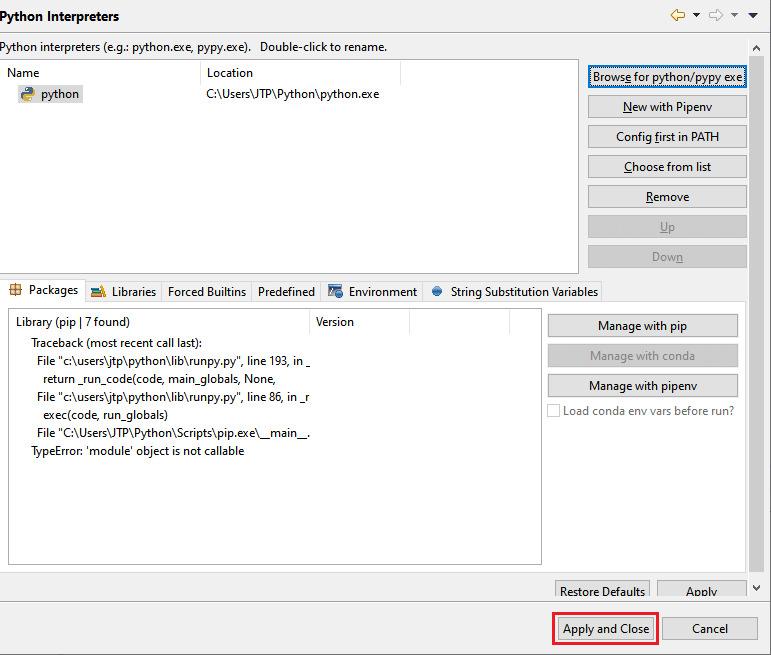
Create a new projectTo create a new project, follow the below steps:
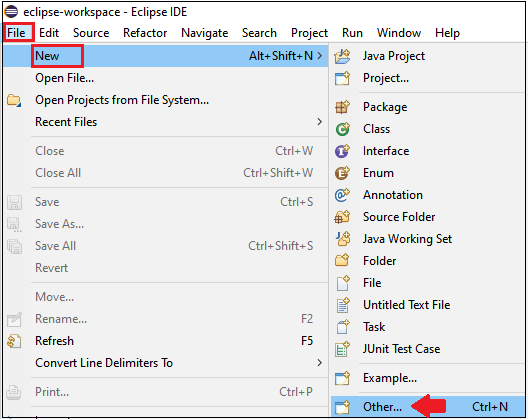
When we select the other option from the pop-up window then a new window will open there we will find some folder from that we have to select and expand the PyDev and from that select the PyDev project, and done with all click on next button as shown in the image: 
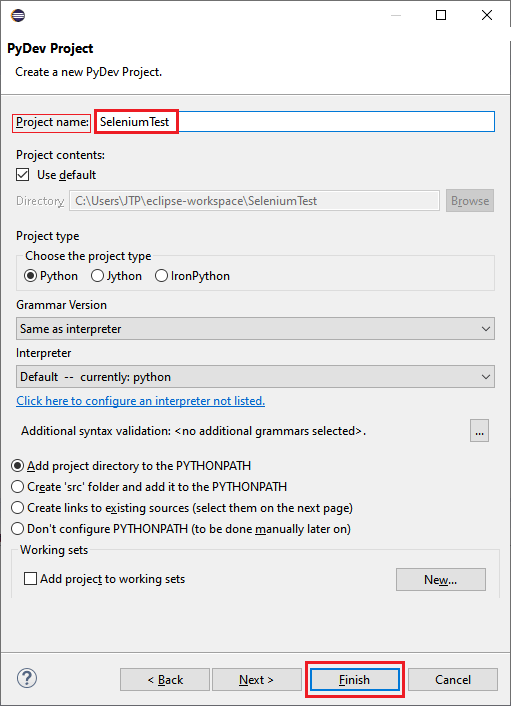
After giving the name of the project in the Python then the project is created successfully in the Eclipse as we can see in the below image: 
Create a New packageFollow the below process, to create a new package: To create the new package firstly, right-click on the project created previously as selenium test and then click on new and some options will be displayed from that select the PyDev package as shown in the image: 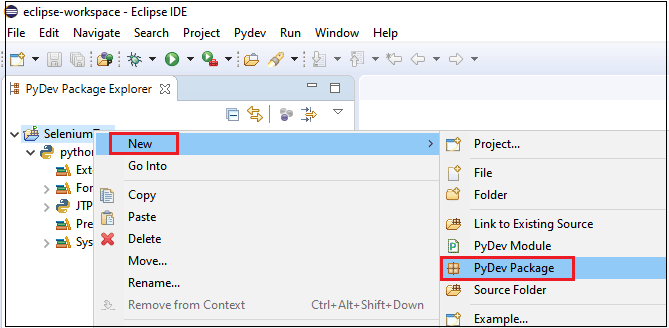
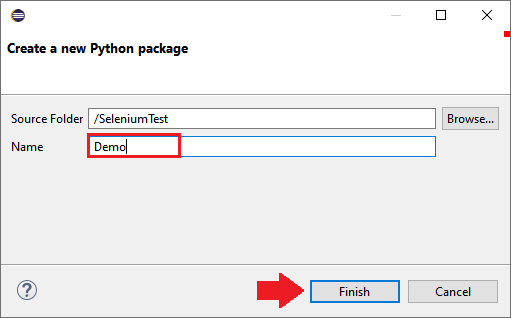
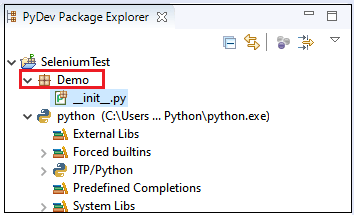
After creating a PyDev Package, we will create a PyDev module. Create a PyDev ModuleTo create a PyDev module, follow the below process: To create the new PyDev module firstly, right-click on the package created previously as Demo and then click on new and some options will be displayed from that select the PyDev module as shown in the image:
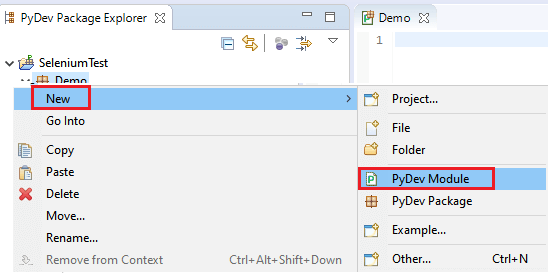
After selecting the PyDev module we have to name that as "Test" as shown in the below image and once we are done with giving the name for it then we have to click on the finish button to complete the process and then our module will be created successfully. 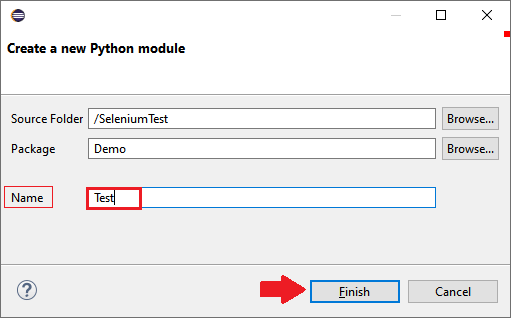

After successfully creating the python model that can be used to write and execute the Selenium test scripts. Now we can write and execute them using the model created. Write and Execute the Selenium test scriptWrite the Selenium test ScriptTo test our selenium test scripts firstly, we have to perform a login test in the Gmail application. In this test, we will automate the below test scenarios:
Follow the below steps: Step1 Here, we are starting the process to write the selenium test scripts to do that the first step includes importing the required packages like in this we have to import the web deriver using the below statement: Step2 After that, we will open the Google Chrome browser.
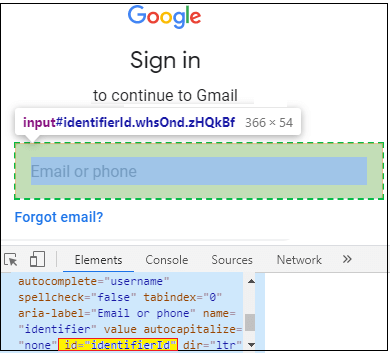
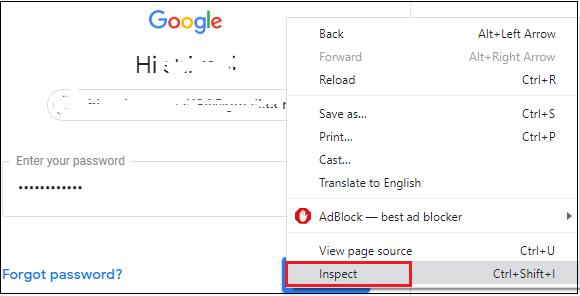
The sample code is as below: Step3 This step is mainly used to maximize the window and then we have to delete all the cookies of the selected browser. Here the sample code: Step4 The fourth step is responsible for navigating the user from the Python to the Gmail application using the URL of the application: The sample code is as below: Step5 Once we navigate to the URL of the Gmail application, there we will be having the username or Email text box. In that we have to pass our value. If we want to identify the username text box then follow the below process: Right-click on the username text box. Here, we will see many options from that select the inspect button available at the bottom as shown in the image below: 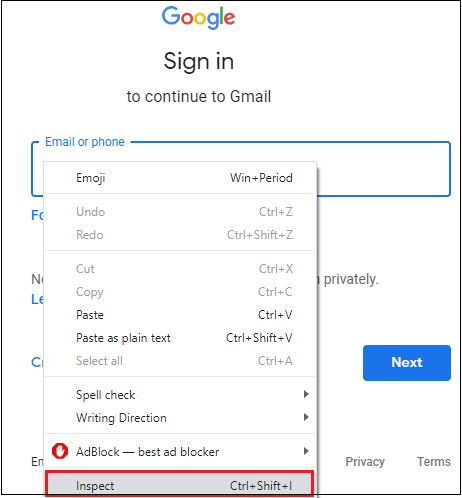
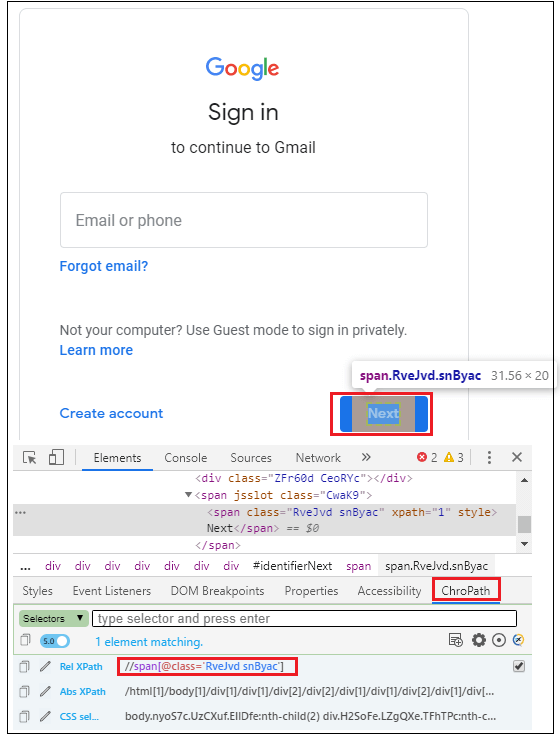
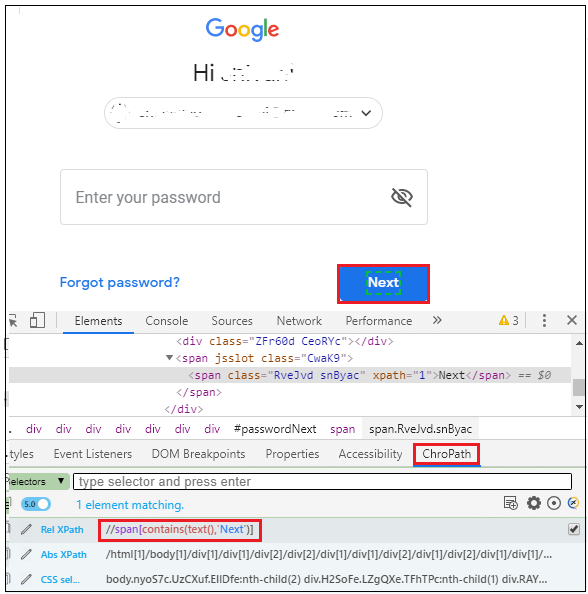
Step6 In this step, we will identify the Next button and click on it. To identify the Next button, follow the below process:
Here again the options will be shown that are used in the development of the Next button.
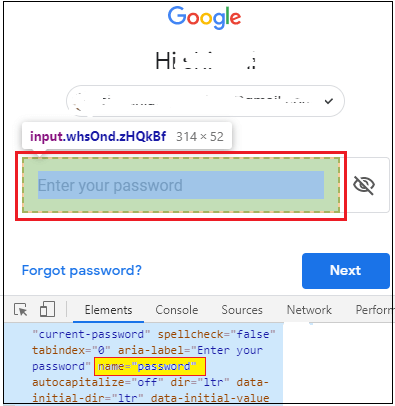
Step7 In this step, we will identify the password text box and pass the value of it. To identify the password textbox, follow the below process:
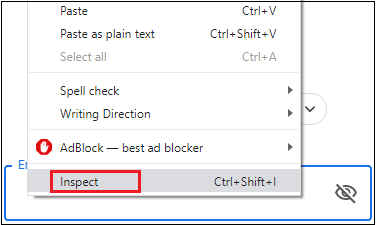
Here again the options will be shown that are used in the development of the password text box.
Here the sample code: Step8 In this step, we will identify the Next button and click on it. To identify the Next button, follow the below process:
Here the sample code: Step9 In the last step of the test script, we will close the browser. Here the sample code: And, our final test script will look like this after writing all the above steps successfully. Note: In the above code, use your Gmail id at place: [email protected] and password: #########Run the test scriptTo run the above test script, we have to right-click on the code and then we will see some options from that select Run As → Python Run as we see in the below screenshot: 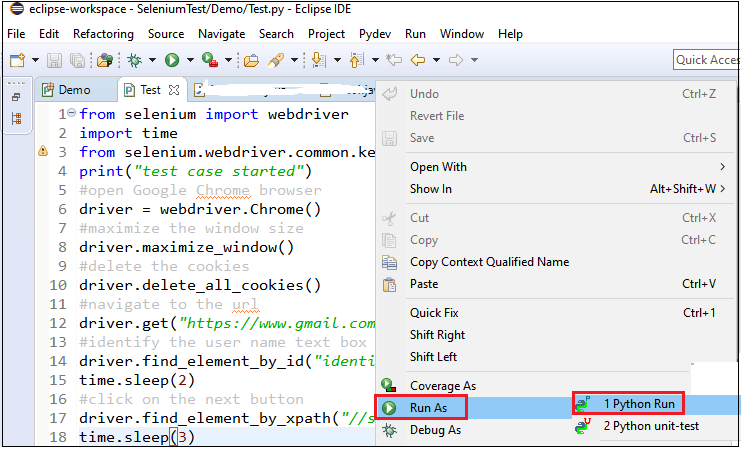
To run the above test script, we have to right-click on the code and then we will see some options from that select Run As ? Python Run as we see in the below screenshot: 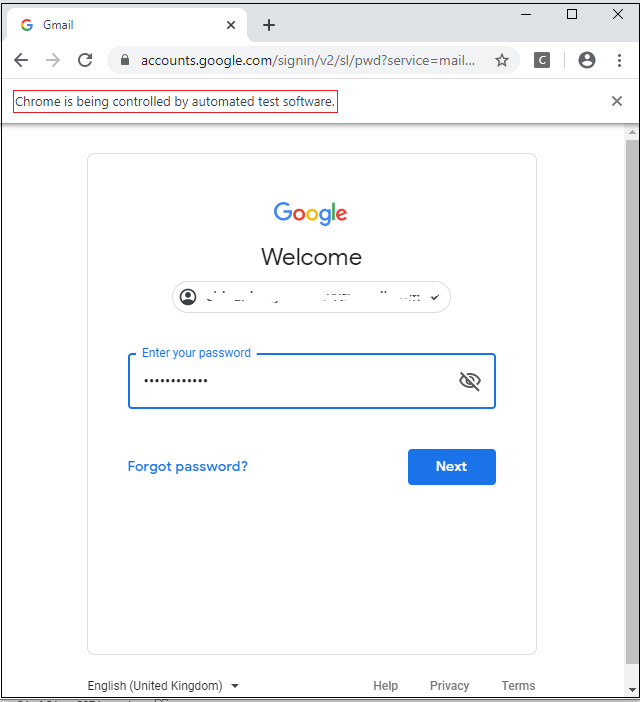
And, as we can see in the below screenshot that our code is running successfully as we get the print message (output) on the console screen. 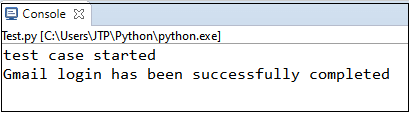
|

 For Videos Join Our Youtube Channel: Join Now
Feedback
- Send your Feedback to [email protected]
Help Others, Please Share


