How to enable or disable write protection on a USB flash drive?
Multiple methods exist to activate or deactivate write protection on a USB flash drive. You can enable or disable the write protection by using a hardware switch or by altering the read-only settings via an operating system; the process depends on your PC.

Note: You should have administrator privileges on your device to proceed with a few instructions on the following page. So that you can perform the appropriate tasks for switching between the write protection on your USB flash drive.
Write-protection hardware switch
Some models of USB flash drives contain a switch for write protection towards the side or on the bottom. The purpose of the switch is to keep your drive secure from various viruses and malware when you use this drive on a public computer. Suppose your drive has this switch. Toggle the switch so that it gets locked. This process will set the device, files, and folders within it to read-only mode.
Using DiskPart to alter read-only settings
In your USB flash drive, by using the DiskPart command line in Windows, you can activate or deactivate the read-only mode by following the below procedure.
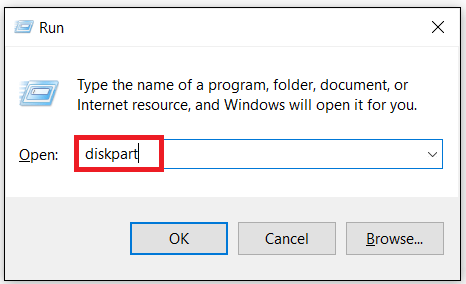
- Firstly, press and hold the Windows key by using the keyboard until you press the R key (Window key + R). Then the Run box will pop up. In that box, input text as "diskpart" and press Enter.
- The Windows will redirect you to the User Account Control prompt. The prompt will enquire you for permission. Select "Yes" to grant permission.
- The command prompt will start and get displayed, and you will find DISPART> prompt. Input the text as a list disk to the right of DISPART> and press Enter key.
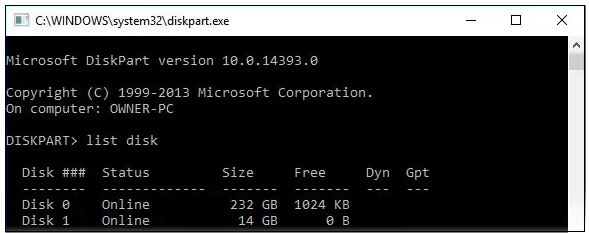
Now, know your USB flash drive by using the size of the disk. The image Disk 1 size is 14 GB, hence the USB flash drive.
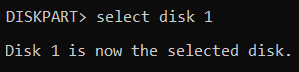
- Choose the USB flash drive by writing the below command.
As disk 1 is a USB flash drive, we have selected disk one among other disks.
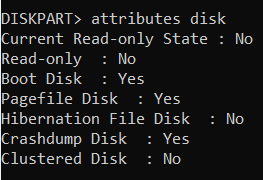
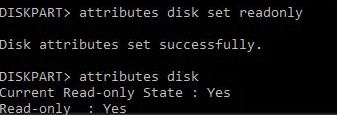
- By using the DISKPART, attributes disk command, we can know all the attributes related to disk.
- If you wish to make the drive only readable without letting any changes, be done, type text as "attributes disk set readonly" at the right of DISKPART> as follows:
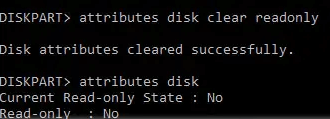
- Or, if you want to write anything to the drive, you should remove it from read-only mode. For that typed text as "attributes disk clear readonly" at the right of DISKPART> as follows:
- After making the necessary changes, input the text "exit" to close the program.
Alter the security permissions in flash drive properties
When you are using DiskPart, as mentioned on the above page, you will not be able to remove the read-only option for your USB flash drive. The security of your system will not allow you to do so, and then you have to alter the permissions to make the drive writable.
Follow the below steps to verify if security permissions need to be altered.
Note: If the following steps do not show any effect on your flash drive, it may avoid locking of permission changes by a security program. In such situations, we cannot write anything to the USB drive. So, to alter the permissions on your device, you should get access to administrative privileges.
- Click on My Computer or File Explorer and open it.
- Search for the USB flash drive from the drives linked to the computer.
- Go to the flash drive and do a right click. Then click on Properties in the pop-up menu.
- To know information about the flash drive formatting, move to General tab and verify the File system entry and then choose the corresponding file system type.
NTFS file system
- Move to the properties window and select the Security tab.
- Under the Group or user names area, select the Edit button.
- Now go to the permissions window and choose the Everyone option if not already chosen. In the Permissions for Everyone section, verify that the Allow checkbox is marked with a tick for the Modify entry. If it is not marked before, tick the box.
- Finally, select the OK button in the Permissions and Properties window. The entire process will save changes made to the security permissions.
Note: After clicking on the Allow checkbox, when your USB flash drive is in read-only mode, redo the steps and tick in the checkbox for the Full Control entry. Verify if the USB flash drive enables you to edit its contents now.
When you wish to make the flash read-only for everyone, then in the Allow column, remove tick marks from all the checkboxes with the Read entry as an exception.
FAT file system
- Go to the properties window and select the Sharing tab.
- In the Sharing tab, choose the Advanced Sharing button.
- The Advanced Sharing Window will be opened by clicking on the Share this folder checkbox.
- Now select the Permissions button.
- When the Permissions window is opened, choose the Everyone entry if it still needs to be chosen. Move to the Permissions for Everyone section and click on the Change entry check box if this is done after this.
- Finally, select the OK button in the Permissions, Advanced Sharing, and Properties windows. The entire process will save changes made to the security permissions.
Note: After clicking on the Allow checkbox, when your USB flash drive is in read-only mode, redo the steps and tick in the checkbox for the Full Control entry. Verify if the USB flash drive enables you to edit its contents now.
When you wish to make the flash read-only for everyone, then in the Allow column, remove tick marks from all the checkboxes with the Read entry as an exception.
Change write protection through the Windows registry
By using the Windows registry also, you can turn on or off the write protection on the USB flash drive. The below process helps you to alter write protection through the Windows registry.
- First, open the Windows Registry Editor.
- Traverse to the registry named "HKEY_LOCAL_MACHINE\SYSTEM\CurrentControlSet\Control\StorageDevicePolicies".
Under Control, if you do not find the StorageDevicePolicies key follow the below procedure.
Move the cursor over the Control key, right-click, choose New, and then key.
Input the "StorageDevicePolicies" text as the name for the new key and press Enter key.
- Go to WriteProtect value and double-click on it.
If you have generated a new key for StorageDevicePolicies, you should enter the WriteProtect value at the beginning and double-click on it.
Move the cursor over the StorageDevicePolicies key and select Newfollowed by DWORD (32-bit) Value.
Now enter a new value name as "WriteProtect" and press Enter key.
- Alter the WriteProtection value to 1, and then the write protection will be turned on. Finally, click OK.
If you alter the WriteProtection value to 0, the write protection will be turned off. Finally, click OK.
- The process is done by exiting the Windows Registry Editor and closing it. Then reboot your computer to save the changes made.
Turn off BitLocker protection.
BitLocker is used for securing storage devices through AES encryption. The BitLocker will protect the files and folders in the computer even when the computer is stolen.
Note: Users must get the BitLocker password or the recovery key to turn off BitLocker. If you don't have the BitLocker password and recovery key, you cannot disable the BitLocker and format the USB flash drive.
It is common to have BitLocker installed and turned on your computer. By following the below steps, you can check whether the BitLock protection is turned on, and then you can disable it.
- Click on the File Explorer. After opening the program, select the Computer or This PC (based on your Windows version) on the left side of Windows.
- Search for the USB flash drive in the list of storage drives present in your PC or the drives connected to your PC. If they find a padlock icon adjacent to the flash drive, it determines that the BitLocker is turned on. If you do not find a padlock, it means BitLocker is disabled.
- Please move to the USB flash drive entry and do a right-click on it. Then click on Manage BitLocker.
- Now the BitLocker Drive Encryption window is opened, and choose the USB flash drive. Now you can disable the BitLocker option by clicking on it.
- Input the BitLocker passkey or select an option for entering the BitLocker recovery key.
BitLocker must decrypt the USB flash drive and disable the write protection. After the deactivation of write protection, users can copy files to the device.
Fix USB flash drive issues with chkdsk
Even after checking and doing the method mentioned earlier, if you cannot turn on or off the write protection for the USB flash drive, you should determine that your flash drive has errors. To fix the flash drive errors through the chkdsk tool, follow the steps given below.
- First, open an elevated command prompt (a command prompt that executes commands that need administrative privileges) in Windows.
- After opening the command prompt, Windows alter the dive letter to a USB flash drive.
- In the command prompt, input the below-mentioned command. It helps you to check for the presence of errors on the flash drive. Then you can remove those errors.
Suppose, if your flash drive is E: drive, then type chkdsk e: /f /r /x
- Before executing the command, alter the <drive_letter> to the flash drive's drive letter.
- Finally, press Enter key to run the command.
Formatting the USB flash drive
Suppose you have still not activated or deactivated the write protection for your USB flash drive. You can fix all drive errors and corruption by using formatting. Then you have formatting as the last option.
After the formatting is completed, check whether you can change the write protection for the USB flash drive. If you cannot do it, it signifies that your drive is faulty and you should change it.
Tip
Whenever we format the drive, all the data will be removed completely. Hence formatting must be done at last if none of the other methods works.
Protecting individual files
We can always have the option to enable or disable the write protection on a particular file and folder on the removable disk.
|

 For Videos Join Our Youtube Channel: Join Now


