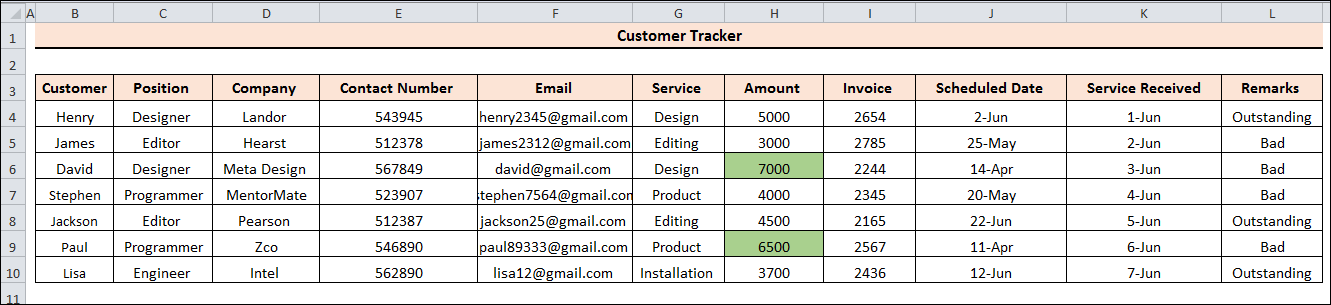
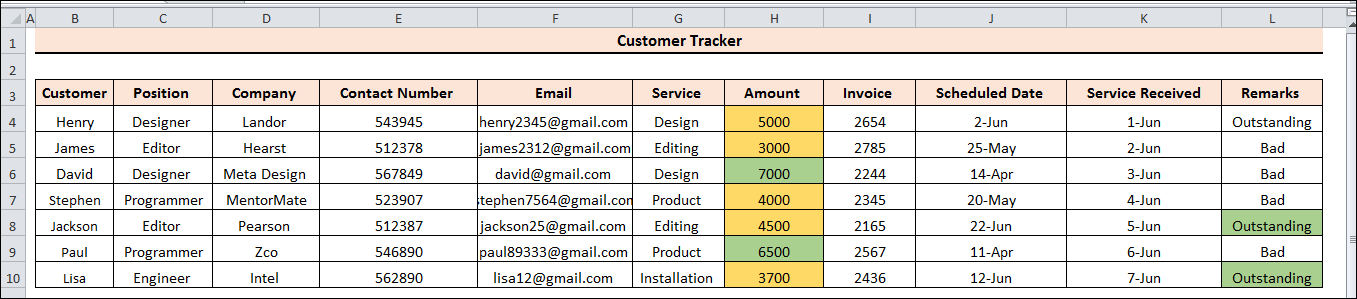
Customer service tracker in Excel
It is important to keep track of customers, especially when you are dealing with good number of clients. It is easy to keep track of customers using Microsoft Excel. It provides the information about the number of customers and how well they were served.
This tutorial we will explore the method for tracking step-by-step customers in Excel.
Step-by-Step Process to Track Customers
We aim to follow a step-by-step process to develop an Excel customer tracker. In this, we will create a worksheet with the customer's contact details and service data. Further, we will use these two items to maintain a list in Excel that includes notes about every customer.
Step 1: Make a dataset for contact information
A customer details worksheet is essential when creating a customer tracker. The contact worksheet contains the details of a customer, such as their position, company name, email address, phone number, and relevant field.
- Open a blank worksheet in Excel.
- Add the customer data to your worksheet.
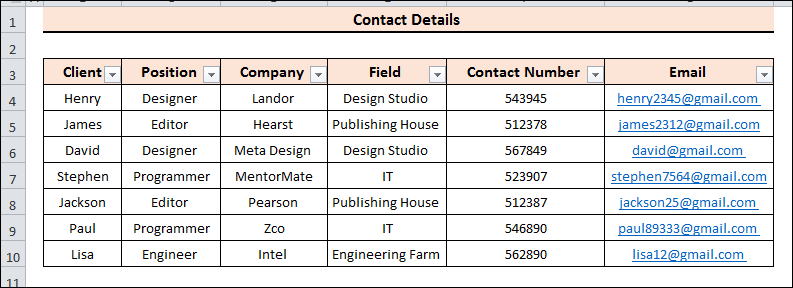
- The sheet name can then be changed by right-clicking on it.
- There will be a Context Menu. Click Rename after that.
- We put our worksheet name as 'Contact Details'. Once done click on the Enter key.
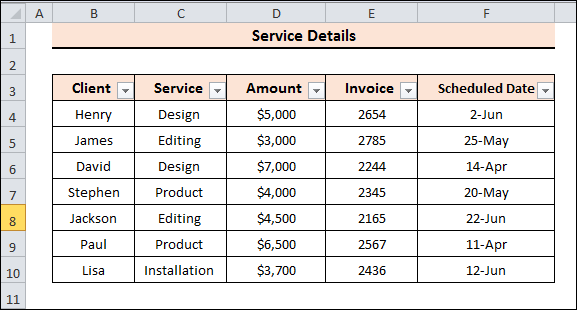
Step 2: Create Customer Service Information
Customer service information must be created to construct a customer tracker. Without service information, we can't track anything.
- Start with a blank worksheet.
- Since the primary focus is customer service, we must provide the name, the specific service's price, and the date the service is expected to be provided.

- Next, right-click on the sheet name to modify it.
- You'll see a Context Menu Select the Rename option from the menu.
- Update the worksheet to "Service Details" at this point.
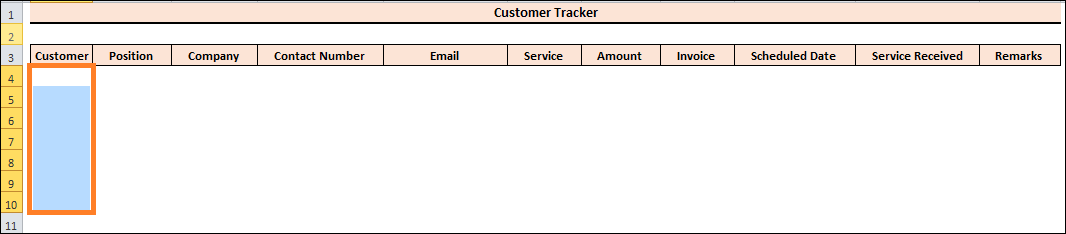
Step 3: Create a customer tracking system
Now, we'll create the dynamic customer tracker. We perform this using information from the previous dataset with the help of VLOOKUP and IFERROR functions. The primary benefit of using this is that it will lessen the need to record historical data repeatedly.
- In the customer tracker worksheet, first, make the column headings.

- Data validation allows us to select the customer's name along with their activities.
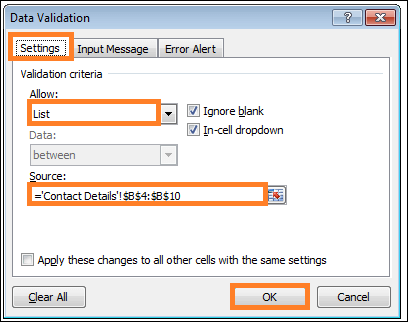
- Select cells B4 - B10 to begin this process.
- Click the Data tab from the ribbon menu.
- Next, select the Data validation command from the Data Tools groups.

- A dialogue box for data validation will show up. Click on the Settings command.
- Afterwards, click on the List drop-down command in the Allow section.
- Next, select the needed source by clicking it in the Source The Contact details are where we find the source.
- In the end, select OK.
- You can select the customer's name from the drop-down list.

- The names of every customer will appear when you click on the drop-down List, allowing you to select any customer you like.
- Click upon cell C4 to obtain the customer's position next.

- Enter the formula below within the formula box now.

Explanation to the formula
VLOOKUP (B4,' Contact Details'!$B$4:$G$10,2, FALSE): In this case, the VLOOKUP function looks up the value in cell B4 within the Contact Details worksheet's range of B4 to G10. The second column in that range wherein B4 matches will be returned. False here denotes that a precise match is required; otherwise, no results would be displayed.
IFERROR (VLOOKUP (B4,' Contact Details'))!$B$4:$G$10,2, FALSE),0): If there is a mistake in the previous function, the IFERROR function will return zero.
- To use the formula, hit the Enter key.

- After that, you may choose any customer name from the List below and move the fill handle icon to see that customer's position.
- Click cell D4 now.

- Next, fill in the formula box with the following formula.

- To use the formula, press Enter.

- Select cell E4 now.

- Enter the formula below into the formula box now.

- To use the formula, press Enter.

- Select cell F4 now.

- Next, enter the following calculation into the formula box.

- To use the formula, press Enter.

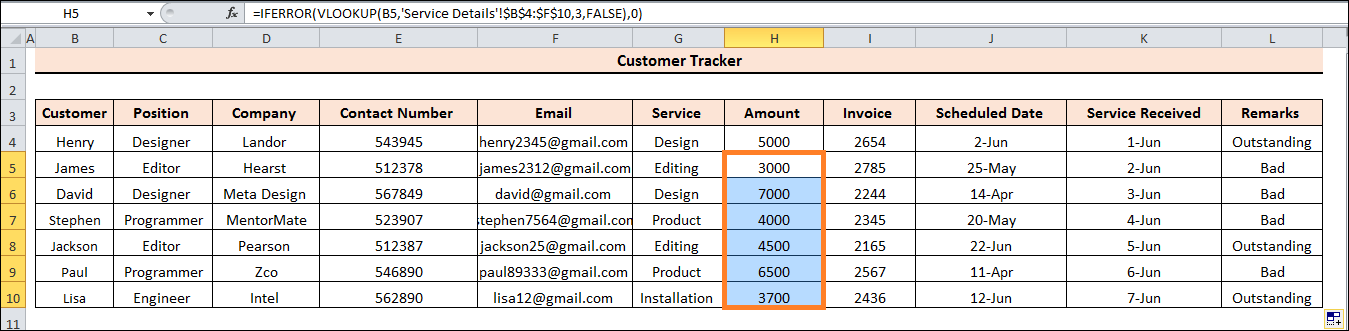
- To obtain the services of a particular client, click cell G4.

- Enter the following calculation into the formula box.

Explanation of the Formula
VLOOKUP(B4,'Service details'! Here, the worksheet named Service Details' range from B4 to G10 is searched for the value in cell B4 using the VLOOKUP function ($B$4:$G$10,2, FALSE). When B4 matches in that range, the second column will be returned. False denotes a precise match; otherwise, no results would appear.
- IFERROR(VLOOKUP(B4,' Service Details'!$B$4:$G$10,2, FALSE),0): If problems arise with the previous function, the IFERROR function will give you zero.
- You can use the formula by pressing Enter.

- Go to the cell H4 now.

- Fill in the formula box with the following formula.

- You can use the formula by pressing Enter.

- We must now obtain the Scheduled Data. Clicking on cell J4 is required to obtain this.

- Put this formula in writing:

- To use the formula, press Enter.

- The planned date has shown up in this instance using the General Format.
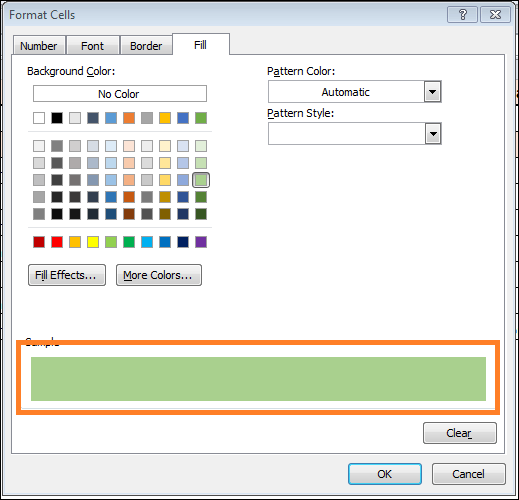
- Navigate to the Home tab within the ribbon to make changes. The small arrow in the lower right corner can be selected from the Number group. Check out the screengrab.

- There will be a dialogue box to format cells. sSlect the Number command located at the top.
- Select the Date option under Category.
- Next, click over the following pattern in the Type area. In the end, select OK.
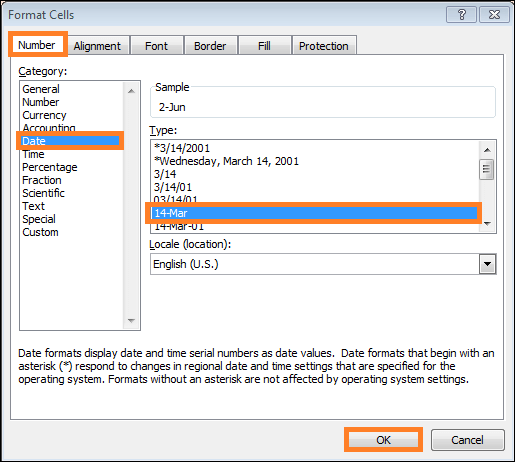
- The scheduled date will be sent to us in date format.

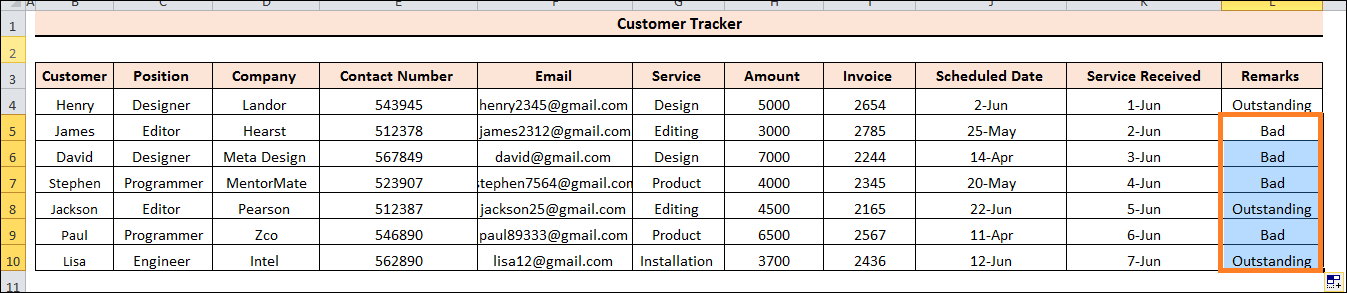
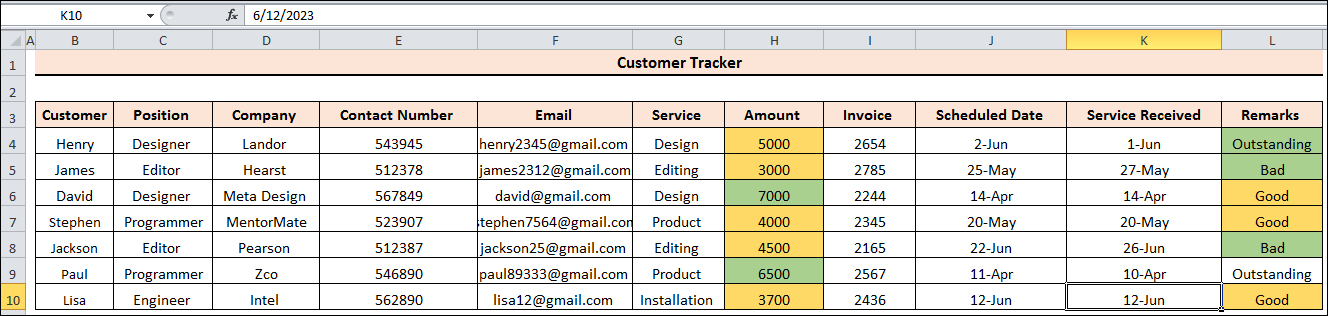
- The section labelled "Service Received" comes next. It refers to the moment you obtain the service.
- Whether or not the customer delivers the service on time is indicated in the remarks section as the final result.
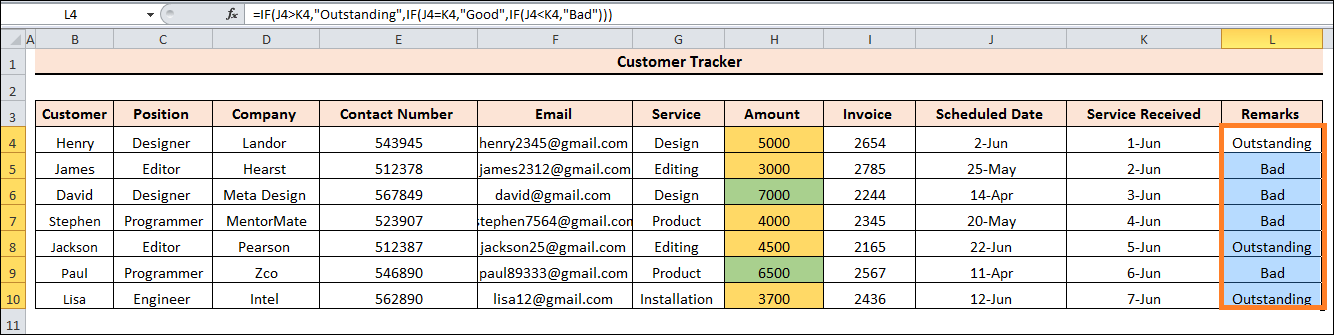
- Click on cell L4 to make Remarks for a certain client.
- Put the following formula in writing.

Explanation of the Formula
- If J4>K4-Exceptional, If J4=K4-Good,
- If J4 Once the formula is applied, hit Enter.

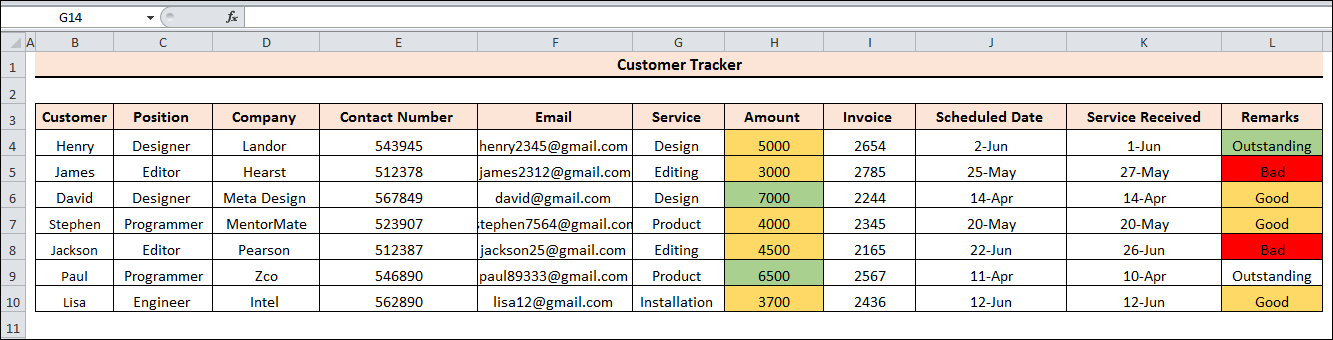
- The following will happen if we now take the details of another customer. Examine the screen grab.
Step 4: Make Customer Tracker Dynamic
Conditional formatting is a helpful tool that enables you to specify and express several criteria using distinct colours. Pay close attention to the following steps to make the customer tracker dynamic.
- Here, we formatted the amount and notes using conditional formatting.
- First, we determine how much goes through cell H4 to cell H10.
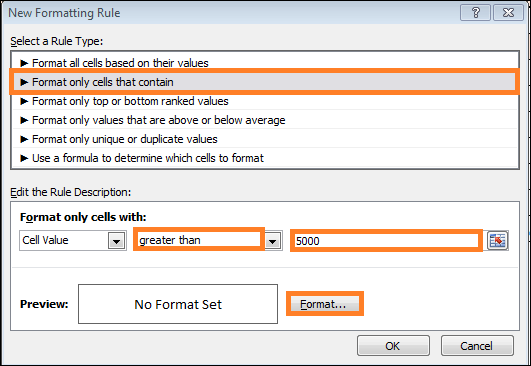
- Select the Style group and then click on Conditional Formatting.

- Click the New Rule after that.
- The dialogue box for a new formatting rule will open.
- To format only cells that include, click on it.
- Setting Greater than 5000 now.
- Next, to modify the format colour, click on Format.
- In this case, a green hue is used for amounts over 5000.
- Select the Fill command by clicking.
- Next, select your favourite colour, which is green.
- In the end, select OK.
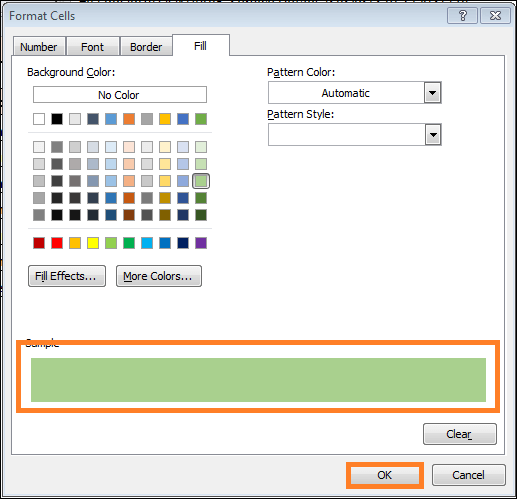
- As a result, the amount over 5000 will be marked as green.
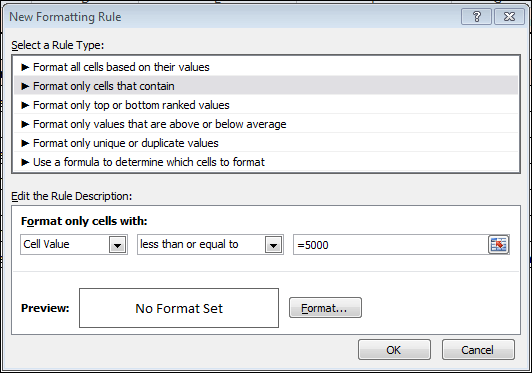
- We must establish another conditional formatting for values less than or equal to $5000.
- Once more, select the Home tab.
- Click the Conditional Formatting under the Styles group after that.
- Next, click on New Rule under Conditional Formatting.
- The dialogue box for a new formatting rule will open.
- To format only cells that include, click on it.
- Please set it to be less than or equivalent to 5000 now.
- The format colour can then be changed by clicking on Format.
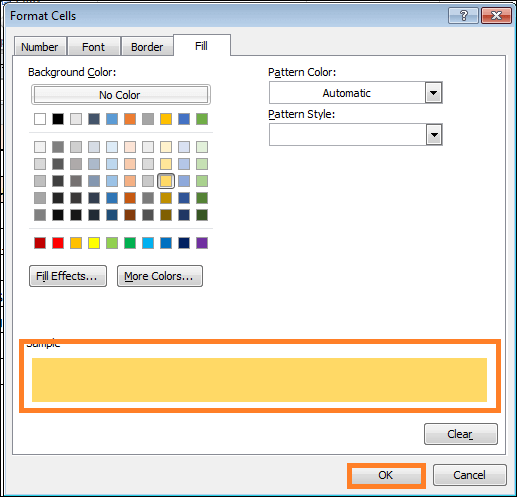
- Here, Yellow is used for values below or less than equal to 5000.
- Select the Fill tab by clicking on it.
- Next, select Yellow as your favourite colour.
- In the end, select OK.
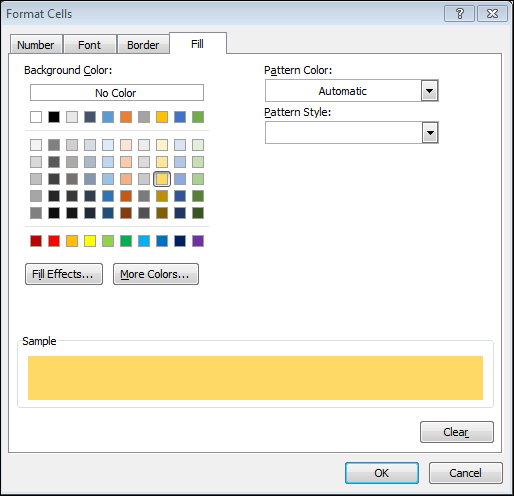
- This will make all values that are $5000 or less yellow.
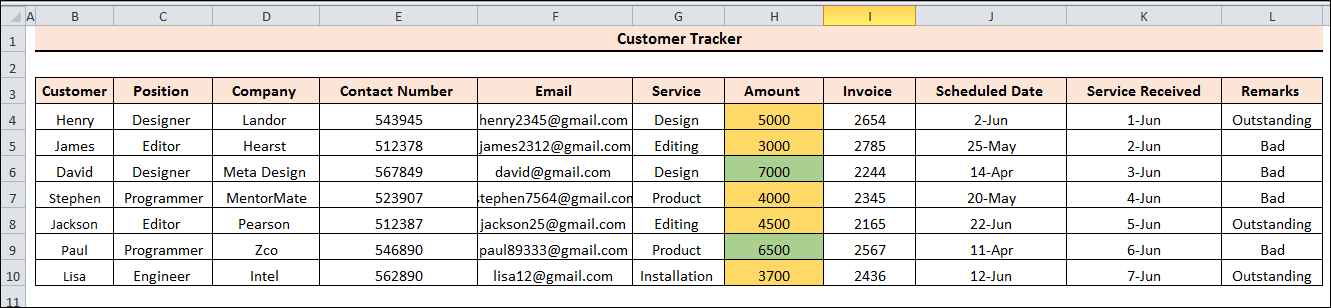
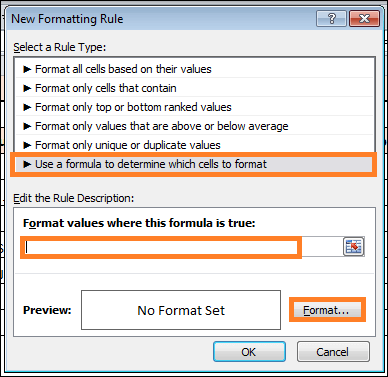
- We want to choose exceptional statements as green, good remarks as yellow, and awful remarks as red when it comes to remarks.
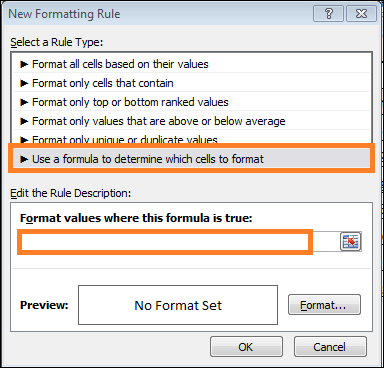
- To accomplish this, we must configure Conditional Formatting using the formula for every scenario.
- Click over cell range L4 to L10 first.
- Next, select the Home tab from the ribbon.
- Select Conditional Formatting from the Styles group.

- Next, select New Rule under Conditional Formatting.
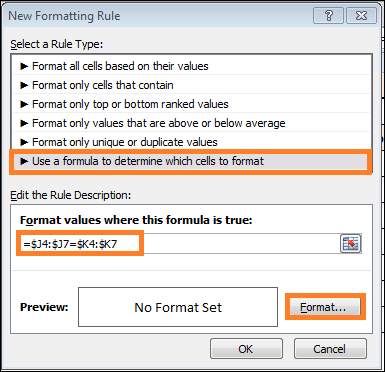
- The New Formatting Rule dialogue box will be displayed. To choose which cells to format, click on Use a formula.
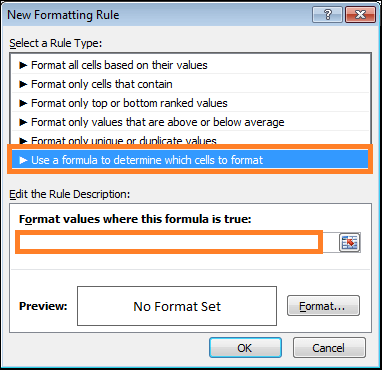
- A box allowing you to jot down the formula will open. In the box, write the following formula.
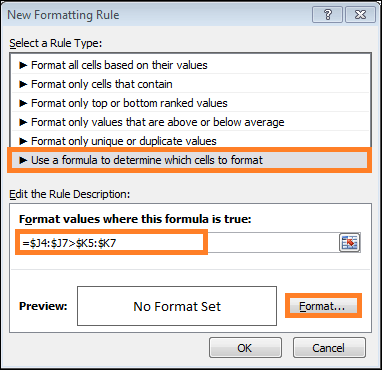
- Next, select your favourite colour by clicking on Press the Fill tab.
- Next, designate Green as the colour you want for this circumstance.
- Click OK once more.
An explanation of the formula
- J4:J7>K4:K7: In this case, the service received is shown by column K, and the scheduled time is indicated by column J. This circumstance illustrates what happens when customers provide their service ahead of schedule. It's also crucial to remember that you can omit the IF function if you utilize the formula in the Conditional Formatting.
- Lastly, when some clients provide their work ahead of schedule, Remarks will become green.
- Next, we would like to designate customer comments as yellow when they provide their service on schedule.
- Click the Conditional Formatting option and choose New Rule if you want to repeat this.
- Enter the cells address that you want to format using a formula. As a result, a box to jot down the formula will open.
- Enter the formula below in the box.
- Select your chosen colour by clicking on Format.
- Select the Fill tab by clicking.
- Set your favourite colour to Yellow after that.
- At last, press OK.
- Remarks that apply to the formula will then be set to Yellow.
- In conclusion, we will mark the customer's remarks in red if they fail to meet the deadline.
- Click the Conditional Formatting option and choose New Rule if you want to repeat this.
- Following that, a dialogue box for conditional formatting will show.
- Enter the cells you want to format using a formula. As a result, a box to jot down the formula will open.
- Enter the formula below in the box.
- Select your chosen colour by clicking on Format.

- On the Fill command, click.
- Make Red your favourite colour after that.
- At last, press the OK button.
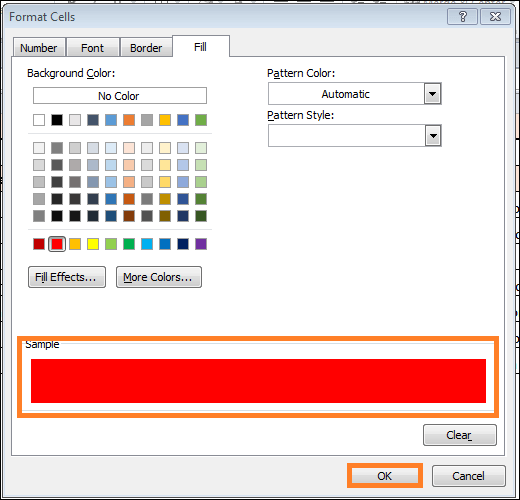
- This will set all the Remarks that apply to the formula to Red.
With the help of this Excel customer tracker, you may more effectively manage your customers for upcoming transactions.
|

 For Videos Join Our Youtube Channel: Join Now


