| |
Python Tutorial
Python OOPs
Python MySQL
Python MongoDB
Python SQLite
Python Questions
Plotly
Python Tkinter (GUI)
Python Web Blocker
Python MCQ
Related Tutorials
Python Programs

Age Calculator using PyQt5 in PythonIn this post, we'll look at how PyQt5 may be used to develop an age calculator. A fantastic coding project idea for beginners is the age calculator. You should attempt creating an age calculator if you are new to programming. It is a programme that asks for the user's date of birth as an input and returns the user's age as an output. So, if you're interested in learning how to create an age calculator in Python, this post is for you. We'll introduce you to a Python tutorial for building an age calculator in this post. Python bindings for Qt v5 are part of the cross-platform PyQt5 GUI toolkit. The capabilities and simplicity offered by this toolkit make it quite simple to create an interactive desktop application. It must be installed using the following command. This project is to calculate the present age of a person, which can be used to determine the age by entering their certain details like date of birth and present date. Some basic PyQt5 requirements before starting the project :In Python, using a virtual environment to handle dependencies is the most effective method. Simply said, a virtual environment is a local directory that has the libraries needed for a particular project. In contrast, a system-wide installation of those libraries would have an impact on all of your projects. Every GUI programme must include precisely one instance of QApplication,this is a requirement of Qt. The import line must be run before several components of Qt will function. Therefore, it will be required in almost every PyQt programme you create. A PyQt app's buttons, labels, windows, dialogue boxes, progress bars, etc. are all examples of widgets. Widgets are frequently nested, just like HTML components. A button, for instance, may be found in a window, which itself may include a label. Support for custom styles is one of Qt's advantages. You may alter the appearance and feel of your application using a variety of ways. In addition to the aforementioned, style sheets allow you to alter the appearance of your application. This is the CSS equivalent in Qt. Steps for Implementing the GUI :
Implementation on the back end :
Walking through the code :First of all, we will be importing all the required libraries into our program for efficacy. The libraries imported include QtWidgets, QtCore, QtGui and sys. Then, we will create a new class for the new window and initialize its properties. Then, we will set the title of the window to "Age Calculator" and after that we will set its geometry. After that, we will display all the widgets present in the window. Next, we will create a function to introduce all the components in our window. Then, we will create a new heading label and will set its geometry. After this, we will introduce the font properties and set the font to the label respectively, concluding it by setting alignment and the colour for the heading label. Then, we will create a new dateOfBirth label for taking the date of birth of the user and will set its geometry. After this, we will introduce the font properties and set the font to the label respectively, concluding it by setting alignment for the dateOfBirth label. Then, we will create a new present label for taking in the current date from the user and will set its geometry. After this, we conclude it by setting alignment and the font style for the present label. Next, we initialize the QDateEdit and will edit the first date. Then, we will create a new frst label for editing the first date by the user and will set its geometry. After this, we conclude it by setting its alignment, font style and will add action to the label to react according to the change in the date. Next, we initialize the QDateEdit and will edit the date. Then, we will create a new scnd label for editing the date by the user and will set its geometry. After this, we conclude it by setting its alignment, font style and will add action to the label to react according to the change in the date. Then, we will create a new push button for starting to calculate the age of the user. The push button will have the name calculate. Then, we will set its geometry and after that its colour will be along with the graphic effects. Lastly, we will also add the action that needs to be taken after the button will be pressed. Then, we will create a new result label for displaying the result of calculated age to the user and will set its geometry. After this, we conclude it by setting its alignment and the font style for the result label. Next, we will update the style sheet for the same by mentioning all the properties and their values like border, background, etc. Lastly, we will convert the single line label to multi line label. After setting the default dates for frst and scnd labels, we will call a function for making changes to first date and setting maximum date for it. Then, we will call a function for making changes to second date and setting maximum date for it. Next, we will create a function to be called when the push button that we created earlier will be pressed. First, we will take the first set date that is the birth date in the format day, month and year. Then, we will take the second set date that is the present date in the format day, month and year. Then, we will use the if-else condition to calculate the accurate result. Don't count the current month if the birth date exceeds the specified brth_month, instead, add 30 to the date, deduct the birth date from that number, and then count the days that are left over. Otherwise, if the birth month is greater than the current month, don't count the current year and add 12 to the month instead so that we can later deduct and figure out the difference. Then, we will calculate the number of days, months and years between the birth and the present date. That will be done by subtracting the day of birth from the present day, subtracting the month of birth from the present month and subtracting the year of birth from the present year. Then, we will display this result in the result label in the form such as we get n day/days, n month/months and n year/years as the actual age of the user. Finally, we will be creating the pyqt5 application by creating a base. Then, we will create an instance of that window where our application will be displayed or run. And finally, we will start the execution of our application by exiting the base. The complete code :The following is the complete code that will be used to create an age calculator: Output: The output of the above mentioned code is attached here in the form of a screenshot. 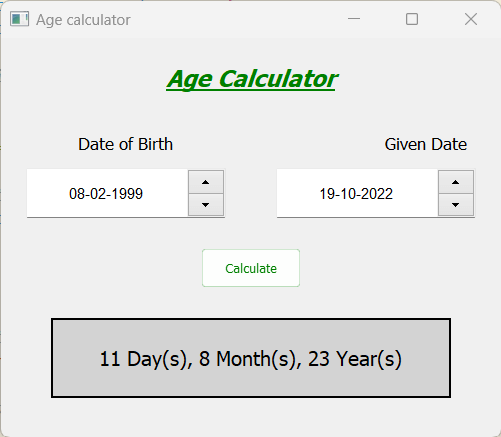
Next TopicCreate a Table using PyQt5 in Python
|
 For Videos Join Our Youtube Channel: Join Now
Feedback
- Send your Feedback to [email protected]
Help Others, Please Share


