| |

Bulk File Rename Tool with PyQt and PythonYou want to use a specific naming pattern while renaming several files in your folder. That manual process can be time-consuming and prone to mistakes. You're considering using Python to create your custom bulk file-renaming solution to automate the file-renaming process. This tutorial is for you if so. After completing the project in this lesson, you'll be able to put a wide range of PyQt and Qt Designer skills to use Introduction To automate the process of renaming several files in a certain directory in your file system, you will construct a bulk file renaming utility in this article. You'll use PyQt to develop the program's graphical user interface using Python's pathlib to manage file renaming operations (GUI). Your bulk document renaming tool will have the following appearance and functionality if you complete this lesson: When you finish building the Application, you can rename many files in your file system, a routine process while organizing your folders and files. Although this example's Application concentrates on Python files and images, you can also add other file kinds. Project OverviewThe project you'll create in this tutorial is a GUI program that loads several files from a specified directory and enables you to rename all those files using a defined appellation prefix and consecutive digits. Also, you'll learn how to organize the project. Prerequisites You should be familiar with the following ideas to finish this tutorial and benefit from it to the fullest extent possible: Python and PyQt are used to construct GUI applications. Qt Designer is used to creating GUIs. PyQt QThread is used to offload time-consuming processes and prevent GUIs from freezing. Your bulk file rename utility is dependent on PyQt v5.15.12 for external software. Using pip as normal, you may install this library from PyPI: As recommended by Python's best practices, you should construct a virtual environment to isolate the dependencies on your project. Afterward, it's time to begin developing your mass file-renaming Application! Step 1: Creating the GUI for the Utility Bulk Rename File. In this section, you'll learn how to easily develop the GUI for the bulk file renaming utility using Qt Designer. Also, you'll discover how to convert yours.ui file into Python code instantly. Creating the GUI With Qt DesignerLaunch Qt Designer to develop the GUI for your bulk file renaming program. Then carry out the steps in the example on a widget-based form.
Since you'll be using the object names in your Python code, you should alter them to something more legible and descriptive. Click Save on the Qt Designer toolbar to save the modified object names in your Window permanently.ui file. Moreover, you can save the file by hitting the keyboard shortcut Ctrl+S. You can shut down Qt Designer once you've completed creating the Interface for the bulk file rename program because you won't require it anymore. You'll carry out that task in the section that follows. Transforming Qt Designer's O/P to Python source Code You must translate the contents of the. ui file into Python code to load the GUI in the finished Application once you have a GUI file that is appropriate for your Application and is in the. ui format. This conversion can be done using the pyuic5 command-line utility provided by PyQt. You may see that your Window. ui file contains XML code by looking at its content. All of the graphical elements for the GUI of your Application are defined in that code. A portion of the file's content is shown below: The Window.ui file is used to create a Python module named window.py, which is then stored in the rprename/ui/ directory. The GUI for your bulk file rename utility is coded in Python and is located in the module. This is a brief excerpt of the code: The entire source code for the bulk file rename tool's graphical user interface is provided by Ui_Window_var. While.retranslateUi() The layout of your project is complete at this point. You have everything you need to make your tool for bulk file renaming. Using the graphical user interface (GUI) you just created, it's time to put together the basic PyQt application. Step 2: Create the PyQt Skeleton Application So far, you have used Qt Designer to create a graphical user interface for the bulk file rename tool. Additionally, in order to use the content of the.ui file in the Application, you made use of pyuic5 to translate it automatically into Python code. Finally, you saved the code to the rprename/ui/ directory in window.py. Construct a PyQt skeleton application and configure its main Window to use the window.py GUI code. Setting Up the Bulk File Rename Tool's WindowYou must first create the Application's main Window before you can start building the skeletal PyQt application for your bulk file renaming utility. Open the rprename/ init .py file first in your preferred code editor or IDE. Include the following information: The aforementioned file defines a top-level constant called __version__ to contain the Application's version number, in addition to a few comments and the module docstring. After that, open rprename/views.py and enter the following information inside: You must first import QWidget_var package PyQt5.QtWidgets into views.py. you import Ui Window from ui. Window after that. The GUI for your bulk file rename utility is provided by this class, as you have already seen. After that, you make a class called Window. Using this class, multiple inheritance is used. It also derives from your GUI class, Ui Window, as well as QWidget_var. Ui Window offers the specialised GUI configuration you require for this programme, while QWidget_var enables the fundamental GUI capabilities. Window's initializer uses super to invoke the initializer of the base class (). Also, it calls. setupUI(), a non-public method that gathers all the code necessary for creating and configuring the GUI. Up until this point, setupUI(self_var) only invokes.setupUi() from Ui Window, the second parent class. You may now develop a PyQt skeleton programme for your bulk file rename tool with the initial version of Windows available for use. The Application's construction of PyQt SkeletonIt's time to write the boilerplate code needed to construct a PyQt application now that the Application's main Window is ready for use. Open the rprename/apps.py file in your code editor once more. then incorporate the next code. To access exit() in this module, you must import sys. When the user closes the main Window, you can safely exit the Application using this function. After that, you import Window from views and QApplication from PyQt5. The definition of main() as your Application's primary function is the final step. Window and QApplication are created in main(). Then you use Window.show(). Finally, you use.exec() to execute the Application's main or event loops. Cool! The graphical user interface (GUI) of your bulk file rename tool has a button for loading the files you want to rename. The PathPath to the source directory will be displayed in the top line edit. The list of files to be renamed will be displayed in the list widget on the left, and the renamed files will be displayed in the list widget on the right. The user needs to enter a prefix for the filename before clicking Rename to begin the process of renaming the files. The file renaming progress will be shown by the progress bar at the bottom. In the following section, you will rename multiple files simultaneously while writing the necessary code to provide the Application's main functionality Step 3: pathliband PyQt Threads are Renamed You will make use of PyQt QThread and Python's pathlib to implement the file renaming functionality for your bulk file rename tool. You can rename files and manage paths on the file system with pathlib. On the other hand, renaming files with QThread will take place in a separate execution thread. Why? The renaming process might take a long time, though, depending on how many files you want to rename. When a long-running task is started in the Application's main thread, it can freeze the graphical user interface, which can hurt the user experience. You can make your application responsive by creating a worker QThread to offload the file renaming process and prevent GUI freezing issues. Again, click the link below to download all of the code you'll write in this section: You must first have a way to load the files into the Application before you can begin renaming them. You must store the paths to the files you want to rename in a convenient data structure after selecting them. Return to rprename/views.py and modify the code as follows: In this case, the deque is first imported from collections. Stacks and queues are adapted into deques. The paths of the files you need to rename will be stored with a deque. The PathPath can also be imported from pathlib. Your file system's actual file or directory paths can be represented by this class. This class will be used for various operations on files and directories. In this tutorial, you will learn how to rename physical files on your hard drive using PathPath.rename(). You can load multiple files into your bulk file rename tool by clicking Load Files now. Take note that the Choose Files to Rename dialog lets you choose from a variety of file filters to specify the kind of file you want to load into the Application. Note: The purpose of the line numbers in the code above and in the remaining code samples in this tutorial is to make the explanation easier. They do not follow the script or module's final line order. Cool! You can already load a variety of file types into your project. To continue coding, please close the Application. You will use the file renaming feature in the following section. Renaming Multiple Files in a WorkerQThreadYou can delegate the task of renaming files from the Application's main thread by setting up a worker thread. By doing this, you can avoid any potential GUI freezing problems when you choose many files to rename. A QThread object will be used to carry out the file renaming operation. The worker thread will use Pathlib.rename to rename the files (). Open the rprename/rename.py file in your code editor right away. Enter the upcoming code: This code does the following: PyQt5.QtCore's QObject and pyqtSignal() are imported on line 9. You can create subclasses with custom signals and features using QObject. You can create custom signals with pyqtSignal() and emit them when a particular event occurs. Renamer, a QObject subclass, is defined on line 11. And three custom signals are defined in lines 13 to 15:
Line 17's class initializer requires two arguments:
The.renameFiles_var() method used to rename files is then defined.
You are now prepared to begin renaming files after you have coded Renamer. A worker thread needs to be created and set up before you can do that. However, before doing so, return to rprename/views.py and modify its import section as follows: The first step in this step is to link the.renameFiles_var() method of the Rename button to the.clicked() method. To set up, set up, and run the worker thread, this method calls runRenamerThread_var(). The final line of code defines updateStateWhenFileRenamed_var(). The method removes a file from the list of files to be renamed when it renames it. The method then updates the Application's graphical user interface (GUI) lists of files to rename and files that have been renamed. Step 4: Change the GUI State based on the renaming progress Your bulk file rename tool has so far provided the majority of its functionality. The tool already allows you to rename a number of files in your file system. But what would take place if the user clicked "Rename" in the middle of the process of renaming the file? Also, what happens if the user doesn't give a filename prefix? The reason why the Application's progress bar does not show the file renaming progress is another problem that is even more obvious. All of these inquiries involve adapting the user interface to the current state of the Application. You will write the necessary code in this section to either resolve or prevent the aforementioned issues. The progress bar will be your first stop. Progress Bar UpdateProgress bars are commonly used in GUI programmes to let users see how long-running activities are progressing. Users may believe the programme is blocked, stuck, or experiencing internal problems if they don't receive feedback on its current performance. You utilize a progress bar in this project to give feedback on how the file renaming procedure progresses at any moment. Return to the file rprename/views.py in our code editor and make the following change to accomplish that: I'm done now! Run your Application once more if you want. It'll operate as follows: With these changes to Window, your bulk file rename tool's progress bar now accurately displays the status of the file renaming process, which is good and enhances the user experience. Enabling and Disabling GUI ComponentsWhen developing graphical user interface (GUI) applications, you are aware that some GUI actions are only available in certain circumstances. If, for instance, the user has not provided a filename prefix or there is no file already loaded into the Application, it makes no sense to allow them to click "Rename" in your bulk file rename tool. There are at least two approaches to take in a situation like this:
Conditional statements can be used to ensure that a particular action makes sense at a particular time to implement the first method. On the other hand, to implement the second strategy, you will need to identify all of the states your Application might encounter and provide methods for updating the user interface in response to those states. You'll use the same approach to update the GUI because the first and last states in the table above are very similar. This means that you only need to use four methods. Return to views.py and add the following code to Window to begin coding these methods.: This update works like this:
When the Application is launched, you can launch the dialog and select the files you want to rename by pressing Space on your keyboard. You cannot act on the Rename button and the Filename Prefix line edit. You can now code the procedure to update the user interface when files are loaded into the Application. The Application starts the file renaming process when the user clicks "Rename" and calls "updateStateWhileRenaming()" to update the GUI accordingly. The method prevents the user from clicking the Load Files and Rename buttons while the renaming process is in progress. That's all! The following behavior will occur if you run the Application now. The GUI of your bulk file rename tool now shows the current state of the Application at any given time. As a result, you can provide your customers with a user-friendly and stress-free experience. Bravo for your efforts! Screenshot of output: 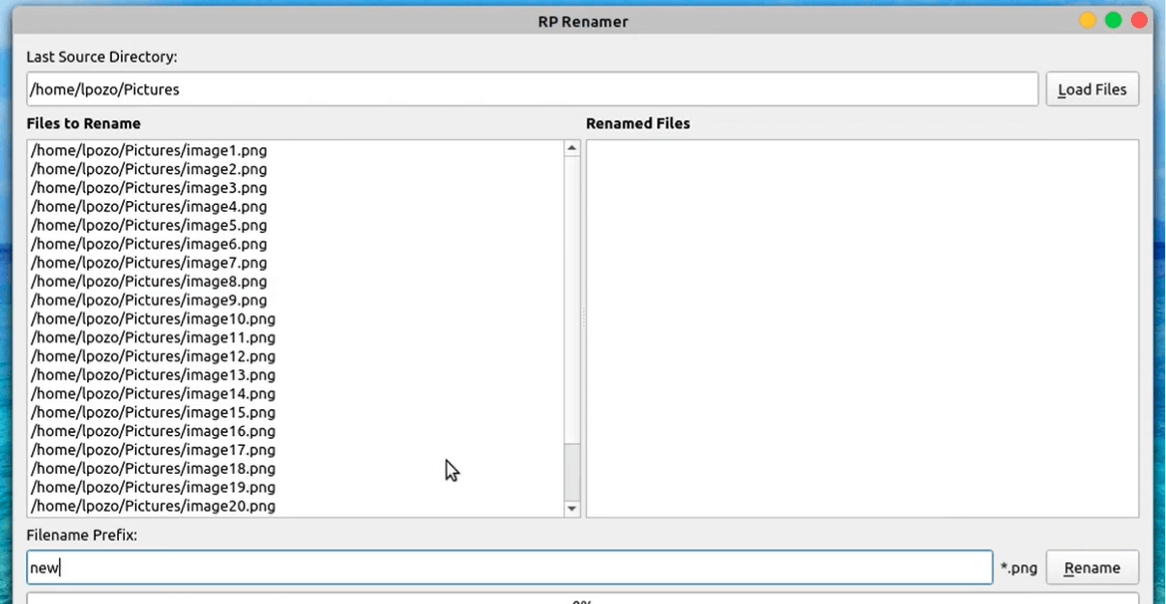
ConclusionA common issue when you organize your files and folders is when multiple files are renamed automatically. You built a real-world GUI application in this tutorial to complete this task quickly and effectively. By building this tool, you demonstrated a wide range of abilities related to PyQt and Qt Designer application development. You also used Python's pathlib to work with files. You received instructions on how to:
Next TopicCreate a Quote Generator in Python
|
 For Videos Join Our Youtube Channel: Join Now
Feedback
- Send your Feedback to [email protected]
Help Others, Please Share


