| |

PyQt library in PythonEven as mobile and web applications seem to overtake the market of software development, there is still a demand for traditional Graphical User Interface (GUI) desktop applications. For developers who are fascinated in creating these kinds of applications in the Python programming language, there are a large variety of libraries to select from, involving Tkinter, PyQt, wxPython, PySide2, and many others. In the following tutorial, we will understand how to develop GUI desktop applications using the Python programming language and PyQt. Understanding PyQt library in PythonPyQt is a Graphical User Interface widgets toolkit. It works as a Python interface for Qt, one of the most prominent and famous cross-platform GUI libraries. PyQt library was developed by RiverBank Computing Ltd. We can download the latest edition of PyQt from its official website - https://riverbankcomputing.com/software/pyqt/download. PyQt library is available in two versions:
Even though PyQt4 can be built against Qt 5.x, only a small subset that is also compatible with Qt 4.x will be supported. This statement implies that if we decide to utilize PyQt4, we will probably miss out on a few of the new features and improvements in the PyQt5 library. One can also refer to the official documentation of PyQt4 for more information on this topic - https://www.riverbankcomputing.com/static/Docs/PyQt4/qt_v5.html. We will be covering the PyQt5 library in the following tutorial, as it appears to be the future of the library. From now onwards, consider any mention of PyQt as a reference to PyQt5. PyQt5 is based on Qt version 5 and contains classes that cover Graphical User Interfaces as well as network communication, threads, multimedia, XML handling, regular expressions, SQL databases, multimedia, web browsing, and other technologies available in Qt. The PyQt5 library is a top-level Python package that can implement over a thousand of these Qt classes in a set of Python modules. The PyQt5 library is compatible with many operation systems like Windows, Unix, Linux, macOS, Android, and iOS. This can be an attractive feature if we are looking for a library or framework in order to develop applications that can be run on multiple platforms with a native appearance and feel on each platform. The PyQt5 library is available under two licenses:
If we want to utilize PyQt5 to create commercial applications, then we will require a commercial license for the installation. The PyQt5 license must be compatible with the Qt license we are working on. The code must also utilize a GPL-compatible license if we utilize the GPL version. How to install the PyQt library?There are multiple options available for us to choose from while installing PyQt on the system or development environment. The first option is to build from the source. This can be a bit complicated, so we might want to avoid it. If we want to build from the source, we can refer to the official documentation of the library. Another option would be the use of binary wheels. Wheels are a very popular way to manage the installation of Python packages. However, we must consider that wheels for PyQt5 are only available for Python 3.5 and above. There are wheels available for different operating systems like:
These wheels involve copies of the subsequent Qt libraries; thus, we won't require installing them individually. The third option is to utilize package managers on Linux distributions and macOS. For Windows, we can utilize a binary .exe file. The fourth and final option is to use the Anaconda distribution in order to install the PyQt library on the system. Let us consider the following section where we have opted for one of the above options to install PyQt5. Installing PyQt5 using pipIn order to install the Python module, we need 'pip', a framework to manage packages required to install the modules from the trusted public repositories. Once we have 'pip', we can install the pyqt5 module using the command from a Windows command prompt (CMD) or terminal as shown below: Syntax: Verifying the InstallationOnce the module is installed, we can verify it by creating an empty Python program file and writing an import statement as follows: File: verify.py Now, save the above file and execute it using the following command in a terminal: Syntax: If the above Python program file does not return any error, the module is installed properly. However, in the case where an exception is raised, try reinstalling the module, and it is also recommended to refer to the official documentation of the module. Let us now create the first PyQt Application Creating the first PyQt ApplicationSince we have installed the PyQt library successfully, let us start some coding. We are about to create a "Hello, World!" application with Python and PyQt. Let us consider some steps we will follow: Step 1: Importing QApplication and all the required widgets from PyQt5.QtWidgets. Step 2: Creating an object of QApplication. Step 3: Creating an object of the application's GUI. Step 4: Displaying the GUI of the application. Step 5: Executing the event loop (or main loop) of the application. We will begin by creating a Python project file as intro.py in the present working directory and importing the required widgets. The following snippet of code demonstrates the same: File: intro.py Explanation: In the above snippet of code, we have imported the sys library, which will allow us to manage the exit status of the application. We have also imported the class and widgets like QApplication, QLabel, and QWidget from the QtWidgets module of the PyQt5 library. We will now create an object of the QApplication class. Let us consider the following snippet of code demonstrating the same: File: intro.py Explanation: In the above snippet of code, we have instantiated the QApplication class. Since the QApplication object (myApp) does so much initialization, we should create it before creating any other object associated with the GUI. The object of the QApplication class also deals with general command line arguments, so we are also required to pass in sys.argv as a parameter while creating myApp. Note: sys.argv consists of the list of command-line arguments passed into a Python script. If the application does not accept command-line arguments, we can utilize an empty list rather than using sys.argv. We can perform something like myApp = QApplication([]).Step three consists of creating the GUI for the application. For this example, our GUI will be based on QWidget, the base class of all user interface objects in PyQt. Let us consider the following snippet of code that illustrates the creation of GUI: File: intro.py Explanation: In the above snippet of code, we have created an instance of QWidget, which offers all the features that we will need in order to create the window (or form) of the application. Using the help of the setWindowTitle() function, we have added a title to the window. We have then utilized the setGeometry() function to define the size of the window and where to place it on the screen. The first two parameters are the x- and y-coordinates at which the window will be placed on the screen. The third and fourth parameters are the width and height of the window. Every practical GUI application requires widgets! Here we have used a QLabel object (firstMsg) to display the message on the window of the application. QLabel objects can accept HTML text, so we have used the HTML element '<h1>Hello, World! Welcome to Javatpoint</h1>' to format the text as an h1 header. At last, we have used the move() function to place firstMsg at the coordinates (60, 15) on the window of the application. Note: In PyQt5, we can utilize any widget (a subclass of QWidget) as a top-level window or even a button or a label. The only condition is that we pass no parent to it. When we utilize a widget like this, PyQt5 automatically provides it a title bar and turns it into a normal window.The parent-child relationship is utilized for two complementary purposes:
This relationship also defines ownership, with parents owning their children. The PyQt5 ownership model ensures that if we delete a parent (for instance, a top-level window), all of its children (widgets) are automatically removed. We should ensure that any QWidget object has a parent with the sole exception of top-level windows in order to avoid memory leaks. Now that we are done with step three, let us code the last two steps and get the first PyQt GUI application ready to go live: File: intro.py Explanation: In the above snippet of code, we have called the show() function on myWindow. The call to the show() function schedules a paint event. In other words, it inserts a new event into the event queue of the application. We cover the event loop in a later section. Note: A paint event is a request to paint the widgets that compose a GUI.At last, we have initiated the event loop of the application by calling the myApp.exec_() function. The call to the exec_() function is wrapped in a call to sys.exit(), which allows us to exit Python cleanly and release memory resources when the application terminates. We can run intro.py with the following command: Command: Output: 
Explanation: In the above output, the application displays a window (based on QWidget) with its message. We utilize a QLabel that consists of the message in HTML format to show the message. Understanding the Fundamentals of PyQtWe will require to master the fundamental concepts of the PyQt logic to utilize the library for GUI applications development efficiently. Some of these concepts involve:
These elements will be considered the building blocks of the PyQt GUI applications. Most of them are represented as Python classes. The QtWidgets module of the PyQt library provides all these classes. These elements are extremely significant so we will cover them in the following section. Understanding WidgetsQWidget is the base class for all the objects of the user interface or widgets. These are rectangular-shaped graphical components that we can place on the windows of the application to order to construct the GUI. Widgets consist of attributes and methods that enable us to model their appearance and behavior. They can also paint a depiction of themselves on the screen. Widgets also receive mouse clicks, keypresses, and other events from the user, the window system, and many other sources. Every time a widget catches an event, it emits a signal to announce its state change. PyQt5 has a rich and modern collection of widgets that serves different purposes. Some of the most common and helpful widgets are as follows:
Let us now understand the use of these widgets in brief. Buttons We can create a button by instantiating QPushButton, a class that offers a classical command button. Some typical buttons are OK, Apply, Cancel, Yes, No, and Close. Buttons like these are perhaps the most utilized widget in any Graphical User Interface. Whenever we click them, we can command the computer to perform actions. We can even perform activities in response to a user clicking a button. Labels We can create labels by instantiating QLabel. Labels provide us with a method to show helpful information in the form of text or images. Labels can be used like these better to illustrate the purpose or usage of the GUI. We can tweak their appearance in different ways, and they can even accept HTML text, as we saw earlier. We can also use labels to specify a focus mnemonic key for another widget. Line edits A line edit is another common widget and a single-line text box that we can create using QLineEdit. Line edits are helpful when requiring the user to insert or edit data in plain text format. Line edits like these offer basic editing operations such as copy, paste, undo, redo, drag, drop, and many more. Combo boxes A combo box is another useful widget that we can create using QComboBox. A combo box helps present a list of options to the user in a manner that accepts a minimal amount of screen space. These combo boxes consist of pixmaps, strings, or both. The combo boxes can be read-only or editable. The read-only combo boxes allow users to select one of the different options but cannot add their own. However, the editable combo boxes allow the users to add new options. Radio buttons The last widget we will cover here is the radio button, which we can create using QRadioButton. Radio buttons are useful when requiring the user to select one of many options. A QRadioButton object is an option button that can be switched on (checked) or off (unchecked). PyQt5 has a large collection of widgets. At the time of this writing, there are over forty available for us to utilize in order to create the Graphical User Interface of the Application. The widgets we have covered above are only a small sample; however, they display us the power and flexibility of the PyQt5 library. In the next section, we will cover how to layout different widgets in order to create modern and functional GUIs for the applications. Understanding Layout ManagersNow we know the meaning of widgets along with their use in building GUIs. However, how can we arrange a set of widgets to create a coherent and functional GUI? There is a range of techniques that we can utilize to layout the widgets on a form or window. For example, we can utilize the resize() and move() functions absolute sizes and positions. However, this can have some drawbacks:
We can also use an alternative as resizeEvent() to dynamically calculate the size and position of the widget. However, the most efficient alternative might be to utilize the Layout managers, which will boost the production and improve the maintainability of the code. Layout managers are the classes that enable us to size and position the widgets at the places we want them to be on the application form. Layout managers automatically adapt to resize events and content changes. They also control the size of the widgets within them. This implies that the widgets in a layout are automatically resized whenever the form is resized. Note: If we develop international applications, we may have observed how translated labels can be cut short. This is specifically likely when the target language is more verbose than the original language. However, this ability can be a bit tricky and sometimes fail with specifically wordy languages. Layout managers can be useful in avoiding this common pitfall.PyQt offers four fundamental layout manager classes:
The first layout manager class is QHBoxLayout which allows us to arrange widgets in a horizontal manner from left to right. 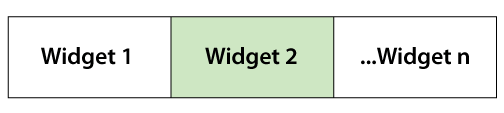
The widgets will appear one after the other, beginning from the left. Let us consider the following snippet of code demonstrating the use of the QHBoxLayout class in order to arrange buttons horizontally. Example: Output: 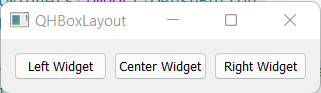
Explanation: In the above snippet of code, we have imported the required modules. We have then instantiated the QApplication class and created a window. We have then set up the title for the window and instantiated the QHBoxLayout class. We added some widgets to the layout and used the setLayout() function to set the horizontal layout in the Application's window. At last, we have used the show() function to display the window and the sys.exit(myApp.exec_()) function to exit the execution of the Application. In the above output, we have added three buttons in a horizontal arrangement. Notice that the buttons are displayed from left to right in the same order as we added them in the code. The next layout manager class is QVBoxLayout which allows us to arrange widgets in a vertical manner, starting from top to bottom: 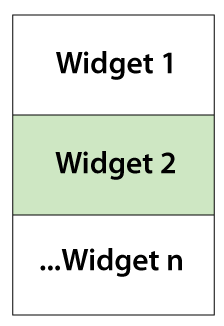
Each new widget will appear beneath the earlier one. We can utilize this class in order to construct the objects of the vertical box layout and organize the widgets from top to bottom. Let us consider the following snippet of code demonstrating the use of the QVBoxLayout class: Example: Output: 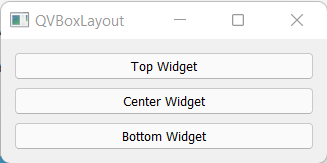
Explanation: In the above snippet of code, we have imported the required modules. We have then instantiated the QApplication class and created a window. We have then set up the title for the window and instantiated the QVBoxLayout class. We added some widgets to the layout and used the setLayout() function to set the vertical layout in the Application's window. At last, we have used the show() function to display the window and the sys.exit(myApp.exec_()) function to exit the execution of the Application. In the above output, we have added three buttons in a vertical arrangement. Notice that the buttons are displayed from top to bottom in the same order as we added them in the code. The third layout manager class is QGridLayout, which allows us to arrange the widgets into a grid of rows and columns. Every widget will have a relative position on the grid. We can define the position of the widget by passing it a pair of coordinates in the form of (row, column). These coordinates should be valid int numbers. They define which cell of the grid we are about to place the widget on. The grid layout works as follows: QGridLayout takes the space made available to its parent, divides it up into rows and columns, and places each widget into its cell. 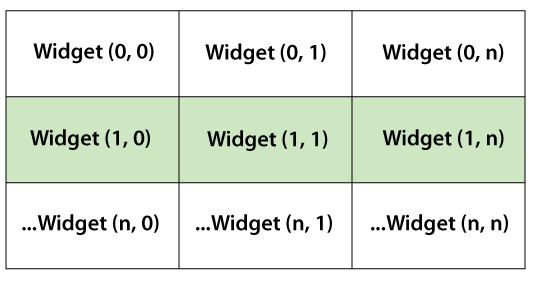
Let us now consider the following snippet of code that demonstrates the use of QGridLayout in the GUI: Example: Output: 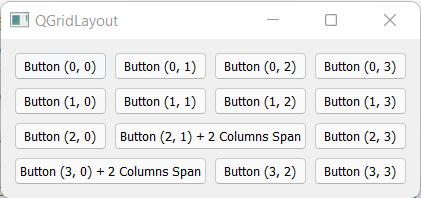
Explanation: In the above snippet of code, we have imported the required modules. We have then instantiated the QApplication class and created a window. We have then set up the title for the window and instantiated the QGridLayout class. We added some widgets to the layout using the addWidget() function. Notice that, in the above case, the second and third parameters we pass to this function are int parameters that define the position of each widget. In lines 29 and 31, we added two more parameters to the addWidget() function. These parameters are known as rowSpan and columnSpan, and they are the fourth and fifth parameters passed to the function. We can utilize them in order to make a widget occupy multiple rows or columns as we did with QPushButton('Button (2, 1) + Columns Span') here. We have then used the setLayout() function to set the Grid layout in the Application's window. At last, we have used the show() function to display the window and the sys.exit(myApp.exec_()) function to exit the execution of the Application. The above output shows that the widgets are arranged in a grid of rows and columns. Two widgets also occupied more than one cell. The last layout manager class is QFormLayout, which arranges widgets in a two-column layout. The first column generally shows messages in labels. The second column usually consists of the widgets like QLineEdit, QComboBox, QSpinBox, and many more. These widgets enable the user to enter or edit data associated with the information in the first column. The following diagram displays the working of form layouts in practice: 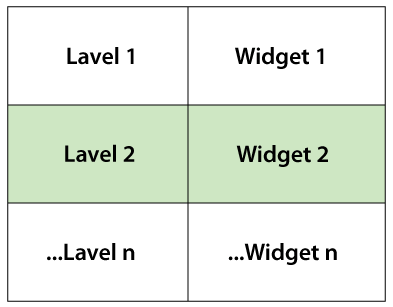
The left column contains labels, and the right column contains field widgets. If we are dealing with a database application, this kind of layout can be an attractive option for increased productivity when creating the forms. Let us consider the following snippet of code that demonstrates the use of the QFormLayout object to arrange the widgets in the Application. Example: Output: 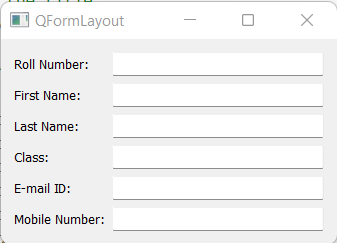
Explanation: In the above snippet of code, we have imported the required modules. We have then instantiated the QApplication class and created a window. We have then set up the title for the window and instantiated the QFormLayout class. We notice that QFormLayout has a convenient method known as addRow(). We can utilize this method to add a two-widget row to the layout. The first parameter of addRow() should be a label, and the second parameter should be any other widget that enables the user to enter or edit data. The above output displays a GUI that utilizes a form layout. The first column consists of the labels asking the user for some information. The second column displays widgets allowing the user to enter or edit the information we asked from them. Understanding DialogsWe can develop two types of GUI desktop applications using PyQt. Depending on the class we utilize in order to create the main form or window, we will have one of the following:
We will begin with Dialog-Style applications first. In the next section, we will cover Main Window-Style applications. We need to create a GUI class that inherits from QDialog, which is the base class of all dialog windows, in order to develop a Dialog-Style application. A Dialog window is always a top-level window that we can utilize as the main window for the Dialog-Style application. Note: Dialog windows are also usually utilized in Main Window-Style applications for brief communication and interaction with the user.When dialog windows are utilized for communicating with the user, they may be:
Dialog windows can also offer a return value and have default buttons (OK and Cancel). A dialog is often a top-level widget. If it has a parent, its default location is centered on top of the parent's top-level widget. This kind of dialog will also share the taskbar entry of the parent. If we do not set a parent for a given dialog, then the dialog will get its entry in the taskbar of the system. Let us consider the following snippet of code demonstrating the use of QDialog for the development of a Dialog-Style application: Example: Output: 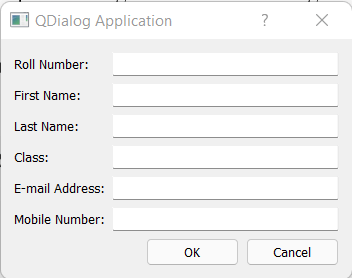
Explanation: In the above snippet of code, we have imported the required modules and defined a class for the GUI, which inherits from QDialog. We have then assigned a QVBoxLayout object to dialog_layout and a QVFormLayout object to form_layout. We have then added widgets to the form_layout. Later we have used the dialog_layout to arrange these widgets on the form. We have then added two standard buttons to the application. At last, we have wrapped the boilerplate code in an if __name__ == '__main__': idiom. This is considered a best practice for Pythonistas. Note: If we observe line 27 in the code block above, then we will notice that layout managers can be nested inside one another. We can nest layouts by calling the addLayout() function on the container layout and passing in the nested layout as a parameter to this method.Understanding Main WindowsMost of the time, the GUI application will be the Main Window-Style. This means that these applications consist of a menu bar, some toolbars, a status bar, and a central widget that will be the main element of the Graphical User Interface. It is also common that the applications will have several dialog windows to accomplish secondary actions that depend on the user input. We will utilize the class QMainWindow in order to develop Main Window-Style applications. QMainWindow offers a framework that allows us to build the GUI of the application. We have to inherit from QMainWindow to create the main GUI class. An object of a class derived from QMainWindow is considered the main window. The class has its built-in layout, which we can utilize to place the following:
We cannot create the main window without setting a central widget first. We just need a central widget, even if it is just a placeholder. We can utilize a QWidget object as the central widget when this is the case. We can set the main window's central widget using the setCentralWidget() function. The layout of the main window will enable us to have only one central widget; however, it can either be a single widget or a composite one. Let us consider the following snippet of code, demonstrating the use of QMainWindow in the creation of a Main Window-Style application: Example: Output: 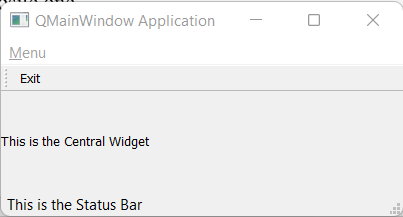
Explanation: In the above snippet of code, we have imported the required module and defined a class as myWindow that inherits from QMainWindow. We have then initialized some functions and set the title of the window. We have then set a QLabel as the central widget. We have then called the private methods that follow to create different elements of the GUI. Later, we created the methods to create the main menu, toolbar, and status bar. At last, we have instantiated the class and executed the application. Note: Whenever we implement different components of the GUI in their methods, we are making the code more readable and more manageable. However, this is not necessary, so we are free to organize the code in the way we prefer best.We can observe that the Main Window-Style application has the components as shown below:
So far, we have covered a few of the more significant graphical components of PyQt5's set of widgets. In the following two sections, we will cover some other significant concepts associated with the PyQt GUI applications. Understanding ApplicationsThe most fundamental class we will utilize while developing PyQt GUI applications is QApplication. This class is at the core of any PyQt application. It manages the control flow of the application and its main settings. In PyQt, any object of QApplication is an application. Every PyQt GUI application must have one QApplication object. Some of the responsibilities of the application involve:
From the above core responsibilities of QApplication, we can conclude that this is a fundamental class that helps in the development of PyQt GUI applications. One of the most significant responsibilities of QApplication is to offer the event loop and the complete mechanism of event handling. Let us have a closer look at the event loop now. Understanding Event LoopsGUI applications are event-driven. This statement implies that the methods and functions are executed with respect to the user actions. For example, clicking on a button, selecting an element from a combo box, inserting and updating the text in a text editor, pressing a key on the keyboard, and many more. These user actions are usually known as events. Events are generally handled by an event loop (also known as the main loop). An event loop is an infinite loop in which all events from the user, the window system, and any other sources are processed and dispatched. The event loop waits for an event to happen and then dispatches it in order to do some tasks. The event loop continues to work until the application is terminated. Event loops are utilized by all GUI applications. The event loop is an infinite loop that waits for the occurrences of the events. Suppose an event occurs, then the loop checks if the event is a Terminate event. In that case, the loop is terminated, and the application quits. Else, the event is sent to the event queue of the application for further processing, and the loop begins again. In PyQt, we can execute the event loop of the application by calling the exec_() function on the QApplication object. For an event to trigger a response action, we have to connect the event with the action we want to be executed. In PyQt5, we can establish that connection with the help of the signals and slot mechanism. Signals and SlotsThe widgets of the PyQt library act as the event-catchers. This statement means that every widget can catch a particular number of events, such as mouse clicks, keypresses, and many more. In response to these events, widgets always emit a signal, a kind of message that announces a change in its state. The signal on its own does not do any task. If we want a signal to trigger an action, we have to connect it to a slot. This is the method or function that will perform an action whenever the connecting signal is emitted. We can utilize any Python callable (or callback) as a slot. If a signal is connected to a slot, then the slot is called whenever the signal is emitted. If a signal is not connected to any slot, nothing occurs, and the signal is ignored. Here are some of the most supportable features of this mechanism:
We can utilize the following syntax in order to connect a signal to a slot: Syntax: Whenever a signal is emitted, slot_func() will be called. This will connect slot_func to the widget.signal function. Let us consider the following snippet of code, demonstrating the same: Example: Output: 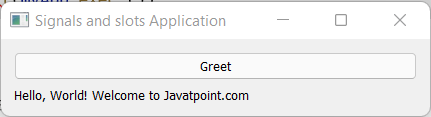
Explanation: In the above snippet of code, we have imported the required modules and defined the slot function. We have created the object of the QApplication class and initialized the button. We have then added the widgets and set the layout. At last, we have displayed the window. Moreover, we can observe that the button triggers the action that connects the greetings() function. The signals and slots mechanism is what we will utilize to give life to the PyQt5 GUI applications. This mechanism will allow us to turn user events into concrete actions. |
 For Videos Join Our Youtube Channel: Join Now
Feedback
- Send your Feedback to [email protected]
Help Others, Please Share


