| |

Python Pyfiglet ModuleWe all may have heard about the ASCII encoding or texts & styles that are ASCII encoded, but if any of us have not heard of it, then we don't need to take any stress. American Standard Code for Information Interchange, known as ASCII in short, is one of the character encoding standards used in electronic communication and other such types of communication. The ASCII encoded characters, or simply to say, ASCII codes, are used for representing texts in electronic communication devices such as telecommunication equipment, computers, smartphones, and many others. In today's time, most of the character encoding systems in the electronic communication devices we use are based on this ASCII encoding system. Although we have many other options of character encoding systems that we can use while doing electronic communication, the ASCII encoding system is the most famous among them. This basic understanding of the ASCII encoding system is important for understanding the topic of this article. The ASCII encoded texts are the texts that are shown to our computer or laptop displays. But if we want, we can change the style of these ASCII encoded texts and make them look more stylish and more attractive. We can achieve this task of changing the style and design of ASCII encoded texts in many ways, and one of these ways is Figlet. The Figlet is a program that contains only a few lines of code, and it is designed to create fancy texts in large size with the help of screen characters. We can use this Figlet method while doing programming work so that we can change the font and style of the ASCII encoded texts in the output and make them look more stylish and attractive. In this Figlet method, ordinary ASCII encoded texts are provided as input, and these texts are converted into large-size patterned texts and fonts, thus, creating fancy texts in the output. Now, this may sound stupid to some of us to perform this task, but this is also an aspect of programming, and we can utilize this method in multiple ways. We will learn about the uses of the Figlet method to get fancy texts later in this article. In today's time, many programming languages provide us the option to use this Figlet method inside a program, and Python is also one of them. Python provides us modules and functions that we can use inside a program to implement the Figlet method for creating fancy texts, and the Pyfiglet module is one such module. Therefore, we will learn this Pyfiglet module of Python in this tutorial and work with this module to understand how we can use this module. Introduction to Pyfiglet Module of PythonThe Pyfiglet module is a Python module that comes with many functions, and we can use these functions in a Python program to create fancy texts with large fonts & sizes in the output. The Pyfiglet module is specially designed to enhance our programming experience as well as to enhance the overall look and structure of the texts used in electronic communication. The pyfiglet module of Python works on the Figlet method, which was originally designed for the C, and later it was imported into Python. After being imported in Python, the Figlet method is now used as a package (Pyfiglet module) in Python programs. The functions of the pyfiglet module can also work with the object-oriented or command-line drivers in a Python program. We have to provide the input ASCII encoded text as the program's input, which we want to see in the fancy text form in the output. We can use the functions of this module in a Python program by simply importing this module into the program. To import this module in Python program, we can use the following line of code: We can use this library in a Python program directly through this method, or we can also use this module through the command prompt shell. In the command prompt shell method, we have to provide this module and run the code where we have used the functions of this module. We can print multiple fancy pattern texts in the output using the functions of this module and taking an input ASCII encoded text. Pyfiglet Module in Python: InstallationNow, before we start working or using the functions of this module in the Python programs to understand the implementation of this Pyfiglet module, we have first to perform the installation process of this module. This is because, like the most popular Python modules, this is also a module that doesn't come in-built in Python. This means that if we want to use the functions of this module and work with it, we have first to install this module in our system. Coming to the installation process, the pyfiglet module of Python can be installed through multiple methods, and we can use any of these methods. Among all the installation methods available for the pyfiglet module, installing this module through the pip installer is the simplest and easiest method. Therefore, in this installation part of this tutorial, we will install the pyfiglet module using the pip installer method through the terminal shell. To install the pyfiglet module through pip installer from command prompt shell, we first have to open the command prompt terminal of our system and write down the following command in it: We will also have an option to change the directory where we have to install this module, but it is recommended to install this module in the default directory as set up while opening the terminal shell. Now, after we have written down the pip command given above in the terminal shell, we have to press the 'enter' to start this module's installation process. We should also ensure that our system or device is properly connected to a stable network (internet) connection. When we press the 'enter' key, the installation process of the pyfiglet module will start automatically, and we may have to wait for a while until this module is successfully installed in our system. 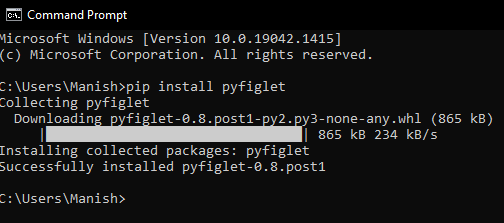
As we can see, the pyfiglet module is now successfully installed in our system, and now we can use this module in any Python program to understand the functioning of this module and the implementation of functions of this module. We can now start work with the implementation part of the functions of this module. Pyfiglet Module of Python: ImplementationWe will now proceed with the implementation part of this module and understand how we can use this module in any given Python program to print fancy texts of different formats in the output. In simple language, we can say that we will perform ASCII art using the functions of the pyfiglet module. To perform this ASCII art means rendering simple ASCII encoded texts into ASCII art form; the pyfiglet module provides us with the figlet_format() function, which we can use inside a Python example program. Syntax for the figlet_format() function: If we want to use the figlet_format() function of this module in our example programs, we have to use the correct syntax of it. Following is the syntax for using the figlet_format() function of the pyfiglet module: As we can see, the figlet_format() function takes two arguments inside it, and the following is the description of the arguments used inside this function: (i) 'inputText': This is a mandatory argument of this function, and without providing this argument, the figlet_format() will not yield an output. We have to provide the input text, which is present in ASCII encoded form, as an argument inside this function, and the function will convert the input given text into fancy pattern texts in the output. (ii) font: The font type is an optional argument in this function. This argument defines the fancy font of the text that will be yielded in the output, and the input encoded text will be printed in the same fancy text pattern as defined in the argument. Now, we will see multiple examples where we will provide different types of fonts as an argument in the figlet_format() function, and the input text given in the function will be printed in the same font as provided in the argument. Different types of arguments will print different patterns and styles of texts according to the font provided in the function, thus, marking different functionalities of the module. We will understand all these different types of fancy font arguments and their outputs by using each one of them in the example programs. We will use different example programs for different argument types we will use inside the figlet_format() function's font argument. Look at the following example program to understand the working of this pyfiglet module and how we can work with this module: Example 1: Printing Text with Default Font:As we have said, the font is an optional argument of the figlet_format() function, and we can even leave this blank. But if we don't use this argument, the input text provided in the function will be printed in the default font of the function. Look at the following Python program where we have printed the input text in the default format of the figlet_format() function: Output: 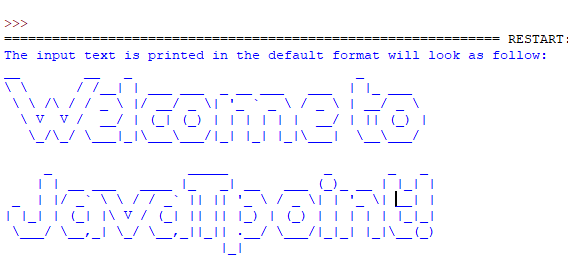
As we can see, the input text is provided as an argument, and this input text is printed in the default font of the function. That's how we can print default pattern texts in the output using this module. Example 2: Using the Slant Font Text:We will here print the input given encoded text in the slant font by providing the 'slant' keyword as the font argument inside the figlet_format() function. Look at the following example program where we printed input given texts in the slant style pattern in the output: Output: 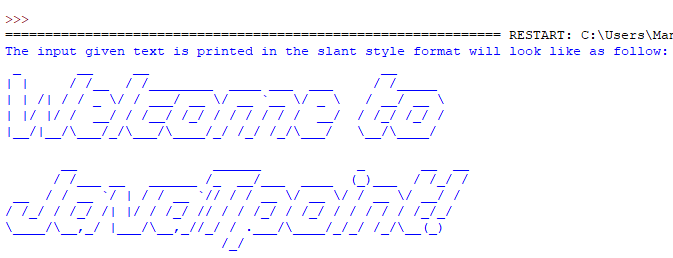
As we can see, the input given texts is printed in the output with the slant style fonts by providing the 'slant' font argument in the program. That's how we can print slant pattern texts in the output using this module. Example 3: Using the 3-D Font Pattern:We will here print the input given encoded text in the 3-D font pattern by providing the '3-D' keyword as the font argument inside the figlet_format() function. Look at the following example program where we printed input given texts in the 3-d font style in the output: Output: 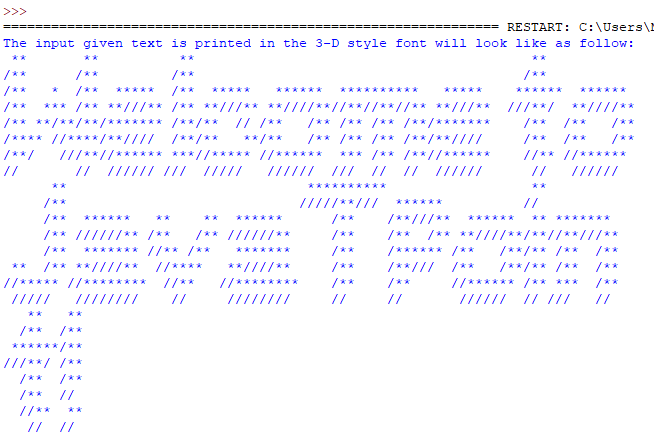
As we can see, the input given texts are printed in the output with the 3-d style fonts, and that's how we can print 3-d pattern texts in the output using this module. Example 4: Using the Alphabet Font Pattern:We will here print the input given encoded text in the alphabet font pattern by providing the 'alphabet' keyword as the font argument inside the figlet_format() function. Look at the following example program where we printed input given texts in the alphabet font style in the output: Output: 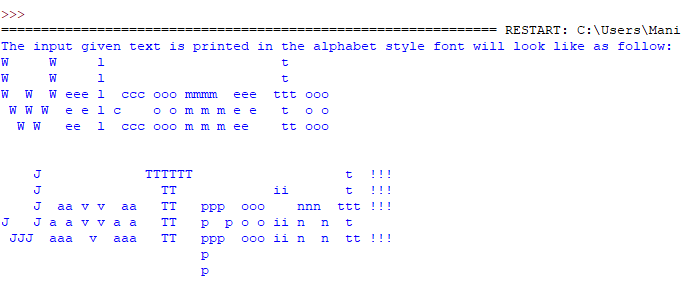
As we can see, the input given texts are printed in the output with the alphabet style fonts, and that's how we can print alphabet pattern texts in the output using this module. Example 5: Using the Doh Font Text:We will here print the input given encoded text in the doh font by providing the 'doh' keyword as the font argument inside the figlet_format() function. Output: 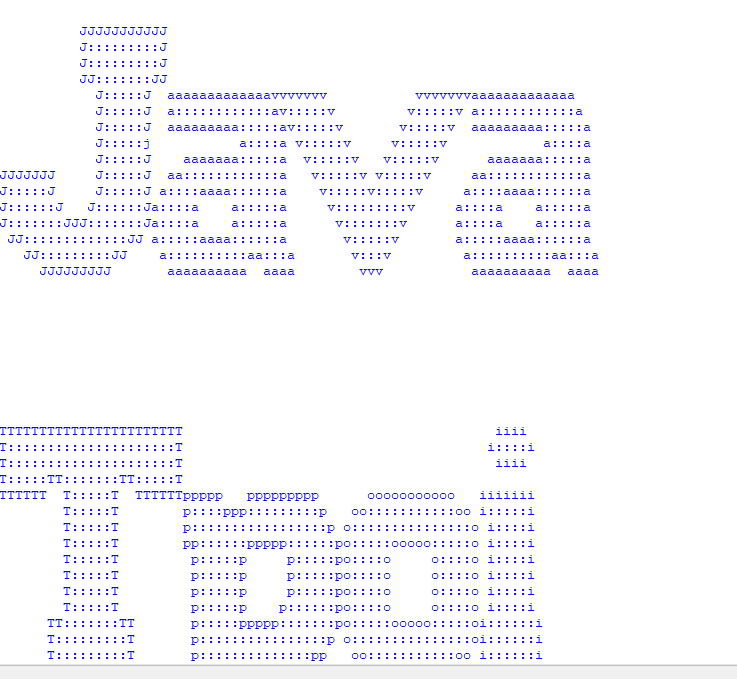
As we can see, the input given texts are printed in the output with the doh style fonts, and that's how we can print doh pattern texts in the output using this module. Example 6: Using the Letters Font Pattern:We will here print the input given encoded text in the letters font pattern by providing the 'letters' keyword as the font argument inside the figlet_format() function. Look at the following example program where we printed input given texts in the letter font style in the output: Output: 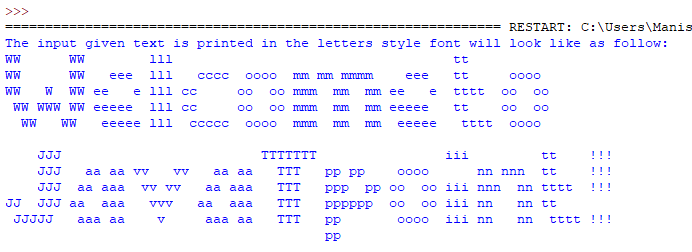
As we can see, the input given texts are printed in the output with the letter style fonts, and that's how we can print letters pattern texts in the output using this module. Example 7: Using the Bubble Font Text:We will here print the input given encoded text in the bubble font by providing the 'bubble' keyword as the font argument inside the figlet_format() function. Output: The input given text is printed in the bubble style format will look like as follow: _ _ _ _ _ _ _ _ _ / \ / \ / \ / \ / \ / \ / \ / \ / \ ( W | e | l | c | o | m | e ) ( t | o ) \_/ \_/ \_/ \_/ \_/ \_/ \_/ \_/ \_/ _ _ _ _ _ _ _ _ _ _ _ / \ / \ / \ / \ / \ / \ / \ / \ / \ / \ / \ ( J | a | v | a | T | p | o | i | n | t | ! ) \_/ \_/ \_/ \_/ \_/ \_/ \_/ \_/ \_/ \_/ \_/ As we can see, the input given texts are printed in the output with the bubble style fonts, and that's how we can print bubble pattern texts in the output using this module. Example 8: Using the Digital Font Text:We will print the input given encoded text in the digital font by providing the 'digital' keyword as the font argument inside the figlet_format() function. Output: The input given text is printed in the digital style format will look like as follow: +-+-+-+-+-+-+-+ +-+-+ +-+-+-+-+-+-+-+-+-+-+-+ |W|e|l|c|o|m|e| |t|o| |J|a|v|a|T|p|o|i|n|t|!| +-+-+-+-+-+-+-+ +-+-+ +-+-+-+-+-+-+-+-+-+-+-+
Next TopicCreating an MCQ Quiz Game in Python
|
 For Videos Join Our Youtube Channel: Join Now
Feedback
- Send your Feedback to [email protected]
Help Others, Please Share


