| |

Age Calculator using Tkinter in PythonIn the following tutorial, we will learn how to build an age calculator with the help of the Tkinter library in the Python programming language. But before we get started, let us understand what Age Calculator is and how it works. What is an Age Calculator?An age calculator is a tool that allows users to calculate a person's age on any specific day based on their given date of birth. There are various methods of calculating a person's age depending upon the culture they belong to. However, most western cultures utilize the age system wherein if a person has lived for 13 years and 9 months, their age will be 13 years. This statement implies that a person's age is increased by 1 year on their birthday. Understanding the working of the Age CalculatorA definition from the Oxford dictionary says that "Age" is the length of time that a person has lived, or a thing has existed. The age calculation method includes comparing the date of birth of a person with the date on which the age is required to be calculated. Thus, a person's age is equal to the date of birth subtracted from the given date. The following equation states the same. Person' s Age = Given Date - Date of Birth (D.O.B.) The following are the steps that allow us to calculate someone's age from their date of birth to a given date: Step 1: Firstly, we will find the difference between the specified year and the birth year, i.e., Specified Year - Birth Year. Note that a fully completed year is considered. Step 2: Secondly, we will estimate the number of remaining months. Since we only consider a fully completed year, a certain number of months will be left out that require to be estimated. Step 3: Lastly, we will consider the remaining days. This provides us with the final age of a person. It is expressed in years, months, and days. Python Program to Calculate AgeLet us now create a Python program to calculate the age on the current date. We will define a function that will calculate the age for the given data. We will later modify this function and use it in the application we build later in this tutorial with the help of the Python Tkinter library. Example: Output: Simple Age Calculator Enter the birth year: 2003 Enter the birth month: 10 Enter the birth day: 25 Age: 18 Years 3 Months and 7 days Explanation: We have imported the date module from the datetime library in the above code snippet. We have then defined a function as calculate_age() that accepts an argument as 'birthday'. Within this function, we have retrieved the current date using the today() method of the date module. We have then checked whether the current day and month are less than the day and month of the birth and stored the Boolean result in a variable as day_check. We have then calculated the difference between the current year and the birth year. However, this difference is not enough. To get it correct, we must subtract 0 or 1 based on whether today precedes the birthday month and day from the year difference. This can be done by subtracting the Boolean value stored in day_check from the value stored in the year_diff variable. Note that the Boolean value will be converted from True to 1 and False to 0 under the operation. We have also calculated the remaining months by subtracting the birth month from the current month and stored an absolute value in a variable. We have done the same to calculate the remaining days. We have then printed the calculated age for the user. We have then defined the main function. Within this function, we have printed an opening statement for the user. We have then asked the user to input the year, month, and day. We have then stored the input data in the date format using the date() method. At last, we have called the function to calculate the age of a person. Let us start building the age calculator using Tkinter in the Python programming language. Project PrerequisitesIn order to start building the GUI-based Age Calculator project in Python, we will require the following libraries.
Since all these libraries come pre-installed with Python, there is no need for us to install them separately. Building the Age Calculator using Tkinter in PythonThe procedure of building the Age Calculator in Python is divided into several steps for better understanding. The steps we will need to execute are as follows: Step 1: We will start by importing the required modules. Step 2: We will then define some functions to manipulate the data in the application and modify the function to calculate the age that we defined earlier. Step 3: We will then create a main window for the application. Step 4: We will add widgets to the window and set the event triggers. Let us now understand these steps in detail. Importing the required modulesFirst, we will import all the necessary modules to help us build this project. These modules include the tkinter module to add a graphical user interface to the application and the date class from the datetime module to work with dates. Let us consider the following snippet of code illustrating the same. File: ageCalci.py Explanation: In the above code snippet, we have imported all the widgets and modules from the tkinter module. We have then imported the messagebox module from tkinter. At last, we imported the date class from the datetime module. Defining Functions to manipulate date in the applicationOnce we have imported the required modules for the project, it is time to start defining some necessary functions that will allow us to manipulate the data provided in the entry fields and calculate the resultant age. These functions include setting a different date, setting the current date, resetting all the entries, checking for errors, and calculating the age. Let us now understand what exactly these functions will do and the code of their implementation. Function to set Different DateThis function will allow us to configure the disabled entry fields' state to normal in the given date row so that the user can manually enter the date of their preferences and calculate the age for that particular period. Let us now consider the following snippet illustrating the same. File: ageCalci.py Explanation: In the above code snippet, we have defined a function as different_date(). Within this function, we have used the config() method and set the state parameter for the entry fields in the given date row along with the state of the current_date_button button to normal and different_date_button to disabled. This will allow the user to enter the data in these fields manually. Function to set the Current DateThis function will allow us to temporarily disable the state of the entry fields back to normal in the given date row, setting the current date in the fields so that the user can calculate the current age. Let us now consider the following snippet illustrating the same. File: ageCalci.py Explanation: In the above code snippet, we have defined a function as different_date(). Within this function, we have used the config() method and set the state parameter for the entry fields in the given date row along with the state of the current_date_button button to disabled and different_date_button to normal. We have used the set() method and set the current date in these fields. Function to Reset all the EntriesThis function will allow the user to delete the input data and calculated result and set all the configurations back to normal. Let us consider the following snippet of code illustrating the same. File: ageCalci.py Explanation: In the above code snippet, we have used the delete() method to delete the input data in the entries fields of the date of birth row. We have then used the config() method to set the value of the state parameters of the entry fields in the given date row along with the current_date_button button to disabled and the different_date_button button to normal. We have then set the values of the objects of the StringVar() class to the current date and displayed them in the entry fields of the given date row. We have also set the value of another object of the StringVar() class, displaying the result as an empty string in the result row. We have then used the focus_set() method to set the focus to the birth_year_field field. Reset FunctionWe will now define another function to be called when the user clicks the RESET button. This function will reset the entries and display a message box showing a success message. Let us consider the following snippet of code illustrating the same. File: ageCalci.py Explanation: In the above snippet of code, we have defined a function as reset(). Within the function, we have called the reset_entries() function. We have also displayed a message box showing a success message using the showinfo() method of the messagebox module. Function to Check the ErrorsThis function will check whether any entry field is empty or not and returns a message box displaying the error. The following is the snippet of code demonstrating the same. File: ageCalci.py Explanation: In the above code snippet, we have defined a function as check_for_errors(). Within this function, we have used the if-conditional statement to check if any entry field is empty. If so, we have used the showerror() method of the messagebox module to display the error. We then called the reset_entries() method to reset the entry fields and returned -1. Function to Calculate the AgeThis function will allow the user to calculate the age of a person. This function will retrieve the information from the filled entry field and check whether the input data is a date and, if so, calculate the age for the same. Let us consider the following snippet of code illustrating the same. File: ageCalci.py Explanation: In the above code snippet, we have defined a function as calculate_age(). Within this function, we have called the check_for_errors() function and stored the returned value in a variable, val. We then check if the value of val is equal to -1 using the if-else conditional statement. If not, we have retrieved the entered data using the get() method and stored the values in integer data type. We then used the try-except method to check if the entered dates were correct. We have also checked if the birth date is less than or equal to the given date and calculated the age for the same. To calculate the age, we subtracted the birth date from the given date and stored the days between the time in a variable, days_left. We have then divided the total seconds in the time by (365.242 * 24 * 3600) and stored the resultant value in integer data type. We have then used the set() method and set the age as the String value in the object of the StringVar() class. If the birth date exceeds the given date, we have displayed the error using the showerror() method of the messagebox module and called the reset_entries() function to reset the filled entries. If the birth date and given date are not in date format, we have raised an exception where we have displayed the showerror() method of the messagebox module to display the error if the entered date is out of range and called the reset_entries() function again. Creating the main window for the applicationWe will now create the main window for the application. This window will display all the widgets we will create later in this tutorial and allow us to interact with them so that we can calculate anyone's age with the help of a graphical user interface. We can easily create one such window using the Tk() class. We will also set the title, size, position, and background color using some of the methods offered by this class. Let us consider the following snippet of code illustrating the implementation of the Tk() class. File: ageCalci.py Explanation: In the above code snippet, we have created an object of the Tk() class of the tkinter module as gui_root. We then used the title() method with gui_root to set the application title. We have also used the geometry() method to set the size and position of the application. We have then used the resizable() method and set the values of its parameters to zeroes to disable the resizable option for better UI. We have utilized the configured background color of the application using the config() method and set the value of the bg parameter to "#FEECF". At last, we have used the iconbitmap() method to set the icon for the application. Adding Widgets to the main window and setting the event triggersOnce the main window is created, it is time for us to add different widgets to perform the different functions we defined earlier. These widgets include different labels, entry fields, and buttons. We will also add some frames to provide well-defined structures to the widgets mentioned above. Let us see the implementation of these widgets in the following snippet of code. Adding FramesFirst, we will start by adding some frames to the application since these frames will provide the structure to other widgets. We will use the Frame() widget to create the frames and place them on the window with the help of the pack() method. Let us consider the following snippet of code demonstrating the same. File: ageCalci.py Explanation: In the above code snippet, we have created several frames using the Frame() widget of the tkinter module. We have set the value of their master parameters to gui_root, the object of the Tk() class, and the main window. We have also set the background color to #FEECCF by specifying it as the values of their bg parameters. At last, we have used the pack() method specifying the padding for y-axis to 10. Let us now start adding the widgets to these frames. Adding widgets to the First Frame - header_frameWe will add a label to this frame to display a heading for the application. We will use the Label() widget to create a label and set its position in the frame with the help of the pack() method. Let us consider the following snippet of code demonstrating the same. File: ageCalci.py Explanation: In the above snippet of code, we created a label using the Label() widget and set the value of the master parameter to the header_frame frame we created earlier. We have also set the text, font, background, and foreground color. At last, we used the pack() method and set the position of the label on the window. Adding widgets to the Second Frame - entry_frameWe will now add widgets to the second frame. These widgets will include labels to display important texts, entry fields to enter data, and some buttons to manipulate these entry fields. We will use the Label() widget to create the labels, the Entry() widget to create the entry fields, and the Button() widget to create buttons. We will also use the grid() method to set these widgets in a grid format on the window. Let us consider the following snippet of code illustrating the same. File: ageCalci.py Explanation: In the above snippet of code, we have created some labels displaying the details like year, month, day, date of birth, and given date using the Label() widget. We have set the value of the master parameters of these widgets to entry_frame, a frame we created earlier. We have then used the grid() method to set the position of the labels in a grid manner on the window. We then used the today() method of the date module and stored the year, month, and day in different variables. We have then created some objects of the StringVar() class setting the master parameters to the entry_frame frame, and used the set() method to set the initial values to display in the entry fields. We then used the Entry() widget to create entry fields so the users could enter the requested information. We have again set the master parameters of these widgets to entry_frame and the textvariable parameters to the objects of the StringVar() class. We have then used the grid() method and set the positions of these entry fields on the window in a grid format. We then used the Button() widget and created two buttons to allow us to manipulate the entry fields. We have again set the values of the master parameters of these widgets to entry_frame and the command parameters to the functions we defined earlier. At last, we have used the grid() method to set the positions of these buttons in a grid format on the window. We have also configured these widgets' font style and size, background, and foreground color. Adding widgets to Third Frame - result_frameWe will now add widgets to the third frame. These widgets will include labels to display result, and some buttons to call the functions to reset entries and calculate age. We will use the Label() widget to create the labels, and the Button() widget to create buttons. We will also use the grid() method to set these widgets in a grid format on the window. Let us consider the following snippet of code illustrating the same. File: ageCalci.py Explanation: In the above snippet of code, we have created an object of the StringVar() class and used the set() method to set the initial value as an empty string to display in the label. We have then created labels to display the result statement, and resultant age with the help of the Label() widget and set their master parameters to result_frame, a frame we defined earlier. We have then used the grid() method to set the position of these labels on the window in a grid format. We have also set the textvariable parameter of one label to the object of the StringVar() class to display the result. We have then created two buttons using the Button() widget to call the functions to reset all the entries and calculate the age. At last, we have used the grid() method to set the positions of these buttons in the grid format on the window. We have also configured these widgets' font style and size, background, and foreground color. Running the applicationWe will now use the mainloop() method of the Tk() class to run the application. The following is the snippet of code illustrating the same. File: ageCalci.py Explanation: In the above code snippet, we have used the mainloop() method to run the application. Now that the project code is complete, it is time for us to save the file and run the following command to execute the project program. Syntax: Before we see the result, let us consider the complete project code of the 'Age Calculator using Tkinter' program. The Complete Project CodeThe following is the complete project code of the 'Age Calculator with GUI' program. File: ageCalci.py Output: 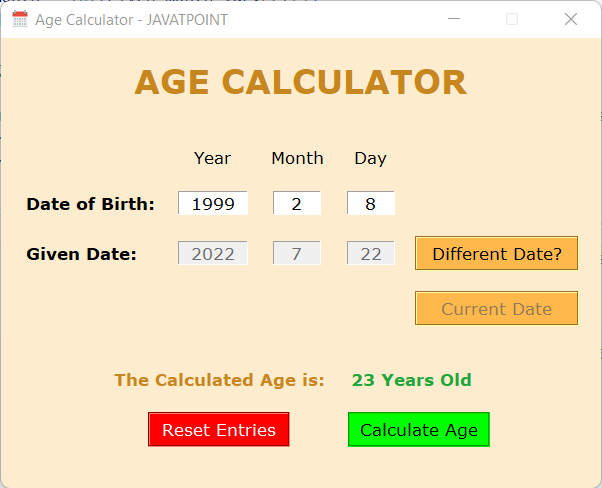
Next TopicHow to Iterate a Dictionary in Python
|
 For Videos Join Our Youtube Channel: Join Now
Feedback
- Send your Feedback to [email protected]
Help Others, Please Share


