Space Invaders game using Python
Introduction
The user of the static shooting game Space Invaders slides a laser across the bottom of the screen in order to fire at the aliens beyond them. As they approach the edge of the screen, the aliens shift lower and move in a group to the left and right.
The objective is to use gunfire to kill every alien. In other words, don't get killed so you can strike the invaders back. If the user always has three lives, the game finishes immediately if the invaders (aliens) touch the bottom of the screen.
We will create a straightforward but fully working version of the well-known game Space Invaders using Python and Pygame. Using Pygame and Python, one of the most well-liked programming languages, a range of game apps may be created fast.
We'll learn how to code a Pygame program and use Pygame logic to make our games in this tutorial. One can also add pictures and music to the window's backdrop. We will also be able to detect collisions and control object movement.
Game guidelines
- Once some time has elapsed, the aliens should go toward the bottom.
- The game should end when the aliens come in contact with the bottom edge.
- The user's spacecraft can only move in one of two directions: right or left.
- There should be a score counter. We score a point if we manage to hit the alien.
Procedure for building Space Invaders game
- Install the Pygame program first.
- Expanding users and encroachers.
- Automating spaceman movement and user movement by using the keyboard.
- Automatic random space invader fire with keyboard-controlled user shooting.
- Identify item collisions and respond appropriately.
Source Code Snippets and explanations
Explanation of the above Code:
- Line 1: Importing the math library in Python is necessary to grant access to the arithmetic operations described in the C standard.
- Line 2: The Python import random library includes several functions for generating or altering random numbers. The random() mumbo jumbo number generator function is used by the randomly built-in functions in Python to generate random float integers between 0.0 and 1.0.
- Line 3: It imports into the python programming package all the available pygame components.
- Line 4: The mixer library contains classes for loading Noise objects and controlling playback.
Explanation of the above Code:
- Line 2: Pygame.init initializes all loaded pygame modules (). A tuple with the total number of unsuccessful and successful inits is returned if a module fails, but no exceptions are raised.
- Although starting everything quickly with pygame.init() computer boots up all imported pygame modules, you can always initialize particular modules individually. A module's init() method will throw an exception if it doesn't succeed.
- Line 4: The screen will be made as a result. When the display option in PyGame is changed, a visible picture surface is created on the monitor.
- This surface has two display options on systems with a window manager: full-screen and windowed. The display surface is an ordinary PyGame surface object.
Explanation of the above Code:
Line 2: Using the function image is all that is necessary to add the backdrop image. The path of the image should be loaded and sent.
Line 4: The loading and playback of a music name or file object will occur. If a music stream is currently playing, it will be halted. The song does not start playing as a result.
Line 5: This will be used to play the supplied music stream. If a piece of music is playing, it will stop and start again.
Explanation of the above Code:
- Line 2: The actual window caption will be set.
- Line 3: The pygame. image.load() method will return a Surface object with the photograph drawn. This Surface Object is going to differ from the Surface Object as the display Surface Object.
- Line 4: The image can be changed using it.
Then the pygame.image.load() method will return a Surface object with the image drawn. This material object will not be the same as the display surface object. Setting the user's X coordinate. Also, Setting the user's Y coordinate. Simultaneously updating the user change X coordinate.
Explanation of the above Code:
- Setting the foe's list in line 2.
- The initialization of the opponent X coordinate list is in line 3.
- The initialization of the opponent X coordinate list is in line 4.
- The initialization of a foe update in the X coordinate list is in line 5.
- The initialization of a foe update in the Y coordinate list is in line 6.
- Initialization of the num of foes variable, which counts the foes in line 7.
Explanation of the above Code:
Running a loop over the num of foes variable to add and modify the foe X and Y locations. Using the image to append the foeImg.load(). In this example, we used the random operation of the random library to determine the foe's X position at random. In this example, we used the random operation of the random library to determine the foe's Y location at random. Then, addition of the foe's X position change. At last, adding the foe's new Y location.
Explanation of the above Code:
- The score value variable is initialized in line 2.
- Using pygame.font, change the font to "freesansbold.ttf.Font()" in line 3.
- Initialization of the text's X coordinate in line 4.
- Initialization of the text's X coordinate in line 5.
Explanation of the above Code:
- Line 1: Setting the font to 'freesansbold.ttf' using pygame.font.Font()
- Line 2: x & y are the parameters for the method show score(x,y).
- Line 3: Create a surface object, or a Text surface class with text drawn on it, using the render() procedure of the PyGame font object.
- The blit(x,y) technique directs us to sketch the screen's backdrop and position it at (x,y)
Definition of the function game over text in line 5. Then create a Text surface class, or a surface type with text drawn on it, using the render() procedure of the PyGame font object. The screen in line 7, we used blit(x,y) technique directs us to sketch the screen's backdrop and position it at (x,y).
Explanation of the above Code:
- Line 1: Specify the arguments for the function def user (x,y)
- Line 2: The blit(x,y) technique directs us to sketch the screen's backdrop and position it at (x,y)
- Line 3: Creating the function def foe(x, y, I with the arguments x, y, & I
- Line 4: The blit(x,y) technique directs us to sketch the screen's backdrop and position it at (x,y)
Explanation of the above Code:
- line 1: The function def fire shot(x, y) is defined, and its parameters are x and y.
- The shot state is defined as global and initialized to "fire" in line 3.
- Line 2: We are instructed to draw the backdrop surface onto the screen and position it at (x,y)
- Line 3: The function definition isCollisionHappened(foeX, foeY, shotX, shotY) with the arguments foeX, foe, shot & shotY.
- Line 4: Using the path formula, calculate the path.
Applying the if conditional statement to the path value in lines 3, 4, 5, and 6 to determine if it will return 1 or 0
Explanation of the above Code:
- Line 2: The running variable is initialized to TRUE.
- Applying a while loop to a running variable on line 3
- Line 4: This technique fills the display with the given color.
- Line 6: According to the screen.blit(x,y) function, we must draw the screen's backdrop surface and position it at (x,y). Also, applying for loop over in time participating.
- Applying the if conditional statement to the event.type value in lines 4 and 9 will determine whether the event.type == pygame.
Explanation of the above Code:
Line 1: Applying the boolean expression if on the event.key to see if event.key == pygame.K SPACE and if it is true, then Line 2, 3 & 4: Applying the boolean expression if on the shot state to see if shot state == "ready" and if it is true, then we will play the sound "laser.wav". The user is given a shot in line 3. With the arguments shot and shotY, the function fire shot(shotX, shotY) is called in line 4.
Lines 5 and 6: Applying the boolean expression if on the event.type to see if event.type == pygame.KEYUP, and if it is, then Lines 6: Applying the boolean expression if on the event.key to see if event.key == pygame.K LEFT or event.key == pygame.K RIGHT, and if it is, we'll change the user coordinate to 0.
Explanation of the above Code:
- Python's += operator adds two values and stores the result in a variable, as shown in line 3. This operator's name is the addition assignment operator. This operator is typically used to add values to augmentative and alternative communication, which counts the occasions when something has happened. It is the userX=UserX+UserX change in our example.
- Lines 4 and 9: By applying the conditional statement if to the userX, we can determine if userX = 0 and, if so, initialize userX to 0 if it is true.
- Lines 6 and 7: If userX >= 739 is true, we will initialize userX=739, and if not, we will apply the conditional expression; otherwise, if again, to userX.
Explanation of the above Code:
- Line 2: Performing a loop over several adversaries to track hostile Movement.
- Applying the if condition to foeY[i], check whether foeY[i] > 340 and if it is true, we apply the for loop through the num of foes to initialize foeY[j] = 2000.
- Lines 6 and 7: Calling the game over text() function and exiting the loop
- The addition assignment operator is used again for foeX[i] += foeX change[i]. Using the if condition to the foeX[i] to determine if foeX[i] = 0 and, if so, initializing foeX change[i] = 4. Furthermore, using the addition assignment operator for foeY[i] += foeY change[i]. Next, we apply the conditional expression elif to foeX[i] to see if foeX[i] >= 739. If it is, we initialize foeX change[i] to -4, then we use the addition assignment operator to make foeY[i] += foeY change[i].
Explanation of the above Code:
- Lines 2, 3, 4, and 5 are for the collision to see if it happened. If so, the sound "Explosion.wav" will be played first. Initializing shotY to 389 and shot state to "ready" at line 6.
- Line 7: Using the Addition assignment operator, increase the score value variable.
- Line 8: That used the randint() function, an integer number between 0 and 739 is randomly assigned to foeX[i].
- Line 9: That use the randint() function, an integer value between 99 and 199 is randomly assigned to foeY[i].
- Line 10: Calling the foe function with the arguments foeX[i], foeY[i], & i.
Explanation of the above Code:
Using the boolean expression if on the shot state to determine whether shot state == "fire" and, if so, invoking the function fire shot(shotX, shotY) with the parameters shot and shotY as well as using the additional assignment shotY -= shotY change. This is done to allow the shot to move.
Invoking the functions user(userX, userY) and show score(textX1, testY1) with the userX, userY, and testY1 parameters, respectively. Lastly, the Score will be updated and displayed on the screen.
Consolidated Code for Space Invaders game using Python Pygame Module
Output:
pygame 2.1.0 (SDL 2.0.16, Python 3.8.12)
Hello from the pygame community
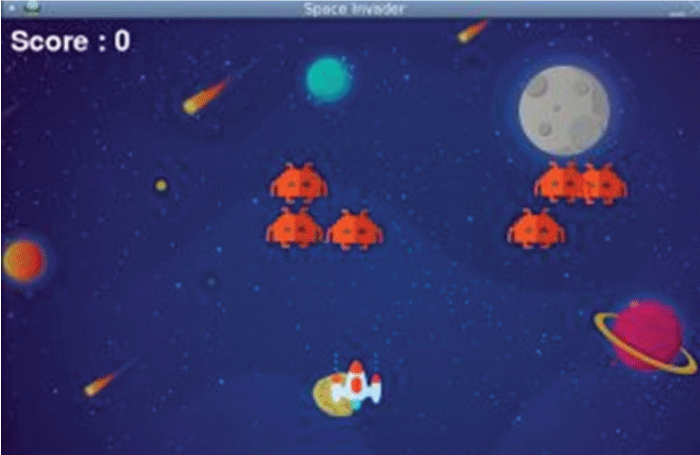
Figure 1: Space Invader Game screen

Figure 2: Screen of Game Over
Conclusion
The Python Pygame package and the procedures we used to develop the space invader game have been discussed in this blog. A Python library called Pygame can be used to make different games.
|

 For Videos Join Our Youtube Channel: Join Now


