| |

Python Pexpect ModuleWe all know about the desktop operating systems and their functions and working. Some of the most famous operating systems which all of us must have heard of are Windows, Linux, macOS, and ChromeOS. Among them, chromeOS is also a Linux-based operating system for the desktop, which increases the popularity of Linux and Linux-based operating systems. Linux is a very popular operating system among programmers and developers because of the enhanced security features. But at the same time, it is not that much among general people, and the biggest reason behind this trend is the complex commands used to operate and work on the Linux operating system-based desktop. Now, talking about Linux, it is a desktop operating system from the family of UNIX-like operating systems, first released by Linus Torvalds in 1991 on September 17. Other than its security features, the other, or we can say the most attractive thing about Linux, is that it is an open-source and free licensing software based on the FOSS (Free Open-Source Software) model. Unlike windows and many other desktop operating systems, Linux is absolutely free, and one can download its latest versions with hundreds of distributions. Other features that Linux offers to developers are faster interpreters and compilers, the option to do heavy customization, less OS complexity, and many others. But what if we don't have Linux OS and still want to use Linux commands. There could be many reasons for doing this, including we may want to get familiar with Linux commands, etc. Maybe not all programming languages, but Python offers us this option to run Linux commands on Windows or any other operating system. For this, Python has the pexpect module, which gives us the option to automate the Linux commands through a Python program using its functions. Therefore, we will learn all about this pexpect Module of Python and understand how we can run Linux commands through a Python program using it. Introduction to Pexpect Module of PythonPexpect is a Python package used to perform many functions, including automating Linux commands through Python programs, spawning child processes and after that automatically controlling them, etc. Pexpect module is a very rich module of Python that comes with lots of functions to perform many different tasks. Pexpect module works as a span child, and it responds to the expected pattern; we define using the Python program to perform several functions. Following are some useful functions that we can perform using the pexpect module of Python:
Installation of Python Pexpect ModulePexpect is not an in-built package of Python (it doesn't install along with the Python installation), and that's why if this module is not present in our system already, we have to perform installation of this module. We should first make sure that the pexpect module is already installed in the system or not because we will not be able to perform implementation without having this module present in our system. If the Pexpect module is already not installed in our system, we can install this module through multiple methods, and among all the possible installation methods, installing the pexpect module with the pip installer is the simplest and easiest one. That's why we will use pip installer in this section for installing this module in our system, and in this method, we will use the following pip installer command: We have to write the above-given command in the command prompt terminal shell, and after writing the command, we have to press the enter key so that the pip installer will start installing this module in our system. Once the installation process of this module begins, it will take a while to install the module in our system successfully, and we have to wait till then. 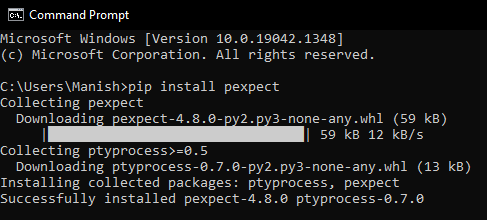
As we can see, a successfully installed message is displayed on our screen, which means that the pexpect module is now successfully installed in our system. Now, we can move forward with the implementation part of the Pexpect module and start importing it into example programs to understand it's working. Automating Linux Commands with Pexpect ModuleHere, in this part, we will automate Linux commands through Python programs by Importing the Pexpect module into them. We have three methods in the pexpect module, which we can use to automate the Linux commands through a Python program. Following are the three methods of pexpect module which we can use to automate Linux commands:
We will understand the implementation of all three methods that are listed above by using them in an example program. We will use a separate example program for each method and automate the Linux command through it. Note: All the pexpect module methods listed above can only run in UNIX-based operating systems, and none of them are available for windows. Therefore, if we run these methods or, example programs, it will show an error in the output. First, we have to set up a Virtual environment for UNIX-based OS if we want to run these programs in the Windows operating system.Method 1: Using run() MethodWe have a run() function in the pexpect module, which we can use to run and execute a command. We can use pexpect.run() method to execute a Linux command by providing it as an argument in the function, and then, we can return the result of the execution in the output. The run() function can be used as a replacement for the os.system method, which is used to execute Linux commands. Syntax for run() Method: Following is the syntax for using the run() method of the pexpect module to execute Linux commands: As we can see in the syntax above, we have provided a Linux command as an argument in the run() method. When we run the program, the run() method will execute the Linux command provided and show the result in the output. Let's understand the implementation of the run() method for executing Linux commands through the following example program. Example 1: Look at the following Python program where we executed a Linux command: Output: The result after executing Linux commands through run method: Welcome to JavaTpoint! As we can see, the Linux command is successfully executed, and the result is printed in the output. Explanation: After importing the pexpect module as px in the program, we have used the run() method with an example Linux command to echo 'Welcome to JavaTpoint!' and we stored it in an initialized variable, i.e., executionResult. Lastly, we printed the execution result in the output using the print statement. Method 2: Using Spawn Class MethodIn this method, we will use a spawn class that will help us automate the Linux commands given in the program. Spawn class is the main interface by which we can start a new child process during the execution and control it through the child classes. The string argument we give in the spawn class can be replaced by the shell command (whenever needed), which must be executed in the program. Syntax for Spawn class: As we can see, we have provided a Linux command as an argument in the spawn class, and it can be replaced by the shell command, which has to be executed. When using the spawn class method, we can use the expect() function with it, which is also an important method of spawn class. The expect() method waits for the child class (defined by us for the spawn class) to process so that it will return one of the given string inputs. When we run the program, the pattern we will specify in the spawn class function will be matched with the input strings defined in the child class, and the matching string will be returned in the output. The expect() used in the child class will return the position of the string where the input pattern of the spawn class is matched in the output. Syntax for the expect() Function: We have to use the expect() function in the child class of spawn method like the syntax given below: Arguments: As we can see in the syntax of expect() function given above, this function takes the following three arguments:
The timeout value used in the expect() function to raise the return value will be pexpect.TIMEOUT. We can use the searchwindow option of the expect() function to set the maxread value of the class. Let's understand the implementation of the spawn class method with expect() function in the child class through the following example program. Example 2: Look at the following Python program where we have matched input pattern defined in the spawn class: Output: The defined pattern in the spawn class is matched at the index number: 2 from the input strings given in expect function As we can see, the index number of the input string, which is matched with the defined pattern, is printed in the output after executing the spawn class. That's how we can match input strings given in the expect() function at the child process with the pattern defined in the spawn class. Since index numbering starts from 0, that's why index number 2 is printed for the place of input string at 3rd position. Explanation: We have used the spawn class to start a child process after importing the pexpect module as px in the program. While starting the child process, we have defined a pattern as 'JavaTpoint', which we will match with the given input strings. After that, we have used the expect() function, where we have defined multiple input strings. The index number of the string, which will be matched with the defined pattern, will be stored as a result in the initialized variable. Lastly, we printed the result with an initialized variable by using it in a print statement. Method 3: Using the sendline MethodIn this method, we will use the sendline() function after starting the child process with the spawn class. The sendline() method will write over the string for the pattern defined for the child process. Sendline method is also used to return the number of bytes consumed by the pattern string defined by us, but we will only use this method for matching patterns from input strings in this part. This method is used to automate the Linux command when we write the string for the child process. Syntax for the sendline Method: Following is the syntax for using the sendline method of pexpect module for writing matching pattern for child process: As we can see, the sendline function takes only one argument, which is the pattern for the child process. We can understand the implementation and application of the sendline method through the following example program: Example 3: Look at the following Python program where we have used the sendline() function to write the matching pattern for the child process: Output: The defined pattern for the child process by the sendline method is matched at the index number: 0 As we can see, the index number where the input string from the expect() function is matched with the defined pattern by the sendline method is printed in the output after execution. That's how we can define and match the pattern for the child process using the sendline method. Explanation: After starting the child process, we have used the sendline() function, where we have defined the pattern for the child process. Then, we matched the defined pattern with the input strings are given in the expect () function. Lastly, we printed the index number of the input string, which is matched with the defined pattern for the child process.
Next TopicPython Optparse Module
|
 For Videos Join Our Youtube Channel: Join Now
Feedback
- Send your Feedback to [email protected]
Help Others, Please Share


