| |

Build a Content Aggregator in PythonThis project-based lesson aims to teach you how to use Python and the well-liked framework Django to create a content aggregator from scratch. It can take a lot of time to visit multiple websites and sources to read the information on your favourite subjects because there is so much content released online every day as you can use them to view all the most recent news and stuff in one location, which is why content aggregators are so well-liked and effective. This lesson will be helpful if you're seeking for a project for your portfolio or a way to expand future projects beyond basic CRUD features. 
You will discover how to:
What You'll Create in a Demo By carefully following this guide, you can create your pyCasts! Podcast content aggregator in Python. The program will be a single web page that lists the most recent Talk Python to Me, and The Only Python Podcast shows in Python. After finishing this tutorial, you can put what you've learned into practice by adding new Podcast feeds to the program. Project OverviewIt would help if you took the following actions to display the content to the user:
Throughout this tutorial, you'll go over each of these. You will now consider the frameworks and technologies you employ for the actions above. 
You'll learn to utilize the feedparser library to parse and fetch the Podcast RSS feeds into your application. With the Django ORM, you'll use this module to marshal the feed's data into a Show model and save the most recent shows to the database. Although you could manually run this code regularly by adding it to a script, that would defeat the purpose of using an aggregator to save time. Instead, you'll discover how to use a custom administration command, a Django feature. You'll use Django to execute your code to parse and save the data. The django-apscheduler module will assist you in creating a schedule for your function calls, often known as jobs. The Django admin interface may then be used to see which jobs ran when. This will guarantee that your feed is automatically fetched and parsed without any admin involvement. PrerequisitesYou need to be familiar with the following ideas and tools to get the most out of this tutorial:
You might learn more if you just get started. If you run into trouble, you may pause and reread the materials above. Step 1: Setting Up Your ProjectYou will have finished setting up your environment, installing your dependencies, and setting up Django by the time you finish this step. Create your project directory first, then change the directory there: You should establish and activate your virtual environment now that you are in the project directory. To do this, choose the tool that makes you the happiest. This illustration employs venv: You must install the necessary dependencies to finish the project when your environment has been activated and pip has been upgraded. A requirements.txt file can be found in the tutorial's source code that can be downloaded: Install the pinned requirements by navigating to the source code setUps// subdirectory. Make sure to replace the real path to the downloaded file in the path to requirements.txt>: Django, feed parser, django-apscheduler, and related dependencies should now be installed. Set up Django and begin creating now that you have everything you need to get started. The following four steps must be followed to finish this build step:
Since you are familiar with Django, you won't go in-depth about these steps. You should execute the following commands: You need to make one more modification after following Django's instructions and finishing the creation of your superuser account before running the programme. Add the file to the settings.py file, even though the program will still function without it: It's time to test out your brand-new Django project. Launching the Django server On your browser, go to localhost:8000 to view Django's standard success page. Step 2: Building Your Podcast ModelYour environment should be set up, your dependencies should be installed, and Django should run smoothly at this point. You will have defined, tested, and migrated a model for Podcast shows to the database by the end of this step. There should be more to your Show model than just the information you want to capture as a developer. Additionally, it should reflect the user's desired information. It may be a mistake to begin writing your model immediately and diving into the code. If you do that, you may soon lose sight of your user's perspective. After all, applications are intended for users, including developers like you. Using pen and paper might be helpful, but you should do what works for you. When writing database models, this can be a useful strategy because it can prevent you from adding additional fields later and performing unnecessary migrations. Describe the specifications for your project from both the user's and the developer's perspectives: I would like to as a user:
I would like to: in my capacity as a developer: - Have a distinctive property for each show so I can prevent database duplication of shows. This final aspect will be discussed in more detail in step 4 of this guide. According to the specifications you provided, the Show architecture in your podcast app should resemble the following: Before you transfer the model into the database, there is one more thing to accomplish. The type of the primary key generated automatically can now be changed in Django 3.2. Unlike the Integer default in earlier Django versions, the new default is BigAutoField. To run the migrations right now would result in the following error: By including an extra line in the PodcastsConfig module in the app.py file, you can prevent seeing this error: Your app is now set up to assign a primary key to each model automatically. Also, you have a model that represents your data and a vision of how it should appear. Now that your Show table has been added to the database, you can perform the Django migrations: It's time to test it now that the changes have been migrated! Because a lot is covered in this lesson, you will use Django's built-in framework for your unit tests. Feel free to redo the unit tests with pytest or even another court on the basis if you'd prefer after finishing the project in this tutorial. You can add them to your podcasts//tests.py file: Use.setUps() to define a sample Show object in the code above. To ensure that the model performs as predicted, you can test a few Show attributes. Testing the string representation of the models that you created in Show. str__ is always a smart idea (). When debugging your code, you'll see the string representation; if it presents the data as expected, debugging will be made simpler. You may now carry out your tests: Congratulations if your test runs successfully! Now that you have a solid foundation for your content aggregator and a clear data model, you can move on. Time for phase three. Step 3: Creating Your Homepage ViewBy this point, your Show model should be implemented in a Django application that runs smoothly and passes unit tests. Building the homepage's HTML template, adding the necessary CSS and assets, adding the website to your views.py file, and testing that the site renders properly are all done in this stage. Static and template folders are in the source code setUps// folder you downloaded. These directories should be copied to the pycasts// project root folder. Don't forget to add the dot (.) to copy the file into the current working directory, and make sure to change the placeholder "source code setUps path" with the access route you saved on your local computer: It's time to connect everything, so Django knows that the directories containing the HTML layouts and static files exist. Pathlib is used by Django 3 in this tutorial for file paths. Go to the settings.py file in the content aggregator app's main menu. The templates// folder you previously made should be added to the DIRS list after you scroll down to the TEMPLATES section. Although Django is now aware of the existence of your static assets and template, you still need more. You still have a few items to cross off the list before you can connect everything you've done thus far:
It isn't important in what order you establish your homepage view and URL paths. Both must be completed for the application to function properly, but you can begin by creating your view class first. Open your views.py file in your podcasts app and change the existing code with the following: Django includes class-based views by default and its more well-known function-based views. To transmit the podcast series to the homepage, you utilize a class-based view in the code above:
Give your website a URL at this point. First, you must create a urls.py file in your podcasts app. Congrats on making it this far! You should be able to launch your app and view the homepage now. As previously, launch your application with the command python manage.py, run server and navigate to localhost:8000. The homepage appears to function, but there is no content. Unit tests can still be used without it to check that the content will display properly. You developed functional testing for the model in step 2. Also, you produced a Show item to test against with.setUps(). Using the same test show data, you may check that your home template functions as expected. In addition to checking how shows appear on the homepage. It could seem excessive with a one-page application like this, and it most likely is. But you want to ensure that any application's future updates won't disrupt the current code as it develops. Also, if you're utilizing this project as a component of your portfolio, you should demonstrate that you understand The new test method to add to one podcasts//tests.py file is indicated in the text below: The same as previously, you can use Python manage.py test to run your unit tests. Congratulations if, at this point, all of your tests are successful! In this phase, you successfully developed the view class, connected your URL routing, and established your HTML template and assets. Also, you added more successful unit tests. You are now prepared to proceed with the following action. Step 4: Parsing Podcast RSS FeedsYour application ought to be looking fairly excellent at this point! You already have all you require to begin contributing content. By the end of this stage, you should be confident in your ability to parse an RSS feed and extract the information you require using the feedparser library. What precisely is an RSS feed before you start parsing one? To parse a feed with feedparser, you can use parse(): You may also access a unique attribute called.entries in a feed that has been parsed using feedparser. This enables iteration across each of the feed's components. You may use.entries to verify the guides of each podcast show once you've added podcast shows to your database. Note: Before putting the following code snippet into practice. Just read it through. Go over this code quickly to understand how to use feedparser. Similar code will be written in the following step when you develop and apply a Django custom command to your project.It would be best if you converted it into a datetime object You aren't yet placing this code into a file since you don't have a reliable mechanism to execute it inside of Django. Explore using a custom command to run your parsing function now that you are familiar with using feedparser. Step 5: Constructing a Custom Django CommandAlthough you learned how to utilise feedparser in the previous step, you still lacked a practical means of executing code that communicates with the Django ORM. The manage.py file is used by custom commands to execute your code. Including the RSS parsing code that you created in the previous step, and then try to add some entries to your database. Update your startjobs.py code right away: While nothing prints to the screen this time when you run the custom command, you should now see podcast shows from The Only Python Podcast on your homepage. You can give it a shot. Have you received something that resembles this image? Congratulation in that case. It paid off. In the following step, you will learn how to add additional feeds after exploring custom commands and setting up the first feed. AggregatorAt this point, your custom command for parsing The Only Python Podcast feed should be operational. You will have learned how to add more feeds to your custom command at the end of this step. You might be tempted to repeat the same code for each podcast feed now that you have a single feed that your custom command can successfully parse. But that wouldn't be a good way to code. You want code that is DRY and easier to maintain. You can use the parsing code on each item in a list of feed URLs by iterating over them. In most cases, that would work. However, there are more viable alternatives due to the way django-apscheduler functions. More on that in the following section. As an alternative, your code has to be refactored to include a parsing method and a separate function for each stream you need to parse. Then, for now, you'll call these methods independently. Note: As was said at the beginning of this course, you are now concentrating on just two feeds. Once the training is through and you understand how to add more, you may dive in and practise by selecting other RSS feeds to add.Meanwhile, Michael Kennedy of the Speak Python to Me Podcast was so kind as to give his permission to use his podcast feed in this guidse. I'm grateful, Michael. You'll now investigate how this will seem in your code: As mentioned, you made the parser code reusable by separating it from the various feeds. You must add a new top-level function for each additional feed you add. Using fetch realpythons shows() and fetch talkpython shows(), respectively, you've achieved this using The Only Python Podcast and the Talk Python to Me Podcast in this example. You can proceed to the following phase, where you'll examine how to automate the custom command and set a schedule for running it now that you understand how to add more feeds to your program. Step 7: Scheduling Tasks With django-apschedulerBy now, you should have at least two RSS feeds queued up and prepared to be analyzed each time your new custom command is executed. The APScheduler library is implemented in Django through the django-apscheduler package. Note: See the official APScheduler docs for more information about APScheduler and all the parameters you can use. On the project's GitHub page, you can get additional information about django-apscheduler.In your virtual environment, django-apscheduler is already installed. You must also add it to INSTALLED APPS in your settings.py file in order to install it in your application: You'll see briefly how django-apscheduler works now that it's installed in your application. Please refer to the official documents for more in-depth explanations. A job is a task that you want to run in your custom command. Your application will contain three jobs in total: one for each webcast feed you wish to parse and a third for erasing old positions from the information base. Your jobs will be stored in the database by the django-apscheduler package, along with all successful and unsuccessful job runs. As the site administrator or developer, having this history is great because it lets you see if any tasks fail. However, suppose these are not removed from the database regularly. In that case, your database will quickly become full, so removing any previous history from the database is the best practice. A schedule will also be followed for this. Even though the job history will be stored in the database, logging any errors for debugging is a good idea. This code can be added to settings.py to add some basic logging settings to your application: Your custom command class should now look like this: Python manage.py startjobs can be used to execute the custom command in a single terminal as before. Start your Django server in a different terminal process. You may now browse the history on your admin dashboard and see that your jobs have been registered: 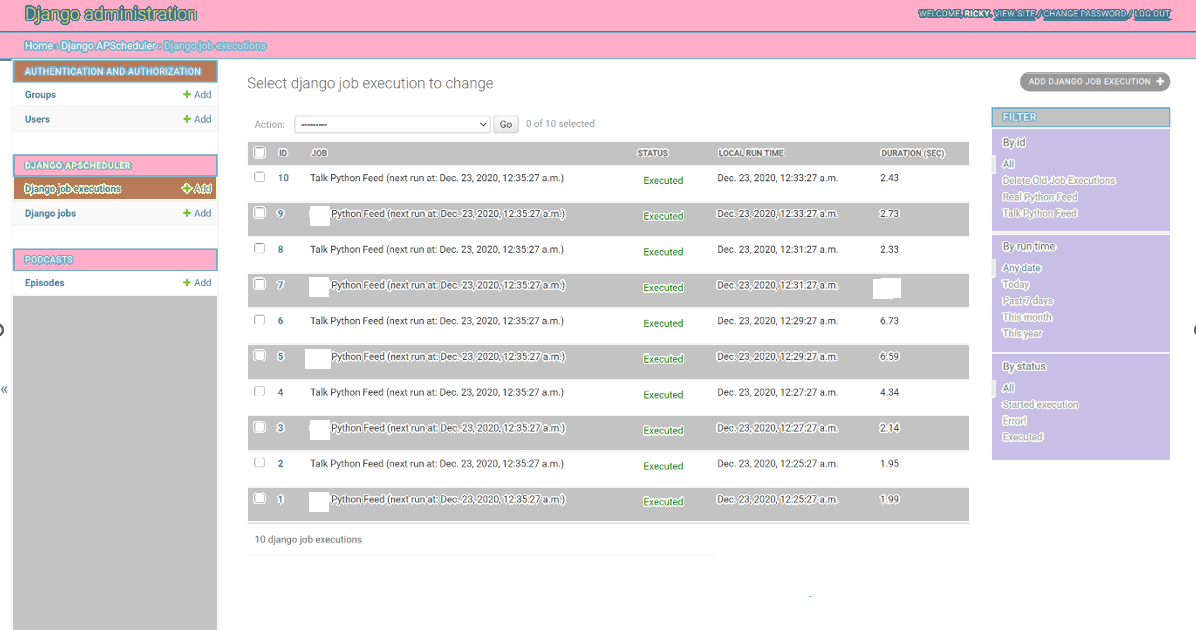
There was a lot going on in this final phase, but you finished and now your app works! You've mastered the use of django-apscheduler to schedule the execution of a custom command automatically. No easy task. Good work! It's never quick or easy to create a project from scratch, such as a content aggregator, therefore you should feel pleased with yourself for seeing it through to completion. No matter how senior you get, trying something new and a little challenging will only help you evolve as a developer. ConclusionYou covered a lot in this project-based tutorial. Great job! In this tutorial, you have learned how to:
Next TopicDenomination Program in Python
|
 For Videos Join Our Youtube Channel: Join Now
Feedback
- Send your Feedback to [email protected]
Help Others, Please Share


