| |

Random Password Generator in PythonIn the following tutorial, we will build a Random Password Generator in Python. The "Random Password Generator" is a program that will generate strong random passwords of the specified length with the help of the alphabet, numbers, and symbols. Let us first understand the prerequisites and build the intuition of the program so that the implementation can become simpler. But before we start, a good knowledge of Python programming language is necessary, along with a clear understanding of the random module and data structures to build a random password generator in Python. We will be utilizing the following:
We will mainly use the random module - A built-in Python module to generate random objects. We will utilize various methods of the random module in order to randomly select the letters of the password from the list of alphabets, numbers, and symbols. Moreover, a fundamental understanding of the Tkinter module and its related method will be very useful while implementing the Graphical User Interface (GUI) approach of building a Random Password Generator in Python. Let us now head on to understand the complete concept and the steps required for the development of a Random Password Generator in Python. Understanding the Concept of developing a Random Password GeneratorThe concept behind developing a "Random Password Generator in Python is quite easy, and its implementation is divided into different steps shown below: Step 1: First of all, we will create a string or list containing all the alphabets (both in small and capital letters), numbers, and symbols. Step 2: Secondly, we will accept the length of the required password as input from the user. Step 3: At last, we will use a loop iterating from 0 to the length of the password, and in every iteration, we will randomly select a letter from the set of letters defined above and store them into a resultant password. Let us refer to the following section for better clarity and implementation: Sample OutputSuppose the user inputs the length of the required password as 8; then one of the randomly generated passwords will appear as shown below: Output: A randomly generated Password is: iE@g#Jq0 Understanding the Requirements of the ProjectIn order to build a Random Password Generator in Python, we will require a good understanding of Programming in Python, such as the working of operators, loops, and functions. We will also use some data structures such as strings, lists, and more. Moreover, we will use different methods of the Python random module that will allow us to select among different values randomly. Some of the most important methods of the random module are randint(), sample(), seed(), choice(), and many more. If the following Random Password Generator program is, we will make use of some methods of the random module. Let us briefly discuss them before implementing them in the program.
In this tutorial, we will also use the Python Tkinter module to adapt a GUI (Graphical User Interface) for the program. Since both the modules are preinstalled as the Standard libraries of Python, there is no need to install them externally. So, let us get straight into the implementation part of the project. Steps to Build the Random Password Generator in PythonThe following are the steps to implement the random password generator in Python: Step 1: Firstly, we will import the required modules. Step 2: We will define a function to generate a password using all alphanumeric characters. Step 3: We will update the program to accept the password length as the user input. Step 4: We will update the program again to generate multiple passwords. Step 5: Finally, we will integrate Graphical User Interface (GUI) in the Password Generator using Tkinter. Let us now understand the implementation of the above steps in detail. Importing the Required ModulesWe will start by importing the random module. The following is the snippet of code demonstrating the same. File: passGen.py Explanation: In the above snippet of code, we have imported the random module. Defining a Function to Generate the Password using All Alphanumeric CharactersNow that we have imported all the necessary modules in the program, it is time to start defining a function that will allow us to generate the password with the help of all alphanumeric characters. Step 1: We will start by defining a function that will return a randomly generated password. This function will accept one parameter signifying the length of the password to be generated. Step 2: We will create a string or list containing all the alphabets (small and capital letters), numbers, and symbols. Step 3: We will initialize an empty string to store the randomly chosen password. Step 4: At last, we will run a loop iterating from 0 to the length of the password. We will randomly select a character from the character list with the help of the random.choice() method and add the selected character to the password string. Finally, we will return the password string. Let us consider the following snippet of code illustrating the same. File: passGen.py Output: A randomly generated Password is: &xCC@5X) Explanation: As we can observe in the above output, the generated password has some repeated character(s). However, we can generate a password consisting of a unique character with the help of the sample() method of the random module. The sample() method only selects unique value(s) from the given sequence. The length of the required password sequence can be specified later. Therefore, we will provide the value of len into the sample() method so that we don't require to utilize the loop. Let us consider the following snippet of code illustrating the implementation of the same for better understanding. File: passGen.py Output: A randomly generated Password is: LAz%^Ugq Updating the Program to accept the Password Length from the UserNow that we have defined the function, we need to generate a password of a given length, it is time for us to make one adjustment to the program. As observed in the previous program, we have explicitly added the length of the required password. We can also accept the user's password length by using the input() method in Python. Let us consider the following snippet of code illustrating the same. File: passGen.py Output: Enter the length of the Password: 8 A randomly generated Password is: Fa!wH67X Updating the Program to Generate Multiple PasswordsWe will now update the program once again to generate multiple passwords using the same logic as discussed earlier. To generate more than one random password, we can add an infinite loop to the program that will accept the length of the required password and produce the password. We can ask a simple question asking the user whether they want to generate a password or exit the program. Let us consider the following snippet of code demonstrating the same. File: passGen.py Output: Do you wish to generate a Password? Press 'Y/y' to Continue, or 'N/n' to Exit: Y Enter the length of the Password: 8 A randomly generated Password is: Pm@p^#61 Do you wish to generate a Password? Press 'Y/y' to Continue, or 'N/n' to Exit: y Enter the length of the Password: 12 A randomly generated Password is: *5&7MAOdrz)Q Do you wish to generate a Password? Press 'Y/y' to Continue, or 'N/n' to Exit: w Invalid Input! Try Again. Do you wish to generate a Password? Press 'Y/y' to Continue, or 'N/n' to Exit: Y Enter the length of the Password: 10 A randomly generated Password is: )w1veSlXsP Do you wish to generate a Password? Press 'Y/y' to Continue, or 'N/n' to Exit: n Thank You! See you next time. Integrating GUI to the Password Generator using TkinterTkinter is a standard Python library used for the development of GUI applications in Python. The following are the steps we will follow to integrate the GUI into the Password Generator using the Tkinter package: Step 1: Import the required modules. Step 2: Define the necessary functions. Step 3: Create the main window for the application. Step 4: Add the Widgets to the window. Step 5: Running the Application. Let us understand the above steps in detail. Importing the Necessary Modules We will import the random module along with the modules and widgets from the Tkinter module. Apart from these modules, we must import the messagebox module from Tkinter. The messagebox module is utilized to display any error, warning, and important message in a message box. Let us consider the following snippet of code to understand the implementation of the same. File: main.py Explanation: In the above snippet of code, we have imported the random module. We have also imported everything from the Tkinter package. We have then imported the messagebox module as mb from the Tkinter package. Defining the Required FunctionsNow that we have imported the required modules, we must define the functions necessary to implement different operations in the application. We will define functions to generate the password, check if the selection is appropriate, retrieve the length of the password, and reset everything in the application. Let us understand the implementation of these functions in detail. Function to Generate the Password We will start by defining a function to generate the password for the given length. Since we have already defined this function, we will make some slight adjustments to it so that it can display the generated password string in the label. Let us consider the following snippet of code illustrating the same. File: main.py Explanation: In the above snippet of code, we have updated the generate_password() function to display the generated password string in the label using the config() method on the defined label widget. We have also printed the generated string in the command line using the print() method. Function to Check the User Selection We will now define a function that will check if the user has made any selection from the given choices. This function will retrieve the current length value of the password and pass it to the function to generate the length-specific password if it is not equal to the initial value. Let us consider the following snippet of code to understand the implementation of the same. File: main.py Explanation: In the above snippet of code, we defined a function as selection(). Inside this function, we have retrieved the password length using the get() method on the object of the IntVar() class. We have then compared the current value of the length to its initial value using the if-else conditional statement. If the length is not 0 (initial value), we have called the generate_password() method by passing the length as the function's argument; otherwise, a message box will pop up indicating the error which we have implemented using the showerror() method of the Tkinter's messagebox modules. Function to Retrieve the Password's Length We will now define a function to retrieve the length of the password. This is an optional function that we will use to print the selected password length in the command line. This function will also help us enable the toggle functionality of the radio buttons. Let us consider the following snippet of code demonstrating the same. File: main.py Explanation: In the above snippet of code, we defined a function as get_length(). Within this function, we have printed the selected length of the password using the print() method. Function to Reset Everything in the Application The last function we define will allow us to reset everything in the application. This function will clear the generated password from the label and deselect any selected radio button in the application. Let us consider the following snippet of code illustrating the same. File: main.py Explanation: In the above snippet of code, we have defined a function as reset(). Within this function, we have set the initial value of the password's length in the object of the IntVar() class. We have also used the config() method to configure the initial text in the label. Creating the Main Window Screen of the ApplicationNow that we have defined all the necessary functions that we will need to implement different operations in the application, it is time for us to create a main window screen. To accomplish this goal, we will create an object of the Tk() class of the tkinter module. This class will create a GUI window screen where we can add widgets later. We will also configure the title, size, and position of the created window, along with the background color and an icon. Let us consider the following snippet of code illustrating the same. File: main.py Explanation: In the above snippet of code, we have created a window by instantiating the tkinter's Tk() class. We have also set the window's title using the title() method. We have also used the geometry() method to set the size and position of the window. We have then configured the background color to #E6E6FA of the window with the help of the config() method. At last, we have set the icon for the application using the iconbitmap() method. Adding the Widgets to the Application and setting the event triggersWe will now add the required widgets to the application to trigger different events. We will make use of frames to organize other widgets like labels, buttons, and radio buttons in a proper way. So, let us understand the addition of these widgets in depth. Adding Frames We will start by adding the frames to the main window. These frames will help structure the other widgets. These frames can be created using the Frame() widget of the tkinter module. Let us consider the following snippet of code demonstrating the same. File: main.py Explanation: In the above snippet of code, we have used the Frame() widgets to add the frames to the window. We have also set the master parameter of the first two frames to gui_root, indicating left and right sides of the window. We have configured the background color by setting it as a value for the bg parameter. At last, we have used the pack() method to set the positions of these frames. Now that we have added the frames to the application, it is time to add the remaining widgets like labels, entry fields, an options menu, buttons, and a table to their respective frame. Adding the Widgets to the heading_frame Frame We will start by adding some labels to the first frame, i.e., heading_frame. These labels will include the heading of the application and a subheading illustrating working of the application. We will use the Label() widget of the tkinter module to create the required label. Let us consider the following snippet of code demonstrating the same. File: main.py Explanation: In the above code snippet, we have used the Label() widget to create the required labels. We have then set the master parameter of these labels to the heading_frame frame. We have also specified the text to be displayed, font style, background, and foreground color. At last, we have used the pack() method to set the position of the above labels. Adding the Widgets to the radiobtn_frame Frame We will now add some radio buttons to the radiobtn_frame Frame of the window. We will use the Radiobutton() widget of tkinter module. We will also create an object of the IntVar() class where the length of the password will be stored whenever the user selects any radio button. Let us consider the following snippet of code illustrating the implementation. File: main.py Explanation: In the above snippet of code, we created an object of the IntVar() class to store the length of the password and used the set() method to set 0 as its initial value. We have then used the Radiobutton() widgets to create some radio buttons and set the value of their master parameters to radiobtn_frame. We have also customized its content, variable, value, font, background color, and function they will call. At last, we have used the grid() method to set the position of these radio buttons in a grid format. Adding the Widget to the button_frame Frame We will now add some buttons to the application to trigger the functions. We can create buttons using the Button() widget of the tkinter module. Let us consider the following snippet of code illustrating the same. File: main.py Explanation: In the above snippet of code, we have used the Button() widgets to create some buttons and set their master parameters to button_frame. We have also configured the text, font style, width, background and foreground colors along with the functions these buttons will call. At last, we have used the grid() method to set the position of these buttons in a grid format. Adding the Widgets to the result_frame Frame We will now add a label to display the generated password. Let us consider the following snippet of code illustrating the same. File: main.py Explanation: In the above snippet of code, we have created a label using the Label() widget and set its master parameter to result_frame. We initially set its text to an empty string and customized its font style, background, and foreground color. At last, we used the pack() method to set the position of the label. Running the ApplicationNow that we have defined all the necessary functions created the main window of the application, and added the required widgets to the window, it is time for us to finally run the application using the tkinter's mainloop() method. Let us consider the following snippet of code demonstrating the same. File: main.py Explanation: In the above snippet of code, we have called the tkinter's mainloop() method with the gui_root, the object of the Tk() class, to run the application. Hence, the project code is now complete. We will save this python program file and run the following command in the command prompt or terminal to see the output. Syntax: But before we see the output, the complete program code of the 'Random Password Generator' is shown below. The Complete Program Code of Random Password Generator in PythonThe following is the complete program code for the 'Random Password Generator in Python'. File: main.py Output: As GUI: 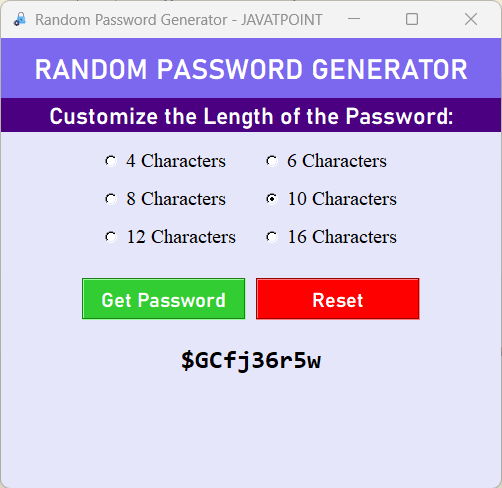
In Command Line: Why Should We Create a Random Password Generator?A good and strong password is essential in today's world, where data and security are the prime concern. People generally use common passwords that hackers can easily hack to obtain their data. A better way to learn any programming language is by doing it practically. Especially developing a good beginner project, such as the Random Password Generator in Python, helps us to improve our fundamentals. This project also allows us to understand the use of different standard and external modules of Python. How to Generate Strong Passwords in Python?In this tutorial, we have discussed different methods to develop the random password generator in Python. In order to generate a stronger password, we can use the sample() method in place of the choice() method, ensuring no repetition of the digits. We can ask the user to input the number of characters, numbers, and symbols that the user wants in the password. Let us consider the following example to understand the implementation of the same. Example: Output: Enter the Number of the Characters that you need in the password : 5 Enter the Number of the Numbers that you need in the password : 6 Enter the Number of the Symbols that you need in the password : 5 The Randomly Generated Password is : 1*53Tp%@64B)rV!0 Explanation: In the above snippet of code, we have imported the random module. We have then defined a function as password_generator() that accepts the length of characters, numbers, and symbols. We have defined a list of characters, numbers, and symbols within this function and used the random.sample() method to randomly select the list of characters, numbers, and symbols up to the given length. We then created a list representing the password and used the random.shuffle() method to shuffle the elements of the list. We then converted the final list into a string containing the required password and returned it. In the main function, we have used the input() method to ask the user the length of the characters, numbers, and symbols required in the password. At last, we have called the password_generator() method by passing all three lengths as the required parameters and printing the generated password for the users. The Conclusion
Next Topicre.sub() function in python
|
 For Videos Join Our Youtube Channel: Join Now
Feedback
- Send your Feedback to [email protected]
Help Others, Please Share


