| |

Build a WhatsApp Flashcard App with Twilio, Flask, and PythonA flashcard is one of the most tried-and-true studies aids, assisting everyone from language learners to medical students in achieving their aim of memorization. Digital flashcards are becoming increasingly useful thanks to the plethora of features and flexible settings offered by programs like Anki or Memrise. There are numerous occasions, nevertheless, when you might not be able to use one of the more powerful programs and require something more portable to study with. For instance, when you can note on your cell phone but not load a fully functional web application. Or you're on a plane that blocks access to certain websites but lets you note numbers to land while you're still in the air. To get you started on your journey to studying flashcards wherever you are, this guide will demonstrate how to create a simple flashcard bot for WhatsApp or SMS. Below is an illustration of what we will be building: 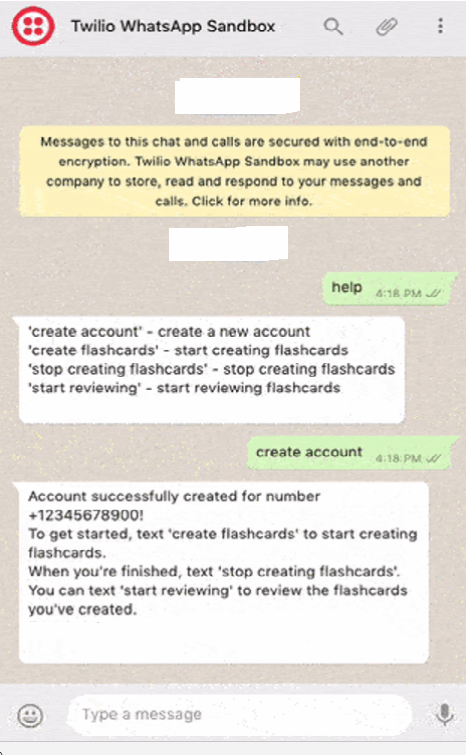
Requirements for this TutorialYou need the following items to follow this tutorial:
Configure the SandboxNote that this lesson, as previously said, functions with both SMS and WhatsApp. If you want to use WhatsApp, you must read this section. Follow the procedures in the Create an SMS Chatbot tutorial's "Configure Twilio's Programmable SMS" section if you want to use SMS. The WhatsApp sandbox offered by Twilio makes it simple to create and test your application. Once WhatsApp approves your application, you can request production access for your Twilio phone number. Connecting your phone to the sandbox is the next step. Click on WhatsApp after choosing Programmable SMS on your Twilio Console. You may view your account's join code and the sandbox number on the WhatsApp sandbox page. 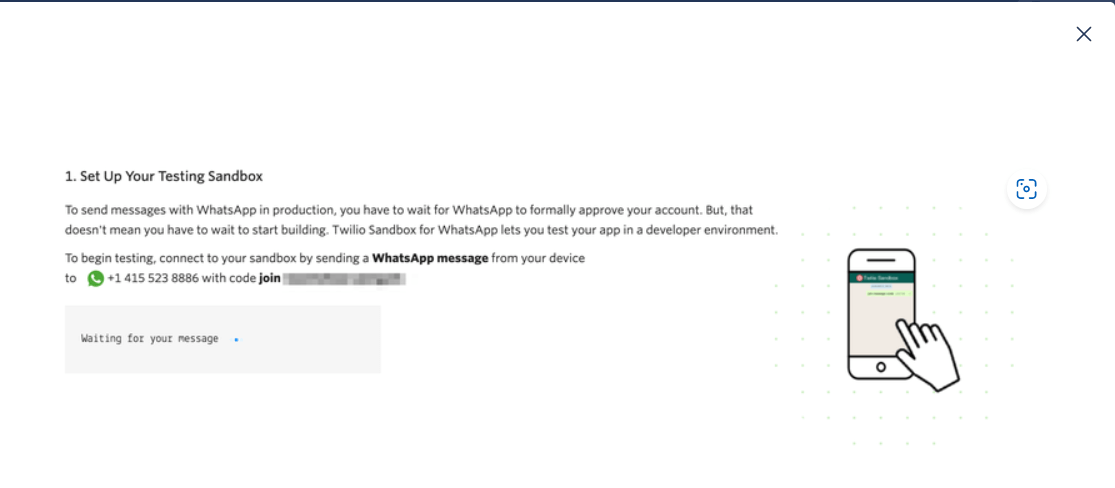
Send a WhatsApp message to the number associated with your account and the provided code to enable the Snapchat sandbox on your smartphone. The word join will be used as the first word in the code, and then a pair of randomly chosen words will come next. Your mobile number should be connected to the sandbox and be able to send and receive messages shortly after you send the message, according to a reply from Twilio. Remember to repeat this process for any phones you wish to connect to your sandbox. Virtual Environment CreationFollowing best practices for Python, we will create a new directory for our flashcard bot project and establish a virtual environment there. The Python packages we require for our chatbot will subsequently be installed. To complete the procedures mentioned above on a Unix or Mac OS system, launch a terminal and type the following commands: Command Prompt: Enter the following statements in a command prompt window if you're following the guide on Windows: Command Prompt: The final command installs the four packages we'll need for this project using pip, the Python package installer, and they are:
For your reference, the following versions of the packages, as mentioned earlier and their dependencies were tested at the time this tutorial was published: Creating a Flashcard BotHuzzah! You're ready to go. Look at what our flashcard bot will be doing in the next section. A flashcard has a frontside and a backside at its most basic. A customer can infer what is on the rear by looking at the front. Because this is a digital flashcard, if the customer successfully guesses the answer, they move on to the next flashcard; otherwise, they may try again until they do. This means that our flashcard bot must possess the following three key features:
Twilio and PythonCreating a WhatsApp Chatbot Using Python, Flask, and Twilio by Miguel Grinberg is a good place to start if this is your first bot using Twilio and Python. It covers all the basic details required to understand how Flask, Twilio, and webhooks work together. The remainder of this tutorial expands on what is covered there, assuming the reader fully comprehends the material. Flashcard Bot ConfigurationCreate a config.py file first and place it in the flashcard-bot folder. This will save the setup of our database. Next, add a new subfolder called "app" to your flashcard-bot folder and add the empty Python files "__init .py," "models.py," and "routes.py" to it. Models.py stores our Customer and Flashcard database models and the basic app setup included in __init .py. The Twilio webhook is stored in routes.py. The config.py File In the configuration file, paste the following. This instructs our SQLite database's location for the Flask app. Make sure to modify the SECRET KEY value to do something unique! The apps/__init__.py File Now let's examine the __init .py File. This File contains all the setup required to execute our Flask application. Focus on the _update db(obj) function. As it is utilized to update our information when the customer makes changes, we'll use this quite a bit when we start developing the webhook. Code Snippet: The line from app import methods and models at the bottom of this File is one item that might seem odd. We add this line at the bottom to prevent circular dependencies while starting the Flask server. Before Flask can load the complete File correctly, the app and db objects must be instantiated in the routes.py and models.py files. We ensure that all relevant objects are instantiated by placing the import for these files at the bottom. The app/models.py File We must first set up our two database tables before creating the route. We use two fundamental models:
models.py File: Note that our most memorable model, Client, not just hold the telephone number and the cheat sheets made by the Client but also the ongoing cheat sheet being checked on. Since the actual interaction between the customer and Twilio does not store state, we store this information. As a result, Twilio will not store what I last did not need if I note my flashcard bot out of the blue. It won't know whether I'm making, reviewing, or reviewing flashcards. As a result, to determine the legal actions, we need to store some states in the database. In light of this, there are two methods in the model-get_new_review11(s) and stop_reviewing(s)-in addition to the columns in the database. These are functions that aid in altering the customer's state. Note that we have proactively utilized our assistant capability _update_db two times in this model. You might have yet to see a few things to note in other Flask tutorials that use SQLAlchemy to define its database models. These things include how the relationship between the Customer and Flashcard models is set up. Code Snippet: The explicit primary join attribute on the db.relationship is the first (). We utilize this since there are many connections between Customers and Flashcards, and if we don't use it, we receive an AmbiguousForeignKeysError. This is because we are attempting to create two connections between the Customers database and the Flashcards table: the customer to all their flashcards and the customer to the specific flashcard being examined. SQLAlchemy can only determine how to correctly assign the foreign keys in each of these relationships with an explicitly specified linker between the two tables. So, we must specify what unites the two tables to clarify our relationship. Second, since we specifically specified one of the two relationships, we must explicitly declare the relationship between our second Customer and Flashcard, current review. The flashcard that the customer is now examining is stored in this column. We intentionally built up this relation to use the current review id as the primary key between the two tables so that the model learns which review it is. The program routes.py File Our models are finished. Therefore it's time to develop the logic for our flashcard bot. We will go through each of the three major logical components one at a time. Code Snippet: Let's import our functions at the top of the document. Because our bot has many branches, before we begin the logic, let's generalise the most crucial section: sending a backside note message. A collection of lines are concatenated with a new line and sent back_side to the consumer as a Twilio message using the _send the message() function. Code Snippet: Twilio uses a POST request to a webhook to relay incoming messages to our Flask server, as we will see in the section on testing below (much like submitting a form via your web browser). This means the logic we want to apply to a freshly received message must be contained in a single exposed route. The customer's existence is the first state we verify. To accomplish this, we see if a profile has been made with the message's phone number. Because we only seek the phone number, this bot can support WhatsApp and regular SMS. I've inserted a fallback_side number of 123 for testing's sake. This may be applied during testing. Code Snippet: After that, if the customer still needs an account, we'll ask them to do so. Also, we must determine whether the customer provided us with random commands before we can create their account. We want to make sure we're dealing with a valid customer, so if the customer has not started or tries to start again, this section ends before it executes any additional commands. Code Snippet: Once a customer account has been established, we need to design the interface for creating cards. We achieve this by requiring the customer to issue the start command, which modifies the customer's state to permit creating cards. The note format for flashcards will be front_side/back_side. Hello or bonjour, for instance. During the evaluation, the customer would see bonjour and be asked to note backside hello. Lastly, a stop instruction is issued to clear the customer's state after making flashcards. Code Snippet: When the customer wants to review their flashcards, that is when it all comes together. This employs a similar tactic of altering the customer's status to put them in "review" mode. Following the review logic, we include a catch-all at the very end in case the customer issues a command that we cannot interpret. Code Snippet: Consolidated code: The Complete app/routes.py File Testing the Flashcard BotIt's time to start the server, create the database, and send messages since we've built the routes and models for our flashcard bot! Setting up the database We initialize the database using the commands first from the Flask-Migrate package, which we acquired earlier in this tutorial. Three phases comprise the setup: building our database, determining which additional tables or columns are required, and importing the newly created changes into our database. The three procedures will be done in order since this is the first time the database will be set up. Before executing the next instructions, ensure you are in the flashcard-bot folder and that your virtual environment is active. Code Snippet: You will notice a new migrations folder and an additional app once these have been run. Database SQLite. The scripts needed to build the database schema specified in the models.py File above are in the migrations/versions folder. You can use the migrate and upgrade commands to adjust the structure of your database as you expand and modify this flashcard bot to suit your particular requirements. Messages being sent as a test Make some flashcards now! Run Flask run while within the flashcard-bot folder to launch the bot. The database setup should still have activated your virtual environment. The output ought to resemble this: The service is now executing as a private service on port 5000 within your machine and will sit there waiting for inbound connections. We must utilize ngrok to make this service accessible via the Internet. To assign a temporary public domain that forwards HTTP requests to our local port 5000, open a second terminal window and perform the command ngrok http 5000. If the ngrok program is in your current directory, you may need to use./ngrok http 5000 on a Unix or Mac OS computer. The output of ngrok:
The lines that start with "Forwarding" should be noted. This display the publicly accessible URL that ngrok employs to route requests to our service. Now we must instruct Twilio to send incoming message notifications using this Address. Return to the Twilio Console and select Programmable SMS, WhatsApp, and then Sandbox. When a message arrives, insert the https:// URL copied from the ngrok output into this area. Put that at the end of the root ngrok URL since our chatbot is accessible via the /bot URL. Ensure that HTTP Post is selected as the request method. Remember to save these changes by clicking the red Save button at the bottom of the page. 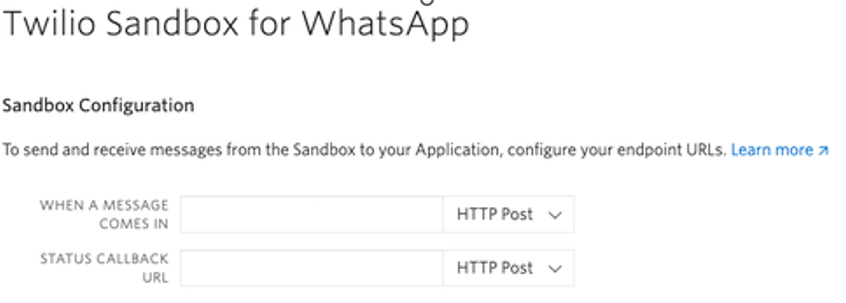
If you wish to communicate with the bot via conventional SMS, go to the Twilio Console, choose Phone Numbers, and select the desired phone number. Copy the https:// URL from the ngrok output, then paste it in the "A message comes in" area when you scroll down to the "Messaging" section. Remember that the chatbot can be accessed via the /bot URL; hence/bot must be added to the root ngrok URL. Make sure the transaction method is set to HTTP POST, and remember to save your modifications. 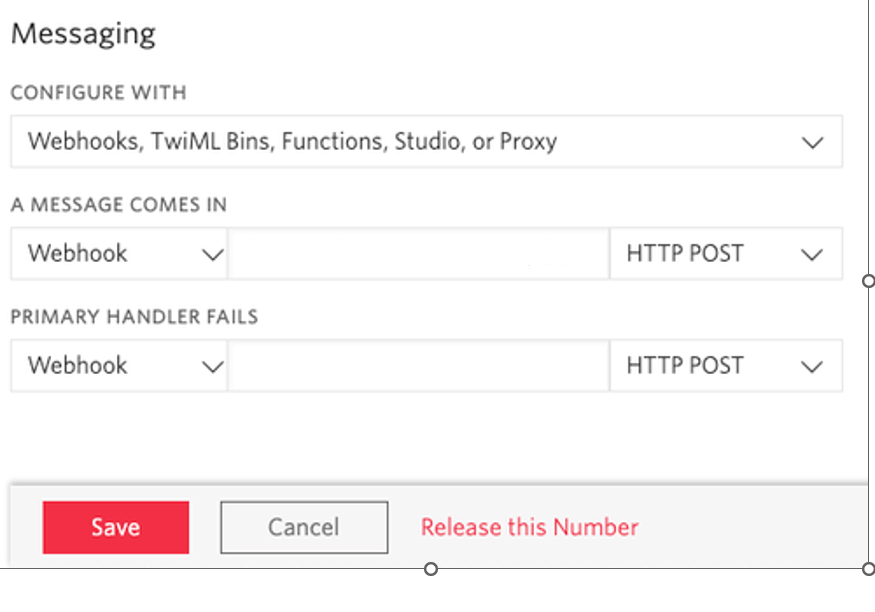
With the smartphone, you are connected to the sandbox and can now start messaging the flashcard bot. Send assistance to the flashcard bot to find out what commands we've programmed in if you need to remember what it can do. Happy studying, everyone else! Keep in mind that there are some restrictions when using ngrok for free. In particular, you are not permitted to retain a ngrok URL for longer than 8 hours, and each time you run the ngrok command, a new domain name will be provided to you. Whenever you restart ngrok, you must update the URL in the Twilio Console. Check out the SMS chatbot blog post if you want to use your new flashcard bot in practice. ConclusionTogether, we created a straightforward but powerful flashcard bot. It's given you some fresh inspiration and helped you realize how effective a provider like Twilio can be with just a few lines of code. |
 For Videos Join Our Youtube Channel: Join Now
Feedback
- Send your Feedback to [email protected]
Help Others, Please Share


