| |

Creating the GUI Marksheet using Tkinter in PythonTkinter is the standard Graphical User Interface (GUI) library for the Python programming language. When combined with the Tkinter library, Python offers a quick and reliable way to build applications based on GUI. In this tutorial, we will build a GUI marksheet with the help of Tkinter in Python. As per the definitions provided by the Oxford Dictionary, a Marksheet is an official record of a student's work, representing the courses taken and grades achieved. Simply put, a Marksheet is a document representing the marks awarded for academic work. Let us now consider the project's prerequisite before we start building a GUI Marksheet using the Tkinter library in Python. Prerequisites of the ProjectThere are some libraries that we will need in the creation of the GUI Marksheet in Python. These libraries are briefly described as follows:
Since the Tkinter library comes preinstalled with Python, there is no need to install it externally. However, we can install the Pillow (PIL) library using the PIP installer by typing the following command in a command prompt or terminal. Syntax: Once the installation is complete, we can verify whether the pillow library is installed properly or not by creating a new python program file and importing the pillow (PIL) module. The following is the snippet of code illustrating the same. File: verify.py Now, let us save the file and run the following command in a command prompt or terminal. Syntax: The library has been installed successfully if the program does not return any importing error. In case any exception is raised, try reinstalling the library and consider checking the official documentation. Let us now start building the project. Building the GUI Marksheet using Tkinter in PythonWe have divided the complete project code for creating the GUI Marksheet in Python into several steps for better understanding. These steps are shown below: Step 1: Importing the necessary modules Step 2: Defining the required functions to manipulate the user data and yield the result. Step 3: Creating the main window of the application. Step 4: Adding necessary widgets to the window and set the event triggers. Let us understand the steps mentioned above in a more elaborate way. Importing the necessary modulesWe will start by importing all the necessary modules to build the applications. These modules include the tkinter module along with the messagebox module of the Tkinter library. We will also include the necessary modules from the PIL library. The following is the snippet of code demonstrating the same. File: guiMarksheet.py Explanation: In the above code snippet, we have imported all the modules and widgets from the tkinter module. We have also imported the messagebox module as mb from the tkinter module. At last, we have imported the ImageTk, Image, ImageDraw and ImageFont modules from the PIL module. Defining the functions for the applicationOnce we have successfully imported the required modules, it is time for us to define different functions allowing us to manipulate the data entered by the user. We will define the functions to calculate the total, percentage, and grade for the given marks and return the result per the record. We will also add some other functions to perform data validation, display result, generate a marksheet, clear all the entries and close the application. Let us understand the implementation of these functions in detail. Functions to calculate the total of the entered marksThis function will accept the marks from the entry fields as its arguments and calculate the sum of the marks returning the total. Let us consider the following snippet of code illustrating the same. File: guiMarksheet.py Explanation: In the above code snippet, we have defined a function as calculate_total(). This function accepts each subject's marks as its arguments and adds all of them to return the total of the marks. Function to calculate the percentage of the calculated sumThis function will accept the total returned from the earlier function and calculate the average by dividing the total by the number of subjects returning the calculated percentage. Let us consider the following snippet of code demonstrating the same. File: guiMarksheet.py Explanation: In the above code snippet, we have defined a function as calculate_percentage(). This function accepts the argument consisting of the total of the marks. Within this function, we have calculated the average by dividing the total by the number of subjects, i.e., 5 in this case and returned the calculated percentage. Function to grade the student as per their percentageThis function will return the grade per the student's performance and the percentage they received. We will use the if-elif-else conditional statement to calculate the grade. Let us consider the following snippet of code illustrating the same. File: guiMarksheet.py Explanation: In the above code snippet, we have defined a function as calculate_grade() with accepted percentage as its parameter. Within this function, we have used the if-elif-else conditional statement and returned the grade on the basis of the student's percentage. We have returned the grade 'O' for the percentage equal to 95 or above. Similarly, we have returned the grade 'A+' for the percentage ranging between 90 to 94, grade 'A' for 80 to 89 per cent, grade 'B+' for 70 to 79 per cent, grade 'B' for 60 to 69 per cent, grade 'C' for 50 to 59 per cent, grade 'D' for 33 to 49 per cent and grade 'F' for less than 33 per cent. Function to calculate the result of the studentThis function will calculate the result by checking whether the percentage of the student is above the passing marks or not, i.e., 33 in this case. We will also check whether the student is passed every subject and return 'PASS' or 'FAIL' as per the situation. File: guiMarksheet.py Explanation: In the above snippet of code, we have defined a function as calculate_result(). This function accepts multiple parameters like percentage and the marks of all subjects. Within this function, we have used the if-else conditional statement to check if the percentage is greater than 33 along with the marks of each subject greater than 33 or not and returned 'PASS' or 'FAIL' as per the situation. Function to check errors in entering the marksThis function will check if any fields displaying marks are empty and return a message box displaying the error. Let us consider the following snippet of code illustrating the same. File: guiMarksheet.py Explanation: In the above snippet of code, we have defined a function as check_for_errors(). Within this function, we have used the if-conditional statement to check whether any fields displaying are empty. We have then displayed a message box with an error message. We have also called the function to reset the entries. At last, we have returned -1 to quit the process. Function to display the resultWe will now define a function to display the result. This function will check the subject name fields and their marks. It will then evaluate the result and display it to the user. Let us consider the following snippet of code illustrating the same. File: guiMarksheet.py Explanation: In the above code snippet, we have defined a function as display_result(). Within this function, we have used the get() method to retrieve the details of the subjects. We then checked if any fields were empty and returned a message box displaying the error for the same. We have then called the check_for_errors() function to check if any marks field is empty. If not, we have converted the marks into float values. We then check if the entered marks range from 0 to 100 and calculate the total, percentage, grade, and result. We have also set the grade to 'F' if the result equals 'FAIL'. We then called a function to disable all the fields, so the user cannot change the data after calculating the result. We have then used the config() method with the labels to display the result. We have also set the state of the 'Generate Marksheet' button to normal. In case the marks exceed the limits, we have returned a message box displaying the error and called the reset_subject_entries() function. Function to Generate the Marksheet as a PNG fileWe will now define a function to generate the marksheet as a PNG file. This function will use some modules of the PIL library and add the entered data to the image file. The following is the image file that we will use for the project. File: report_card.png 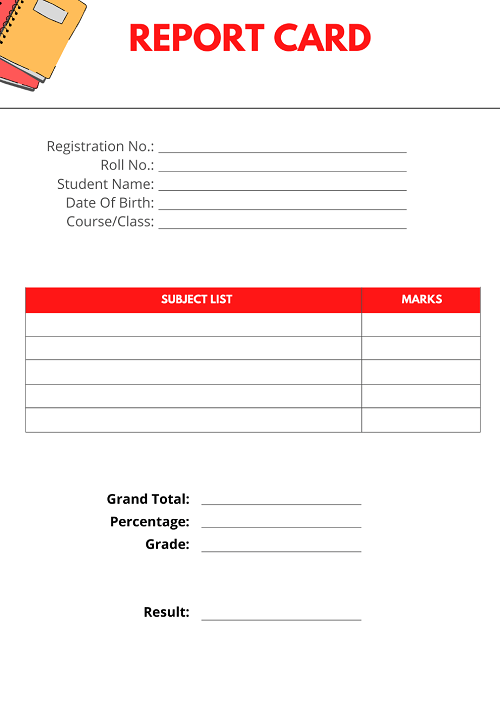
Let us consider the following snippet of code illustrating the same. File: guiMarksheet.py Explanation: In the above code snippet, we have defined a function as generate_marksheet(). Within this function, we have used the get() method to retrieve all the entries from the entry field filled by the user and store them as Strings. We have then used the cget() method to retrieve the text from the labels displaying the result and again stored them as Strings. We have then imported the image file from the directory using the open() method of the Image module and used the Draw() class of the ImageDraw module to create a 2D image interface to add the stored values as text in the image. We have then defined different coordinates specifying the placement of all the text elements. We then used the truetype() method of the ImageFont and imported the required fonts for the decoration of the text values. We have then used the text() method with the object of the Draw() class to place the stored string values in the image file. At last, we saved the image file by the name of the student using the save() method and displayed the final image using the show() method. Function to disable the fieldsThis function is optional. We will define this function to disable the entry fields so that the user cannot change the entered data once the result is calculated. Let us consider the following snippet of code illustrating the same. File: guiMarksheet.py Explanation: In the above code snippet, we have defined a function as disable_field(). Within this function, we have used the config() method with the objects of the Entry() widget and set the value of their state parameters to 'disabled'. Function to enable the fieldsThis function is also optional. We will define this function to enable the entry fields so that the user can enter the data once the fields are cleared. Let us consider the following snippet of code illustrating the same. File: guiMarksheet.py Explanation: In the above code snippet, we have defined a function as enable_field(). Within this function, we have used the config() method with the objects of the Entry() widget and set the value of their state parameters to 'normal'. Function to reset entries in 'Subjects Information' SectionThis function will allow us to reset the entry fields present in the 'Subjects Information' section. Let us consider the following snippet of code illustrating the same. File: guiMarksheet.py Explanation: In the above snippet of code, we have defined a function as reset_subject_entries(). Within this function, we have called the enable_field() function. We have then used the delete() method to delete the entries in the field available in the 'Subjects Information' section. At last, we have set the focus to the first subject name field using the focus_set(). Function to reset all the entriesWe will now define a function that allows us to reset all the entries filled by the user along with the calculated result. Let us consider the following snippet of code illustrating the same. File: guiMarksheet.py Explanation: In the above snippet of code, we have defined a function as reset(). Within this function, we have called the reset_subject_entries() function. We have then used the delete() method to delete the entries in the remaining fields. We have then used the config() method to configure the text of the labels displaying the result. We have also disabled the 'Generate Marksheet' button and used the focus_set() method to set the focus to the very first field, i.e., name_field. Function to exit the applicationWe will now define a function to exit the application. The following is the snippet of code illustrating the same. File: guiMarksheet.py Explanation: In the above snippet of code, we have defined a function as exit(). We have used the destroy() method to close the application within this function. Creating the main window of the applicationNow that we have successfully defined all the necessary functions for the application, it is time for us to create the main window of the application, where we will later add different widgets to manipulate the user data and functions. We will use the Tk() class to create the main window of the application. We will also set the title, size, position, background color and icon. Let us consider the following snippet of code illustrating the same. File: guiMarksheet.py Explanation: In the above snippet of code, we have created an object of the Tk() class as gui_root. We then used the title() method to set the title of the application. We then used the geometry() method to set the size and position of the application on the screen. We have then disabled the resizable option for better UI by setting the parameters of the resizable() method to zeros. We have configured the application's background color to #FCEEF6 by setting it as a value to the bg parameter in the config() method. We then used the iconbitmap() method to set the icon of the application by importing the ICO image file from the directory. Adding widgets to the main window and setting event triggersSince the main window of the application is created successfully, we will add all the necessary widgets to the window and set the event triggers. These widgets include frames to structure other widgets, labels to display important information, entry fields to insert data, and buttons to manipulate the entered data and call the functions. Let us now understand the addition of these widgets in detail. Adding Frames We will start by adding the frames to the main window. These frames will help structure the other widgets. These frames can be created using the Frame() widget of the tkinter module. Let us consider the following snippet of code demonstrating the same. File: guiMarksheet.py Explanation: In the above snippet of code, we have used the Frame() widgets to add the frames to the window. We have also set the master parameter of these widgets to gui_root, and header_frame, respectively. We have configured the background color by setting it as a value for the bg parameter. At last, we have used the pack() method to set the positions of these frames. Adding the widgets to the heading_frame Frame We will now add the labels displaying the heading and an image to this frame. We will use the Label() widget to add the labels. We will also use the ImageTk and Image module of the PIL library to import the image from the directory and make it compatible for use in the Tkinter application. Let us consider the following snippet of code illustrating the same. File: guiMarksheet.py Explanation: In the above snippet of code, we have used the PhotoImage() method of the ImageTk module. Within this method, we have used the open() method of the Image module to import the image file from the directory. We have also used the resize() method to resize the imported image and convert it for compatible use in the Tkinter application. We have then used the Label() widget to create some labels to display the imported image and a heading. We have set the master parameters of these labels to the heading_frame Frame. At last, we have used the grid() method to set the position of these labels in a grid format. Adding the widgets to the subheading_frame Frame We will now add a label to this frame to display a sub-heading. We will again use the Label() widget to add the label to the application. The following snippet of code illustrates the same. File: guiMarksheet.py Explanation: In the above snippet of code, we have used the Label() widget to add the label to display a sub-heading. We have set the master parameter of this label to the subheading_frame frame. At last, we have used the pack() method to set the position of this label. Adding the widgets to the info_frame Frame We will now add some widgets to this frame to collect the student's information, including the student's name, date of birth, class, registration number, school name, and roll number. In order to gather this data, we will use the label with the help of the Label() widget to display the text asking user to enter details. Moreover, we will add the entry fields using the Entry() widget for users to enter the asked information. Let us understand the implementation of the same in the following snippet of code. File: guiMarksheet.py Explanation: In the above snippet of code, we have used the Label() widget to create some labels displaying the text such as Student's Information, Name of the Student, Date of Birth, Class, Registration Number, Name of the Institution, and Roll Number. We have set the master parameters of these labels to the info_frame Frame. We have then used the grid() method to set the positions of these labels in a grid format. Similarly, we have added the entry fields to the application using the Entry() widgets and set their master parameters to the info_frame Frame. We have then set the position of these frames in a grid format with the help of the grid() method. Adding the widgets to the subject_frame Frame We will now add some widgets to this Frame to collect the student's academic record, which includes the subjects the student has studied and marks in each subject. In order to collect this data, we will again use the label with the help of the Label() widget to display the text asking user to enter details associated with subjects. Moreover, we will add the entry fields using the Entry() widget for users to enter the subject's name along with the marks obtained in each subject out of 100. Let us understand the implementation of the same in the following snippet of code. File: guiMarksheet.py Explanation: In the above snippet of code, we have used the Label() widget to create some labels displaying the text such as Subjects Information, Subject Name, Marks obtained (Out of 100), and Number of subjects. We have set the master parameters of these labels to the subject_frame frame. We have then used the grid() method to set the positions of these labels in a grid format. Similarly, we have added the entry fields to the application using the Entry() widgets and set their master parameters to the subject_frame frame. We have then set the position of these frames in a grid format with the help of the grid() method. Adding the widgets to the result_frame Frame We will now add some labels to this frame to display the calculated total, percentage, grade, and result for the entered marks. We will again use the Label() widget to create the labels for the application. Let us consider the following snippet of code illustrating the same. File: guiMarksheet.py Explanation: In the above snippet of code, we have used the Label() widget to create labels displaying the calculated total, percentage, grade, and result, along with some associated text. We have set the master parameters of these labels to the result_frame Frame. At last, we have used the grid() method to set the positions of these labels in a grid format. Adding the widgets to the buttons_frame Frame We will now add some buttons to this frame to manipulate the entered data and call the functions we defined earlier. We will use the Button() widget to create the buttons in the application. These include the buttons to calculate the result, generate the marksheet, reset the entries and close the application. Let us consider the following snippet of code demonstrating the same. File: guiMarksheet.py Explanation: In the above snippet of code, we have used the Button() widget to create the buttons to manipulate the entered data and call the functions we defined earlier. We have set the master parameter of these buttons to the buttons_frame Frame. We have also set the command parameters of each button to the functions they will call. At last, we have used the grid() method to set the positions of these buttons in a grid format. Running the application Now that we have added all the necessary widgets to the application, it is time to call the mainloop() method along with the object of the Tk() class to run the application. Let us consider the following snippet of code illustrating the same. File: guiMarksheet.py Explanation: We have called the mainloop() method to run the application in the above code snippet. Hence, the project code is now complete. We will save this python program file and run the following command in the command prompt or terminal to see the output. Syntax: But before we see the output, the complete project code of the 'Marksheet using Tkinter' is shown below. The Complete Project CodeThe following is the project code for the 'Marksheet using Tkinter in Python'. File: guiMarksheet.py Output: Image 1: Marksheet Generator - Application 
Image 2: File: John Miller.png - Report Card 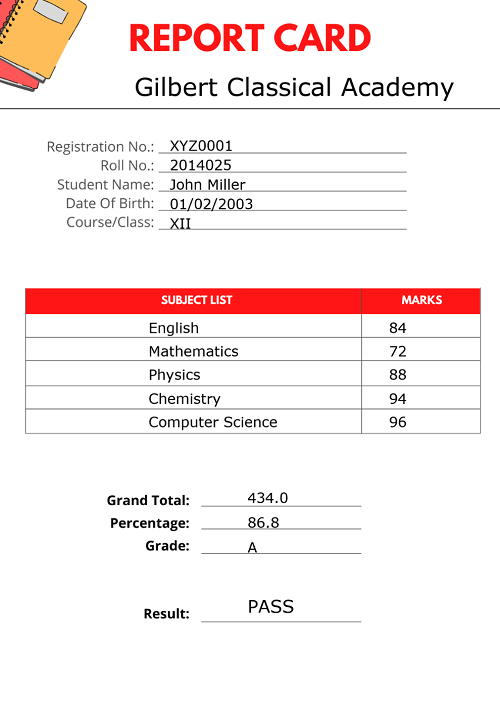
Next TopicA Colour game using Tkinter in Python
|
 For Videos Join Our Youtube Channel: Join Now
Feedback
- Send your Feedback to [email protected]
Help Others, Please Share


