| |

YouTube Video Downloader using Python TkinterYouTube is considered among the most-watched video streaming website. YouTube is an online video platform launched in 2005 that features a wide variety of content, including educational videos, entertainment stuff, TV clips, music & gaming videos, and many more. A slow internet connection can cause difficulties while streaming videos online. With the help of a YouTube video downloader application, we can download videos on our PC or smartphone. This way, we can watch videos anytime without that pesky buffering icon. In the following tutorial, we will learn how to develop a GUI application to download YouTube videos using the Tkinter and pytube libraries in the Python programming language. But before we start building the project, let us see the project's prerequisites. Prerequisites of the ProjectThere are some libraries that we will need in the creation of the GUI YouTube Video Downloader in Python. These libraries are briefly described as follows:
Since the Tkinter library comes preinstalled with Python, there is no need to install it externally. However, we can install the pytube and Pillow (PIL) libraries using the PIP installer by typing the following command in a command prompt or terminal. Syntax: Once the installation is complete, we can verify whether the pillow library is installed properly or not by creating a new python program file and importing the pytube and pillow (PIL) modules. The following is the snippet of code illustrating the same. File: verify.py Now, let us save the file and run the following command in a command prompt or terminal. Syntax: The libraries have been installed successfully if the program does not return any importing error. In case any exception is raised, try reinstalling the libraries and consider checking their official documentation. Let us now start building the project. Building the YouTube Video Downloader using Tkinter in PythonWe have divided the complete project code for creating the YouTube Video Downloader in Python into several steps for better understanding. These steps are shown below: Step 1: Importing the necessary modules Step 2: Defining the required functions to download the video. Step 3: Creating the main window of the application. Step 4: Adding necessary widgets to the window and setting the event triggers. Let us understand the steps mentioned above in a more elaborate way. Importing the necessary modulesAt first, we will start by importing all the required modules, which include all the widgets and modules from the tkinter module, the YouTube class from the pytube library, and the Image and ImageTk modules from the PIL library. Let us consider the following snippet of code illustrating the same. File: youTubeDownloader.py Explanation: In the above snippet of code, we have imported all the widgets and modules from the tkinter module. We have imported the messagebox and filedialog modules from the tkinter module. We then imported the YouTube class from the pytube module. At last, we have imported the Image and ImageTk modules from the PIL module. Defining the functions to manipulate data in the applicationNow that we have successfully imported the necessary modules, it is time for us to define some functions. We will define different functions to browse the folder, download the video, reset the entries, and close the application. Let us understand the implementation of these functions in detail. Function to Browse the Folder We will define a function in order to select the destination folder where the selected video will be downloaded. For this, we will use the askdirectory() method of the filedialog module to select the directory. File: youTubeDownloader.py Explanation: In the above snippet of code, we have defined a function as browse_folder(). Within this function, we have used the askdirectory() method of the filedialog module of the Tkinter library in order to select the directory where the file will be downloaded. We have then used the set() method to set the directory path in the entry field. Function to download the video to the designated path We will now define a function that uses the pytube library's YouTube class to download the desired video. Let us consider the following snippet of code demonstrating the same. File: youTubeDownloader.py Explanation: In the above snippet of code, we have defined a function as download_video(). Within this function, we have used the get() method to retrieve the value stored in the objects of the StringVar class. We have then used the if-else conditional statement to check if any of the retrieved values is not an empty string. We have then created an object of the YouTube class using the URL retrieved from the entry field. We have then used the filter() method of the YouTube class to select the stream with the 'mp4' file extension, progressive equals True, and itag equals 22 in order to download the video of 720p resolution. We then used the download() method to select the designated folder to download the video field. We have then used the showinfo() method of the messagebox module of the Tkinter library to display a message indicating the successful download. If any entry field is empty, we have displayed an error message indicating empty fields using the showerror() method of the messagebox module. Function to reset the entries We will now define a function to reset the entries filled in the entry fields. Let us consider the following snippet of code illustrating the same. File: youTubeDownloader.py Explanation: In the above snippet of code, we have defined a function as reset(). Within this function, we have used the set() method to set the values of the entry fields to the empty string. We have then used the focus_set() method to set the cursor focus to the first entry field. Function to close the application We will now define a function to close the application. Let us consider the following snippet of code illustrating the same. File: youTubeDownloader.py Explanation: In the above snippet of code, we have defined a function as exit(). Within this function, we have used the destroy() method along with the object of the Tk() class in order to close the application. Creating the main window of the applicationNow that we have defined all the necessary functions to manipulate the user data, it is time for us to create the main window where the widgets will be added. We will create the window using the Tk() class of the tkinter module. We will also set the title, size, position, background color, and icon. Let us consider the following snippet of code illustrating the same. File: youTubeDownloader.py Explanation: In the above snippet of code, we have created the main window by instantiating the Tk() class as gui_root. We then used the title() method to set the title of the window. We have also set the size and position of the window using the geometry() method and disabled the resizable option for better UI by setting the values of the parameters of the resizable() method to 0. We have configured the background color of the window with the help of the config() method. At last, we have used the iconbitmap() method to set the icon of the window. Adding the necessary widgets to the window and setting the event triggersSince the main window of the application is created successfully, we will add all the necessary widgets to the window and set the event triggers. These widgets include frames to structure other widgets, labels to display important information, entry fields to insert data, and buttons to manipulate the entered data and call the functions. Let us now understand the addition of these widgets in detail. Adding Frames We will start by adding the frames to the main window. These frames will help structure the other widgets. These frames can be created using the Frame() widget of the tkinter module. Let us consider the following snippet of code demonstrating the same. File: youTubeDownloader.py Explanation: In the above snippet of code, we have used the Frame() widgets to add the frames to the window. We have also set the master parameter of these widgets to gui_root, respectively. We have configured the background color by setting it as a value for the bg parameter. At last, we have used the pack() method to set the positions of these frames. Adding the widgets to the header_frame Frame We will now add the labels displaying the heading and an image to this frame. We will use the Label() widget to add the labels. We will also use the ImageTk and Image module of the PIL library to import the image from the directory and make it compatible for use in the Tkinter application. Let us consider the following snippet of code illustrating the same. File: youTubeDownloader.py Explanation: In the above snippet of code, we have used the PhotoImage() method of the ImageTk module. Within this method, we have used the open() method of the Image module to import the image file from the directory. We have also used the resize() method to resize the imported image and convert it for compatible use in the Tkinter application. We have then used the Label() widget to create some labels to display the imported image and a heading. We have set the master parameters of these labels to the header_frame Frame. At last, we have used the grid() method to set the position of these labels in a grid format. Adding the widgets to the entry_frame frame We will now add some widgets to the entry_frame frame. These widgets include some labels, entry fields, and a button. We will use the Label() widget to create the labels displaying the important information. We will then use the Entry() widget to create the entry fields for the user to fill in the asked data. We will also use the Button() widget to create a button that will allow us to browse the directory. Let us consider the following snippet of code demonstrating the same. File: youTubeDownloader.py Explanation: In the above snippet of code, we have added some labels using the Label() widget setting their master parameters to the entry_frame frame. We have then used the grid() method to set the position of these labels in the grid format on the window. We have then used the Entry() widget to add some entry fields and set their master parameters to the entry_frame frame. We have again used the grid() method to set the position of these fields in the grid format. At last, we have added a button with the help of the Button() widget setting its master parameter to the entry_frame frame. We have again used the grid() method to set the position of this button in the grid format. Adding the widgets to the button_frame frame We will now add the necessary buttons to this frame. We will use the Button() frame to add the buttons to the application that will allow the user to download the requested video in their desired directory, reset the entries, and close the application. Let us consider the following snippet of code demonstrating the same. File: youTubeDownloader.py Explanation: In the above snippet of code, we have used the Button() widget to add the buttons to the application and set the master parameter to the button_frame frame. We have then set the command parameter of these widgets to the functions we defined earlier. At last, we have used the grid() method to set the position of these buttons in the grid format. Running the Application We will now use the mainloop() method along with the object of the Tk() class to run the application. Let us consider the following snippet of code demonstrating the same. File: youTubeDownloader.py Explanation: In the above snippet of code, we have used the mainloop() method with gui_root, the object of the Tk() class, to run the application. Hence, the project code is now complete. We will save this python program file and run the following command in the command prompt or terminal to see the output. Syntax: But before we see the output, the complete project code of the 'YouTube Video Downloader using Tkinter' is shown below. The Complete Project CodeThe following is the project code for the 'YouTube Video Downloader using Tkinter in Python'. File: youTubeDownloader.py Output: 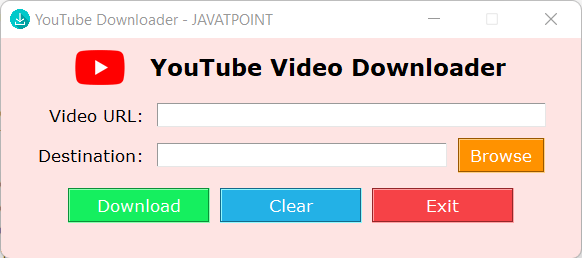
Next TopicFind Key from Value in Dictionary
|
 For Videos Join Our Youtube Channel: Join Now
Feedback
- Send your Feedback to [email protected]
Help Others, Please Share


