| |

Fast API Tutorial: A Framework to Create APIsIn this tutorial, we will learn about the FastAPI framework and how we can create REST APIs. We will learn why FastAPI is so popular and how it differs from the other available frameworks. We will also discuss how to create web APIs that implement best practices by default quickly. By the end of this tutorial, we will be able to start creating production-ready web APIs and be able to go deeper for specific cases. We assume that you are familiar with HTTP and how it works, JSON, and Python basics. So let's move to the introduction of the FastAPI. What is FastAPI?FastAPI is a popular, modern, and high-performance web-framework for creating web services or APIs. It is a Python based framework comes with the standard type hints. REST is a set of the rules that outlines the best practices for sharing data between clients and servers. As its name suggest, it is fast due to its out-of-the-box support of the async feature of the Python 3.6+. This framework was released in 2018 and it was created by the Sebastián Ramírez. An interesting reason behind creating this project, he was not happy with the current available framework like Flask and DRF so he created own framework using tools such as Starlette and Pydantic. Now, FastAPI is quite popular and demanding in industry even big tech giants like Uber, Netflix, and Microsoft are using FastAPI to build their apps. FastAPI FeaturesFastAPI provides many features over the currently available framework. These features are given below.
Flask vs FastAPINow, we will see how Flask is different from FastAPI. Flask is a Python microframework with ORM, caching, and authentication. It was designed to build web applications using Python, and it is meant to be pretty straightforward, fast, and reliable. Despite having such features, why do we need to use the FastAPI? Let's understand the following pros and cons. Advantages
Disadvantages
Use CasesFlask API is most suitable for such type of projects -
Now let's see the FastAPI. FastAPIFastAPI is a modern, efficient, high-performing web framework used to build web APIs. Advantages
Disadvantages
Use Cases It is commonly used for -
Getting Started with FastAPIWe have done enough with the theory, now it is time to do some practical and write the "Hello World" API using the FastAPI. In this section, we will create the minimal FastAPI app. But before that, we need to install it in our system. As any other Python project it would be best to start by creating a virtual environment. Create the virtual environment and activate it. The first step is to install FastAPI and Uvicorn using pip. Once the installation is completed, we are ready to learn how to use them. FastAPI is a framework we will use to create APIs, and Unicorn is the server that will use the API we build for server requests. Note - If you face problem with the above command, you can install them separately as below.and Create First APINow we will create an API display Hello World message and run it with a server using Uvicorn. We will explain its internal part as well. Create the main.py file and paste the above code into it. Now we have a fully functional API application with some best practices. The code won't work itself if we call it using Python directly. We need a server program to run it. We have installed uvicorn, which is our server. Run the Application with UvicornRun the live server using uvicorn. We have highlighted the URL where our app being served in our local machine. Check the ResponseWhen we open the http://127.0.0.1:8000 in browser, it will send the JSON response as below. Now let's breakdown the code -
Now let's break down the main.py code. Line - 1: First we import the FastAPI class that provides all the functionality for the API. Line -3: We initialize the FastAPI class and name it app. It refers to the uvicorn in the above command. Line - 5: We create a GET path. Line - 6: We create an async function that execute when the user visit to the path. Line - 7: We return a response to the client whenever the route is accessed. Path ParametersWe can pass the parameter in the path and declare its type in the function using Python data. With the help of path parameters, we don't need to build a body to find the resource, and it helps scope the API call down to a single resource. These parameters are enclosed in curly brackets {}, and they offer a way for you to control the representation of specific resources. Let's see the following example. Example - We used the path parameter value as student_id, which will be passed as the argument student_id. Data ConversionWhen we run the above API and visit to http://127.0.0.1:8000/students/4, we will get the following response. {'student_id': 4} The function received and returned is 4, which is an integer, not a string ("3"). So the type declaration helps with automatic request parsing. Query ParametersQuery parameters are optional to use. If we pass the parameters in API function, not in the path are automatically interpreted as query parameters. Let's understand the following code. Example - The query is the key-value pair set after the question mark. In URL and separated by the ampersand &. http://localhost:8000/courses/?start=0&end=10 The start with a value of 0 and end with a value of 10 is the query parameters. Request BodyA request body is JSON data used to send data from a client to the API. The API almost always has to send a response body. But client don't necessary to send the response body all the time. There are three most common methods to send data - put, patch, or delete. We can also send data using the GET but it is not preferable. In FastAPI, we use pydantic models to declare a request body. Pydantic tool provides all the advantages and methods. First, we need to import the BaseModel from pydantic then use it to create a subclass defining the schema or data shape so that we want to receive. Let's understand the following example. Example - When we run the API and navigate to http://127.0.0.1:8000/docs it gives us the following page. 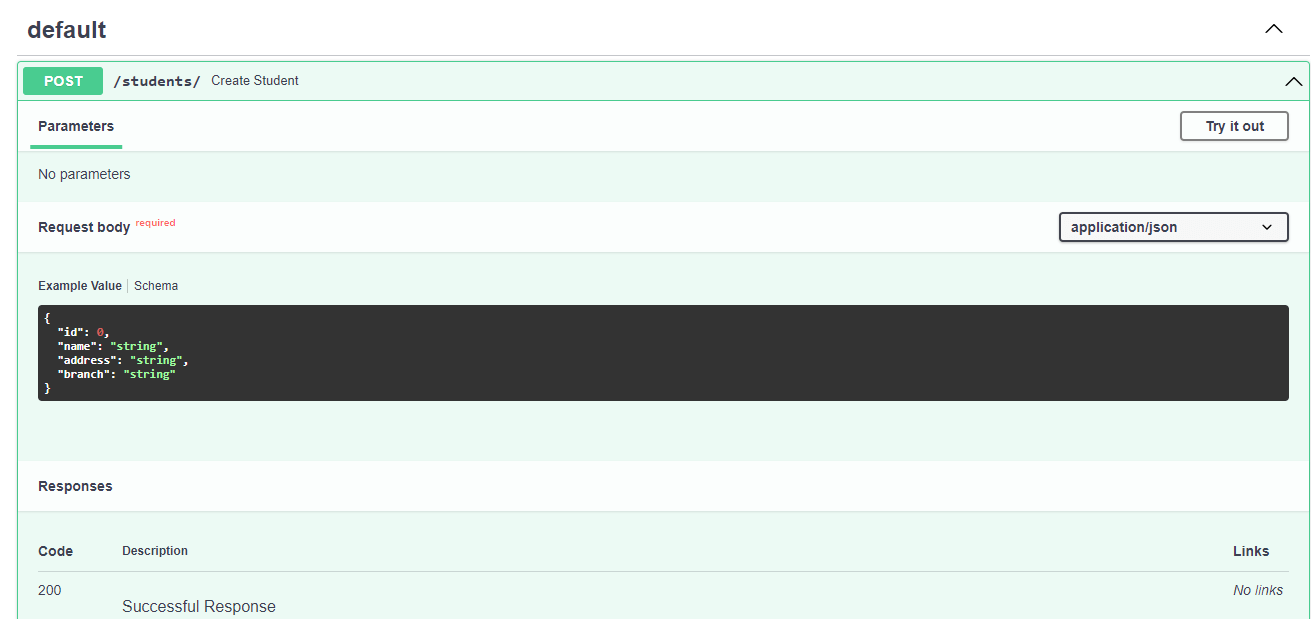
Let's breakdown the above code -
ConclusionIn this tutorial, we have learned about FastAPI and its essential concepts. We have seen how to create production-ready APIs. We have discussed a brief introduction to FastAPI and how it is different from Flask. We learned how to use path parameters to get a unique URL path per item, and how to use the pedantic to receive JSON data in the request. Apart from that, FastAPI has much functionality that we will explore in the upcoming tutorial. However, you can start creating your own high-performance APIs.
Next TopicMirror Character of a String in Python
|
 For Videos Join Our Youtube Channel: Join Now
Feedback
- Send your Feedback to [email protected]
Help Others, Please Share


