| |

Building Physical Projects with Python on the Raspberry PiThe Raspberry Pi is a low-cost, credit-card-sized computer developed in the UK by the Raspberry Pi foundation to support the teaching of fundamental computer science in educational institutions. Since then, it has gained popularity among makers, enthusiasts, and specialists for various projects. Python is a popular, high-level programming language that is easy to learn and use, making it an ideal choice for beginners who want to build physical projects. It has a wide range of libraries and modules available. With the Raspberry Pi and Python, you can build projects that interact with the physical world, such as controlling LEDs, reading sensors, and even creating custom robots. You can also use Raspberry Pi and Python to create more advanced projects, such as a home automation system or a weather station. Broad Overview of Raspberry piThe Raspberry Pi is a low-cost, credit-card-sized computer that was developed in the United Kingdom by the Raspberry Pi Foundation to promote the teaching of basic computer science in schools. It has become popular among hobbyists, makers, and professionals for various projects. 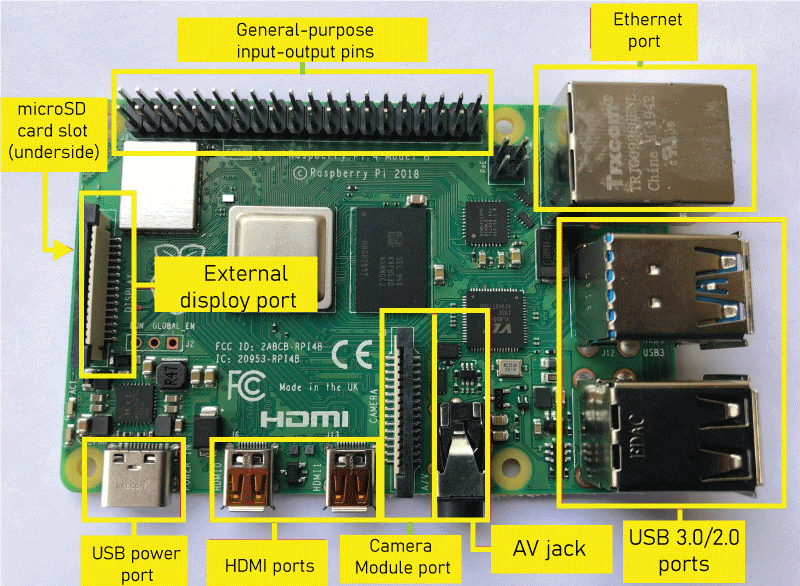
Raspberry vs AndrinoArduino is a microcontroller-based platform widely used for building physical computing projects. A microcontroller is a small computer on a single integrated circuit that can control external hardware and read sensors. The Arduino platform makes it easy to build projects that interact with the physical world, from simple projects like an LED controller to more complex projects like a robot or a weather station. The Raspberry Pi and the Arduino are both popular platforms for building physical computing projects, but they have different strengths and uses. Expertising the key differences among those structures can assist you in making a decision on which one is high-quality for your task. Right Beloware some significant differences between the Raspberry Pi and Arduino:
Setting up Raspberry PiSetting up a Raspberry Pi is a straightforward process that anyone can complete, regardless of their technical background or experience. In this article, we will provide a step-by-step guide to help you set up your Raspberry Pi and get started with your first project. Materials Needed:-
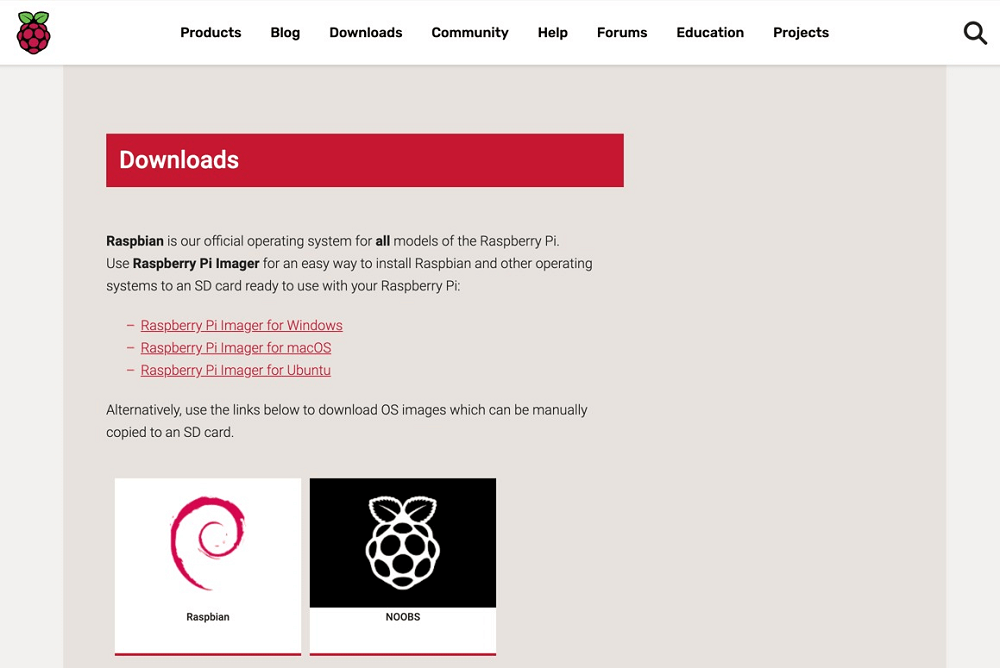
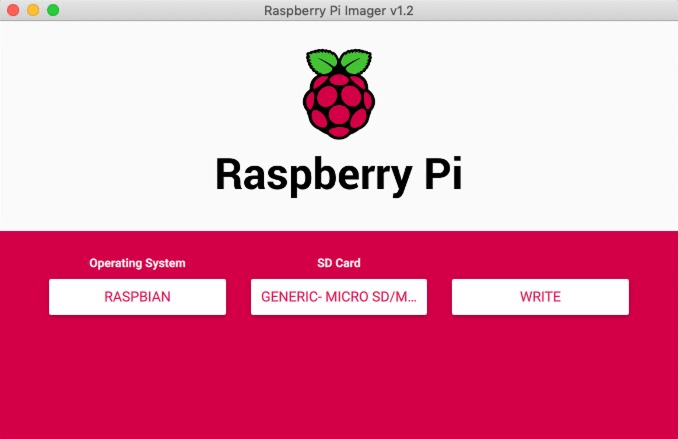
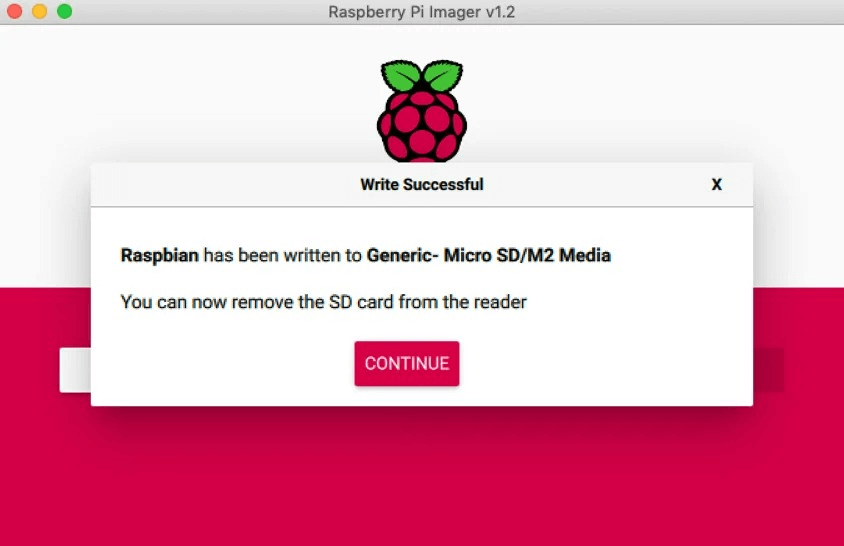
Step 1: Download the Operating System. The first step in setting up a Raspberry Pi is to download the operating system (OS) you want. Many operating systems, including Raspbian, Ubuntu, and others, are supported on the Raspberry Pi. Raspbian, the dependable operating system for the Raspberry Pi, will be used in this instruction. From the dependable Raspberry Pi website, you may get the most recent version of Raspbian. Step 2: Write the Operating System to the MicroSD Card. Once you have downloaded the operating system, write it to the MicroSD card. You can do this using a tool such as Etcher, which is a free and open-source tool that makes it easy to write operating systems to SD cards. Obey Etcher's instructions carefully to write the operating system on the MicroSD card. Step 3: Activate the Raspberry Pi using the MicroSD Card. You should put the MicroSD card into the Raspberry Pi as soon as you have written the operating system on it. The MicroSD card slot is on the bottom of the Raspberry Pi, and you need to push the card into the slot until it clicks into place. Step 4: Connect the Peripherals Next, you need to connect the peripherals to the Raspberry Pi. This includes the power supply, HDMI cable, keyboard, mouse, and monitor. Connect the HDMI cable to the HDMI port on the Raspberry Pi and the monitor, and connect the keyboard and mouse to the USB ports on the Raspberry Pi. Step 5: Power On the Raspberry Pi Finally, you need to power on the Raspberry Pi by plugging in the power supply. Once the Raspberry Pi has started up, you should see the Raspbian desktop on the monitor. Step 6: Configure the Raspberry Pi The last step is to configure the Raspberry Pi to your preferences. This includes setting up the Wi-Fi, keyboard layout, and other settings. You can access the configuration settings by clicking on the Raspberry Pi icon in the top-left corner of the desktop, selecting "Preferences", and then "Raspberry Pi Configuration." Required Hardware for Raspberry PiThe required hardware for setting up a Raspberry Pi is a key component of the overall process and will determine the capabilities of your Raspberry Pi project.
Optional hardwareAdditionally, you may also need the following hardware, depending on your specific project requirements:
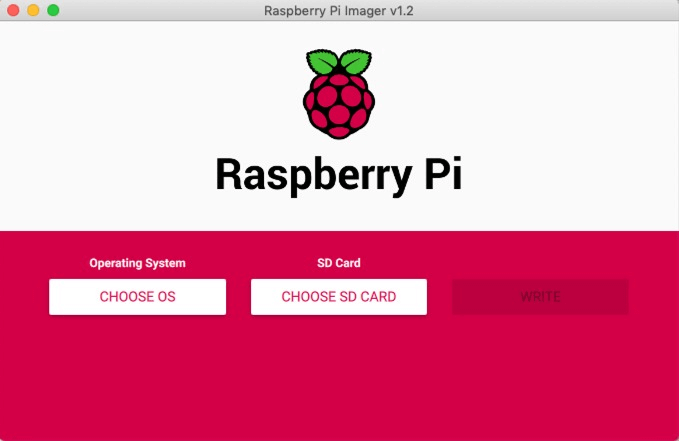
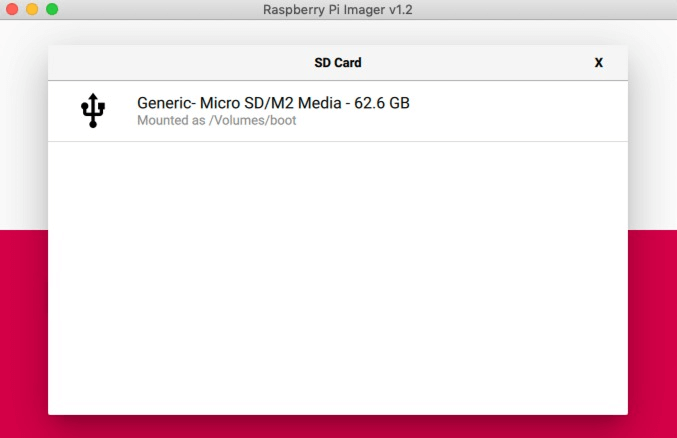
Process for setting up raspberry pi software Setting up software on the Raspberry Pi involves several steps, including downloading the operating system image, writing the image to the MicroSD card, and configuring the Raspberry Pi. Here is a general overview of the process:
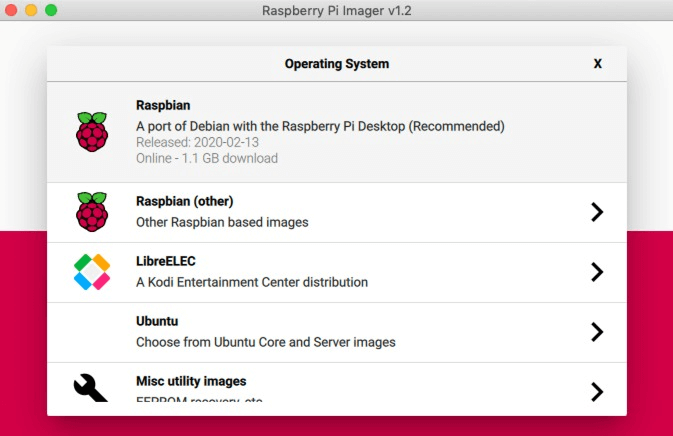
Installing Raspbian From NOOBSThe Raspberry Pi Foundation also provides an alternative to the Raspberry Pi Imager called NOOBS (New Out Of Box Software). NOOBS is a software bundle that includes multiple operating systems, including Raspbian, that can be installed on the Raspberry Pi. 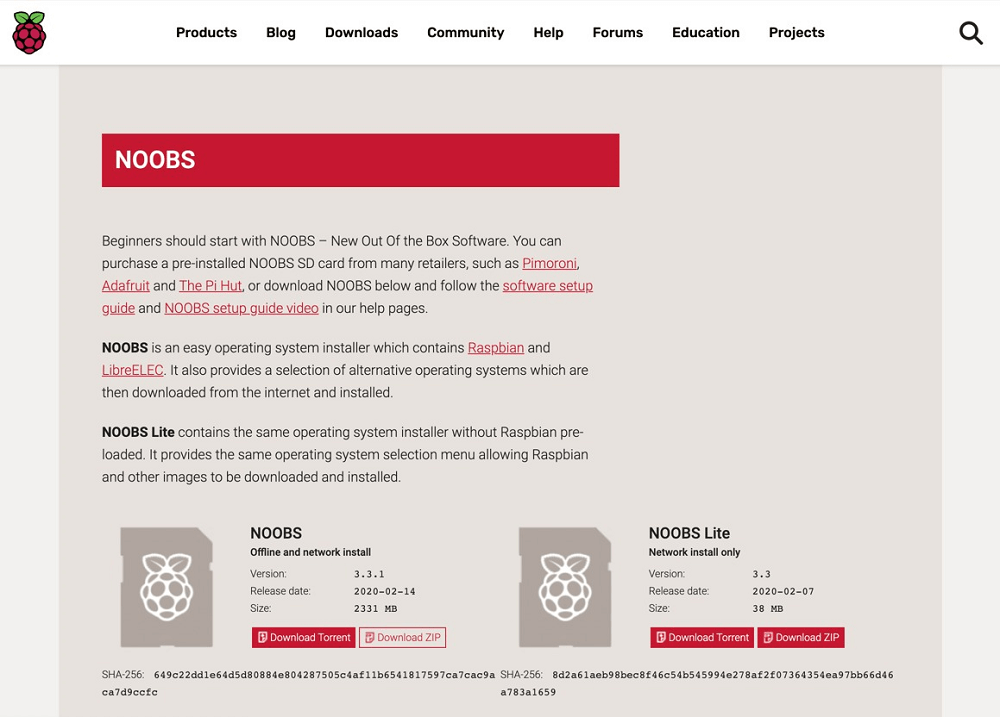
To use NOOBS, you will first need to download the NOOBS package from the Raspberry Pi website. The package includes a ZIP file that contains the operating system images and the NOOBS software. Next, you will need to extract the ZIP file's contents to a MicroSD card. The card should have at least 8GB of storage, although using a card with 16GB or more is recommended. 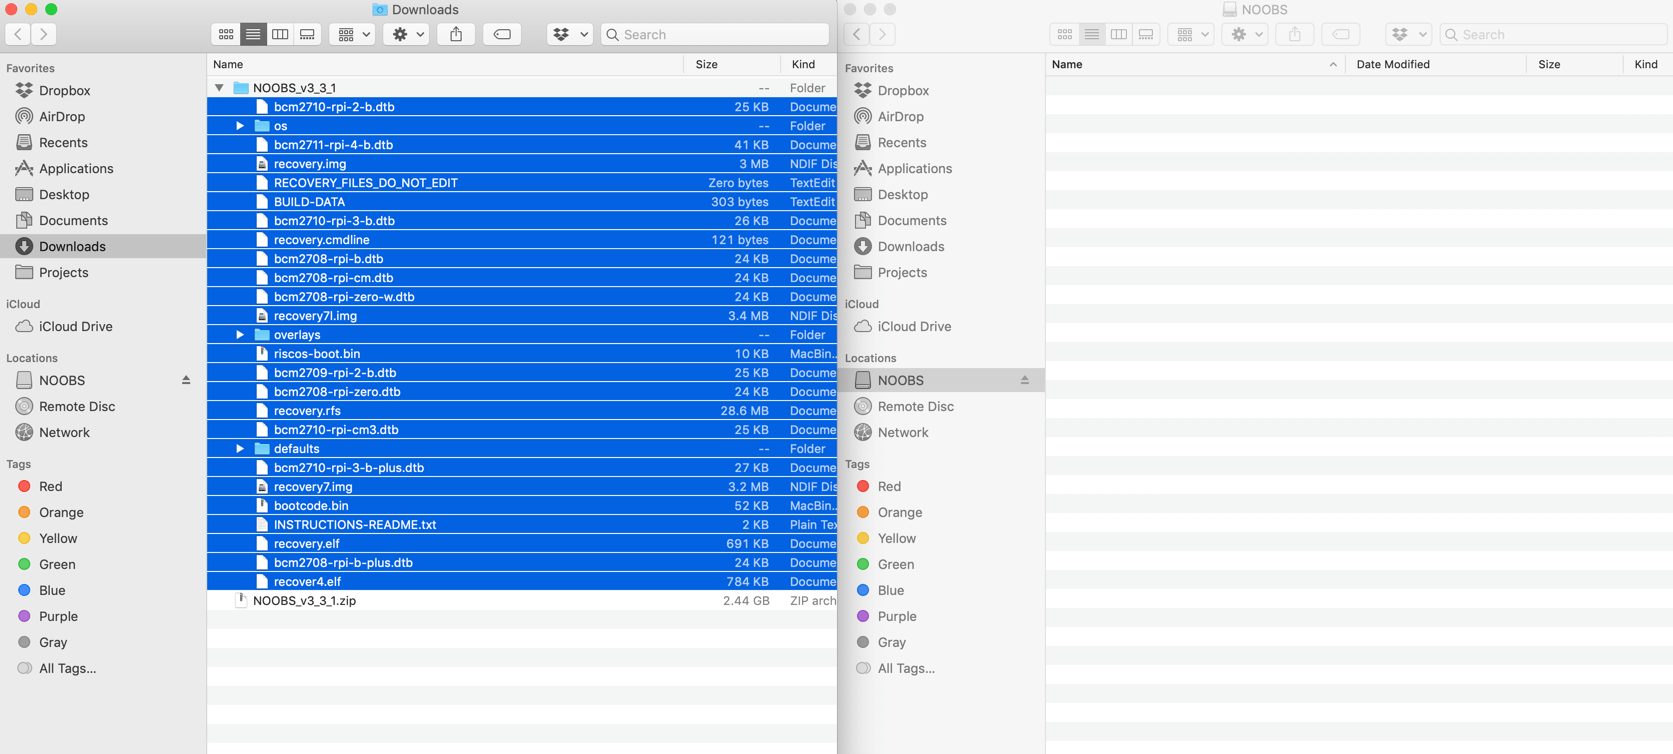
Once the ZIP file's contents have been copied to the MicroSD card, insert the card into your Raspberry Pi and connect it to a monitor, keyboard, and mouse. Turn on the Raspberry Pi, and you should see the NOOBS interface. 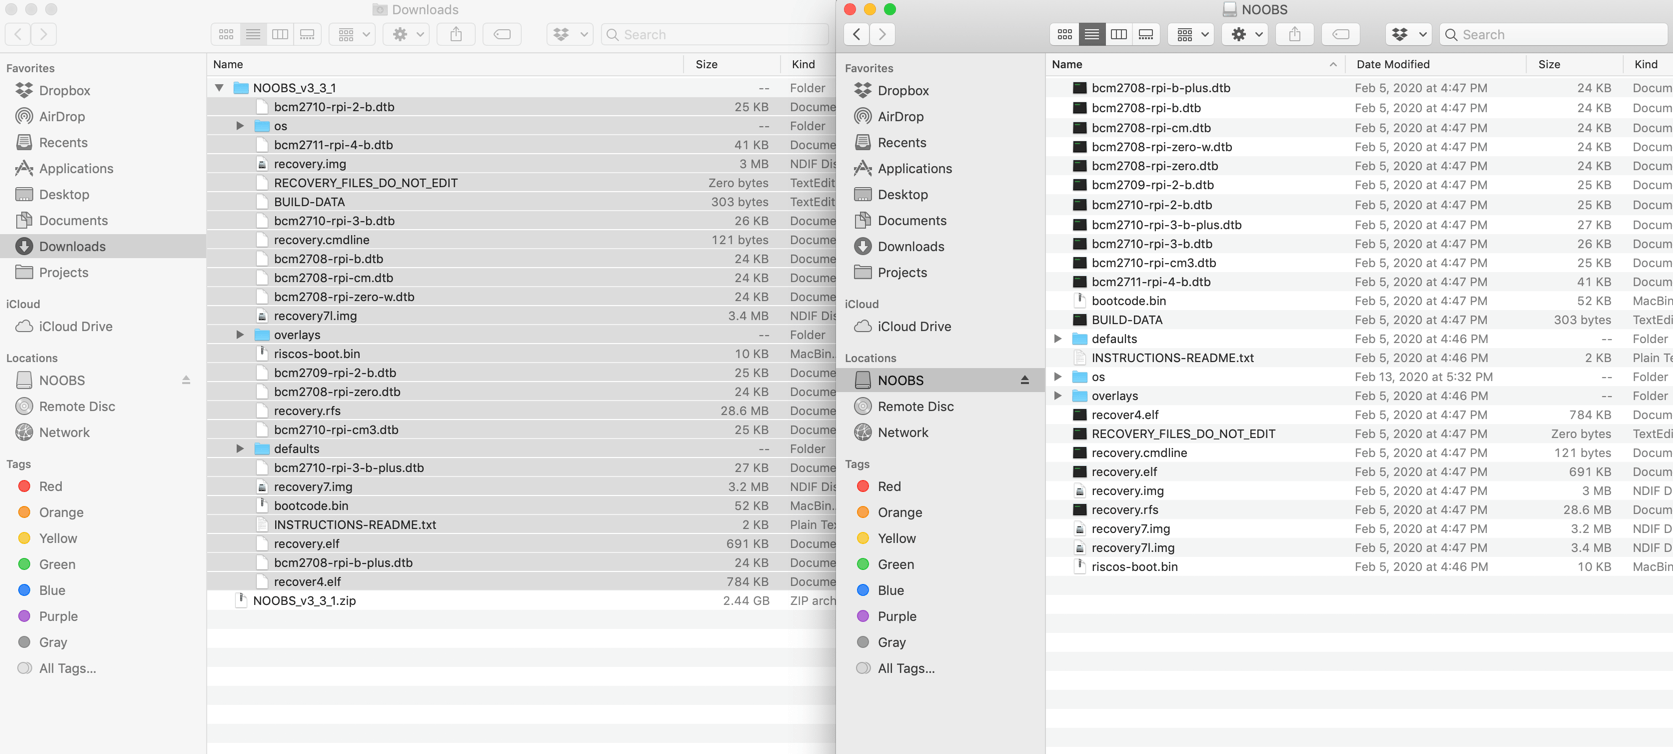
In the NOOBS interface, you can select Raspbian as the operating system you want to install and then click the Install button to begin the installation process. Although the installation procedure will take a while after it is finished, your Raspberry Pi will have Raspbian installed, and you can begin using it. Setup Wizard Raspbian has a setup process to assist you with configuring your password, setting your locale, choosing a wireless network, and changing the operating device on the first boot. Go ahead and take the actions as directed. Once you've completed the steps, restart the operating system, and you're ready to start Python programming on the Raspberry Pi. Running Python on the Raspberry PiTo start Python on the Raspberry Pi, open the terminal and type "python" in the command line. This will launch the Python interactive shell, where you can enter commands and see the results in real time. You can test and debug your code in this mode before saving it as a Python script. You can also write and save your code in a text editor like Nano or IDLE and run it as a standalone program. To do this, you will need to create a .py file with the code and save it to your Raspberry Pi. There are three ways by which we can run python on Raspberry Pi:-
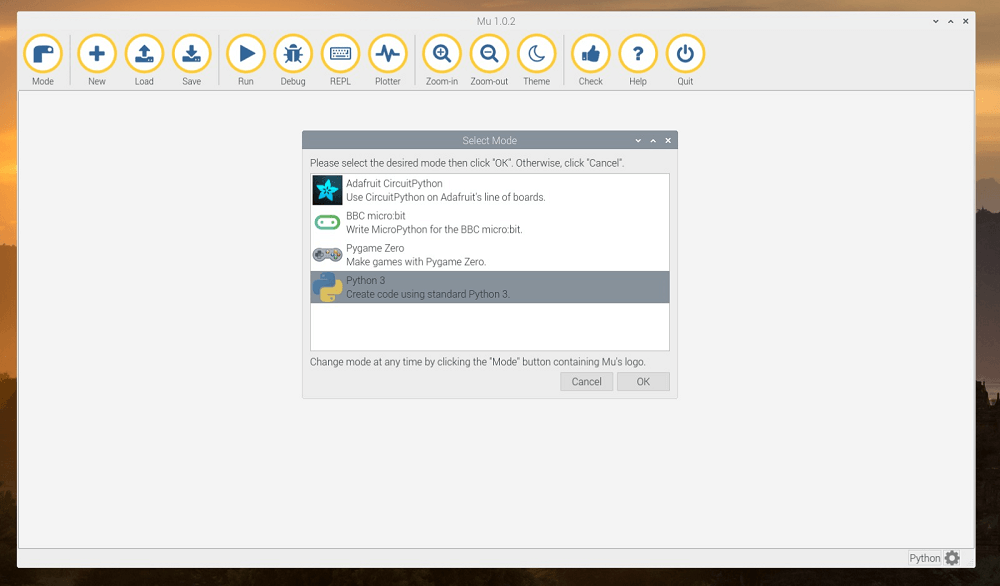
Using The Mu Editor The MU editor is a simple, beginner-friendly code editor for the Raspberry Pi. Still, it is less feature-rich than other code editors like PyCharm or Visual Studio Code. To run Python on the Raspberry Pi using the MU editor, you will first need to install the MU editor on your Raspberry Pi. You can do this by running the following Command in the terminal:- Once the MU editor has been installed, you can start the application by running the following Command in the terminal:- The MU editor will open, and you will see a blank editor window. You can start writing your Python code in this window. Here's a simple example to get you started: To run your Python code, you can either press the F5 key or click the Run button on the toolbar. The output of your code will be displayed in the terminal window. Once you have the MU editor installed on your Raspberry Pi, you can use it to run Python code. To do this, follow these steps:-
The output of the code will be displayed in the Python shell at the bottom of the editor. If you have any errors in your code, they will be displayed here as well. If you need to change the code, make the changes in the editor, save the file, and run the code again. Editing Remotely using SSH The Raspberry Pi can be programmed and controlled remotely over the Secure Shell (SSH) protocol. This allows you to run and debug code, access files, and control the Raspberry Pi without physically connecting a keyboard, mouse, and monitor. 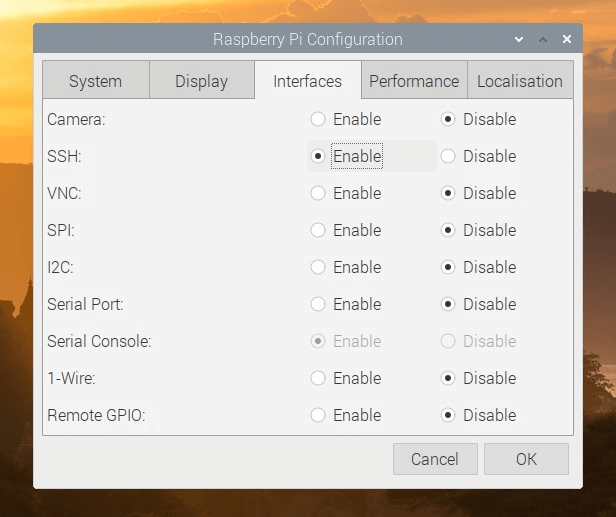
Right Below are the methods to remotely execute Python on the Raspberry Pi through SSH: Authorize SSH on the Raspberry Pi: SSH must be enabled on the device before you can connect to the Raspberry Pi through SSH. You can enable SSH by opening the Raspberry Pi Configuration tool and navigating to the Interfaces tab. From there, you can enable the SSH option. This will display information about the network interfaces on your Raspberry Pi, including the IP address of the eth0 or wlan0 interface. Look for the inet address, which is the IP address of the Raspberry Pi. Connect to the Raspberry Pi over SSH: You can use PuTTY on Windows or Terminal on macOS and Linux to connect to the Raspberry Pi over SSH. To connect, you need to know the IP address of the Raspberry Pi. You can find the IP address by checking your router's network settings or using a tool like Advanced IP Scanner. To connect to the Raspberry Pi, enter the following Command in the terminal or Command Prompt: Replace <IP_ADDRESS> with the IP address of your Raspberry Pi. The default username for the Raspberry Pi is pi, so you will be prompted to enter the password for this user. The default password is raspberry. Log in to the Raspberry Pi: Once you have the IP address of the Raspberry Pi, you can use PuTTY or Terminal to connect to the device over SSH. You might be asked to input the password for this end user since the Raspberry Pi's default username is pi. Raspberry is the pre-set password. Run Python on the Raspberry Pi: Once you have logged in to the Raspberry Pi over SSH, you can use the Python interpreter to run the code. The Python interpreter could be launched by entering the command python3 on the terminal and clicking enter. The Python code may then be entered and run by pressing the enter key. You may enter exit() or press CTRL + D to exit the Python interpreter. To launch the Python interpreter, enter the following Command in the terminal: You can now run Python code in the terminal, including the execution. Creating a python-projects Directory using Mu Editor To create a python-projects directory using the Mu Editor, follow these steps:-
You should now see the "python-projects" directory in the Mu Editor file explorer. You can now save your Python projects in this directory. It's important to keep your projects organized and in a dedicated directory. Doing so will make managing your projects and sharing your code with others easier. Creating a python-projects Directory over SSHTo create a python-projects directory on your Raspberry Pi over SSH, you'll need to use a terminal application such as Terminal on Mac or Putty on Windows. First, you'll need to connect to your Raspberry Pi over SSH using the IP address, default username (pi), and password (raspberry). Once you're connected, you can create the python-projects directory using the following Command: In this case, the mkdir command creates a directory with the specified name, "python-projects". The ~/ at the beginning of the path specifies the current user's home directory, which is pi in this case. You can verify that the directory was created by using the ls command, which lists the contents of a directory: This should return an empty directory since we've just created it and have yet to add any files. You can now navigate to the python-projects directory and start creating your Python projects by using the cd command:- Interacting With Physical ComponentsTo interact with physical components such as electronic components, GPIO pins, tactile buttons, LEDs, buzzers, and motion sensors, you need to use Raspberry Pi's GPIO (General Purpose Input/Output) pins. The GPIO pins are digital inputs and outputs that allow the Raspberry Pi to interact with the physical world. LED:- To control an LED, you can connect the positive lead to a GPIO pin and the negative lead to a ground pin. You can then write a Python script to control the state of the LED, turning it on and off. LEDs come in different shapes and sizes and can be through-hole or surface mounted. Through-hole LEDs have two legs inserted into holes on a printed circuit board (PCB), while surface-mount LEDs are mounted directly onto the PCB. Below are the steps you must follow to connect this circuit: -
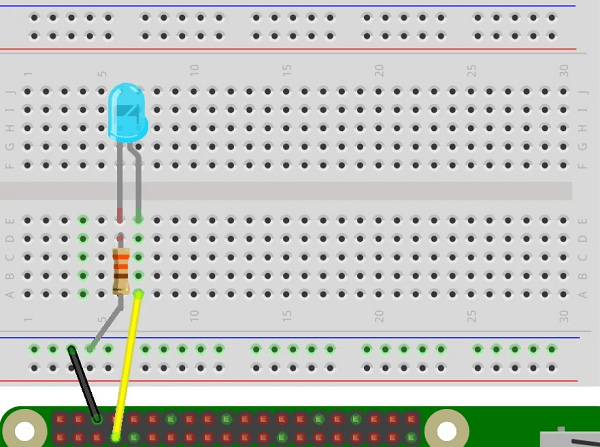
You may use the diagram below to check your wiring: If the wiring appears correct, you're ready to write some Python code to make the LED glow. Create a report for this circuit within the python-initiatives directory to get started. Identify this file as led.py: To make the LED blink on and off, create an instance of the LED class in this code and call its blink() function. Until the system is terminated, the LED will continue to alternate between on and off every second. The default timeout for the blink() method is one second. Starting with initiating the LED out from the gpiozero module and pausing from the signal module:- Makea separate instance of LED called led next. Decide on GPIO pin 4: use the blink() process on led: Add a call to pause() after that to make sure this program doesn't shut down: Your entire piece of software codeshould look like this: To see the LED flicker on and off, save and execute the file. The Light should now be flashing on and off every second. When you're finished viewing your Python code in operation, stop the programme with Ctrl+C or stop in Mu. You now understand how to use Python on a Raspberry Pi to operate an LED. Python will be used to supply audio from the Raspberry Pi for the circuit that follows. GPIO sensors:- There are two main types of GPIO pins: input and output. Input pins read digital signals from sensors and other devices, while output pins are used to transmit digital signals to control LEDs, motors, and other output devices. The Raspberry Pi has 40 GPIO pins, numbered from 1 to 40. These pins are grouped into two rows, with 20 pins each. The pins are labelled based on their physical location on the board, and their functionality can be configured through software. 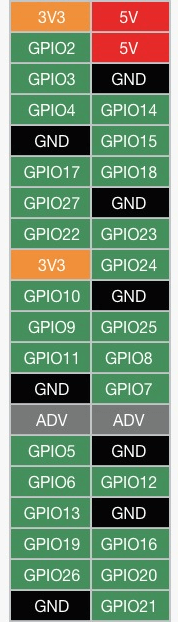
There are three types of GPIO pins on the Raspberry Pi:-
Buzzers:- If you wanted to turn a buzzer on and off or play different tones, you could attach it to a GPIO pin, ground it, and then control it using a Python script. A buzzer is highly digitalized and emits a sound. It frequently has a piezoelectric material that vibrates when an electrical signal is applied, creating a real wave. Buzzers are frequently used in digital devices to provide aural feedback, such as to indicate that a switch has been clicked or an error has occurred. Normally, you would connect a buzzer to a GPIO pin on a Raspberry Pi and use a Python programme to create the electrical signal to trigger the appropriate sound. The type of buzzer and the intended sound will determine the specific code needed.
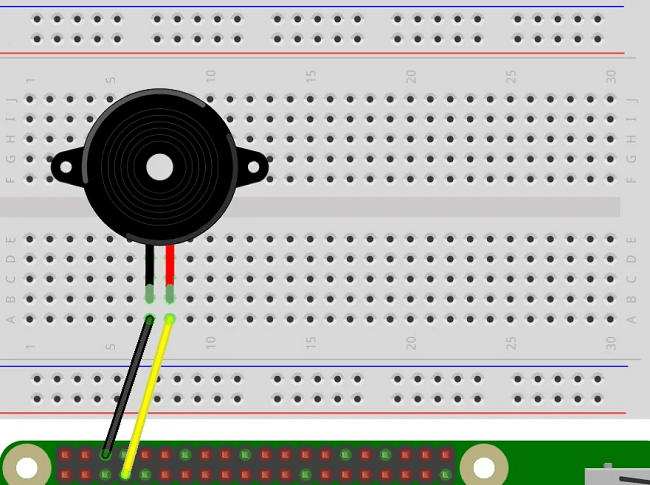
Compare your wiring to the illustration below: Now that the wiring is configured let's start coding immediately. Make documentation for this circuit in the list of Python jobs. Rename this file buzzer.py: To make the buzzer beep on and off, set up an instance of the Buzzer Magnificence in this code and use it.beep() method. On time and Off time are the first two arguments. beep() function. These settings determine how long the buzzer should sound on and off in conjunction with the flow value. For both, the default price is one second. Starting with the sign module's pause command, then adding Buzzer from the gpiozero module: Subsequently, make an instance of a buzzer called a buzzer. Choose GPIO pin 4: Invoke the. beep() method on the buzzer. Put 0.5 in both the on-time and off-time fields. The buzzer may beep every half second as a result of this: Add a call to pause() at the end to make sure the application doesn't terminate: Your entire programme must resemble the following:- Keep the document open and running to hear the buzzer sound on and off every half second. The buzzer will continuously ring until you cancel the programme with Ctrl+C or stop it in Mu. Remember: Note: If you're using Mu, the tone will remain even after you turn off this system. Cut the GND connection to break the circuit and stop the sound. You should also start Mu if the tone persists while you reattach the GND cable. Outstanding! You've learned how to use Python on the Raspberry Pi to control three different types of electrical additives so far. Let's investigate a more sophisticated factor for the next circuit. Jumper Wires Jumpers are small, removable connectors used in electronic circuits to create a temporary or permanent connection between two points on a printed circuit board (PCB) or a breadboard. They are often used to configure or customize electronic devices, enable or disable features, or change the behaviour of a circuit. They come in three different types:-
Tackle buttons Tactile buttons, also known as a push or momentary switches, are electronic switches used to control an electrical circuit temporarily. When a button is pressed, it creates a temporary electrical connection between two conductive plates or contacts, allowing current to flow through the circuit. Tactile buttons come in various shapes, sizes, and configurations. Some common configurations normally include open (NO) and normally closed (NC) buttons. NO buttons are in the open state by default, and pressing the button closes the circuit, allowing current to flow. NC buttons are in the closed state by default, and pressing the button breaks the circuit, interrupting the current flow. To utilise it, you must first attach a tactile button to any of the GPIO pins on a Raspberry Pi. In most cases, one pin is connected to one side of the button and another to another. The circuit is finished while the button is pushed, and a signal is sent to the GPIO pin. If you use Mu, then use the procedures below to make the report:
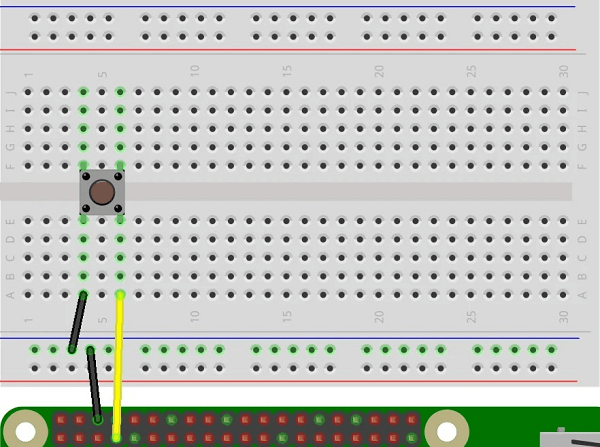
After creating the document, you are prepared to begin programming. The Button class from the gpiozero package should be added first. Moreover, importing pause from the signal package is required. The GPIO library may be used in Python to determine the button's current status. The GPIO pin must first be installed as an entry using the GPIO.setup() capability. After that, you may read the pin's status using the GPIO.input() method. The button is indicated as being pressed if the status is GPIO.high and as being unpressed if the status is GPIO.LOW. Bypass the pin amount as a parameter and initiate an object of the Button class instead. You should utilise the GPIO4 pin in this case so that you may transfer in 4 because the argument is: Next, create functions that will be used for the specific button events that may be accessed via a button, for instance: The event properties for the Button class are when_pressed, when_held, and. when _released. These homes can be connected for special event purposes. The when_held property requires a little explanation, although the. when _pressed and when released properties are self-explanatory. Suppose a feature is close to the. when_held property, it will only be activated if the button is pressed and held for a long enough period. With the help of the. hold time attribute at the Button instance. The maintaining time for when_held is selected. One and a half seconds is the default value for .hold time. During the development of a Button instance, you may override this by supplying a float value: This can make a Button instance delay executing the button held a () function for 2.5 seconds after the button has been pushed and held. Now that you are aware of the special event characteristics on Buttons, set each of them to the corresponding features you previously described:- Outstanding! Your button installation was done for you. For this system to continue listening for the specified actions, pause() must be called. Calling pause() at the end of the file is the ideal course of action. You are prepared to test out your first circuit after the wiring, and the coding is completed. Run this programme inside the python-tasks listing: If you're using Mu, ensure the report is saved first, then click Run to launch the programme. This program is currently operational and watching for occurrences. When you press the button, the following should appear in the console: After pressing and holding the button for at least one second, you must see the output below. Lastly, you must observe the following while you release the button: Now! Using Python, we emphasised and programmed your first circuit on the Raspberry Pi. You'll need to manually stop the application since you used pause() in your code. You can stop by clicking the stop button if you're running this programme in Mu. You can stop this system with Ctrl+C if you're executing this from the command line. Motion sensors:- Connecting a motion sensor towards the Raspberry Pi's GPIO pins allows you to analyse the sensor's data and create a Python script to analyse the data and perform an action based on it. 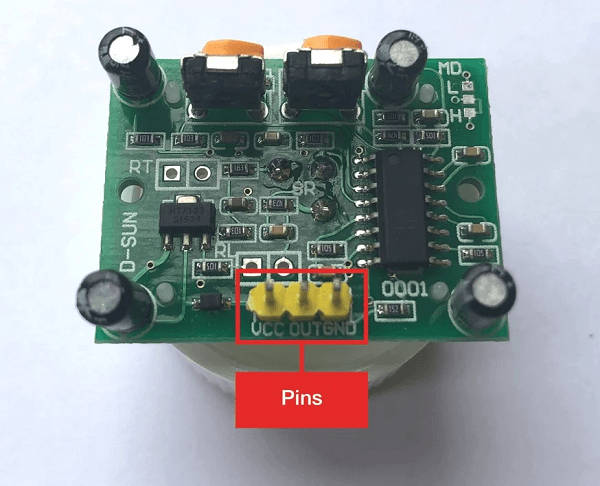
With a buzzer, a PIR motion sensor, and some Python scripting, a Raspberry Pi can be used to build a movement-activated alarm device. The PIR motion sensor senses movement by detecting infrared radiation from objects and people in motion. When movement is detected, the buzzer creates an alarm sound. 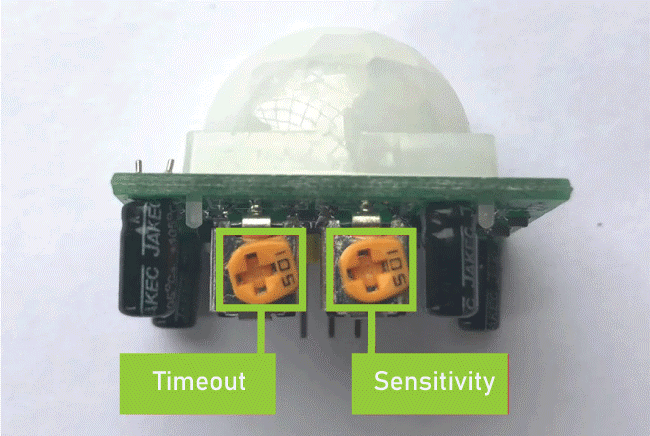
Wiring The steps to complete the wiring are as follows:-
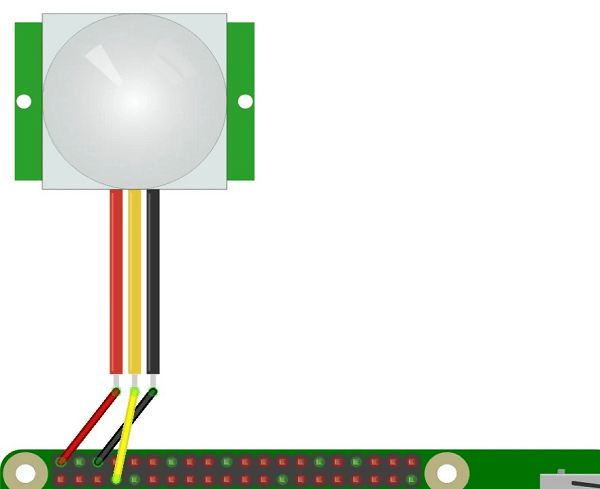
Source Code explanation: As always, add a report for this work to the list of Python initiatives. Call this file motion detector.py for this assignment: Importing the CSV module is the first thing you must do to maintain a timestamp when motion is detected. Moreover, import the pathlib module's direction so you may refer to your CSV document: To produce a timestamp for the movement occurrence, import the date and time from the date and time module after that: Subsequently, import pause from the sign module along with the required element classes from gpiozero: Thanks to the importers' equipment, you can set up the following electronic components you'll be using. Construct timings for the MotionSensor, Buzzer, and LED classes. Enter the PINs for each of these as bypass parameters: Subsequently, mark the area of a CSV file where a timestamp will be stored every time movement is recognized. It will be known as detected motion.csv. Make a dictionary to store the timestamp values for how the CSV is to be written: - The timestamp information should be saved to a CSV record using a method. A header row is supplied when the report is first created: Description of the start motion() method This trait may manifest through a variety of behaviours:
You may witness the actions unfold even as the application runs by uploading a name to print(). Subsequently, define an end motion() property to achieve the following behaviours:
Before executing any substitute code, check if a movement["start time"] value is present. Only record data to the CSV if a start time timestamp was captured. To ensure that any primary motion is excluded, including a call to .wait for no motion(): For the MotionSensor example, set the .when motion and .when no motion properties as follows: To test your new movement detector alert, save the document and execute it: Output Readying sensor... Sensor ready The buzzer must start blaring, and the LED must flash if you wave your hand directly in front of the movement detector. The alert should go away if you stop moving for a few seconds. You ought to see the following in the console: Output Readying sensor... Sensor ready motion detected motion ended motion detected motion ended ... You may progress and stop the application using a stop command in Mu or Ctrl+C. Check out the produced CSV report for further information:- Output: pi@raspberrypi:~/python-projects $ cat detected_motion.csv start_time,end_time 2020-04-21 10:53:07.052609,2020-04-21 10:53:13.966061 2020-04-21 10:56:56.477952,2020-04-21 10:57:03.490855 2020-04-21 10:57:04.693970,2020-04-21 10:57:12.007095 As you can see, the CSV report has received the timestamps for the motion's start and end times. ConclusionAlways improving, the Raspberry Pi is a fantastic computing tool. Its extensive feature set makes it the preferred hardware for physical computing. This tutorial has shown you how to:-
|
 For Videos Join Our Youtube Channel: Join Now
Feedback
- Send your Feedback to [email protected]
Help Others, Please Share


