| |

How to build a GUI application with WxPython?This tutorial explained what a GUI is and how you can use Python to build a GUI application. It also showed how you could make use of wxPython to create a GUI. A GUI application is a graphical user interface for a computer program or hardware. You can use different languages to build a graphical user interface(GUI) Python is a powerful, open-source software language that can be used for various purposes. It can also be used in combination with other languages to create new software applications. The above list is a small selection of how you can use Python to build a GUI application. It can do many tasks that other programming languages cannot do, including; controlling multiple objects from one source, creating modular application structures with functions, providing properties for an object based on its position in the world or as a resource, and much more. What is a GUI? A GUI is a Graphical User Interface for a computer program or hardware. A GUI can be used to present information to the end user and make decisions based either on the data or by entering manual inputs. Some examples of GUI-based programs are Microsoft Windows, Apple OS X, and Linux. Python can be used to create graphical user interfaces, create web applications, and also to create desktop applications. The above list is only a small selection of the many ways you can use Python to build a GUI application. It can do many tasks that other programming languages cannot, including; controlling multiple objects from one source, creating modular application structures with functions, providing properties for an object based on its position in the world or as a resource, and much more. What is wxPython ? wxPython is a cross-platform GUI toolkit with support for creating graphical user interfaces. It uses the wx Widget Toolkit as its core, which provides a simple but powerful API to create applications. It also supports handling a variety of input devices, such as mice, touch screens, and other hardware devices. A GUI created with wxPython looks similar to Microsoft's Windows, OS X, or Linux GUI. For example, one such wxPython GUI that you can use to create a calculator is as shown below. The sample calculator application will have the following features; Calculator with basic arithmetic, Calculator with scientific calculations, and Calculator with percentages. Example: Application of wxPython Now that you know what wxPython is and how it can be used to build a GUI, let's look at an example application that uses it. This example is a simple to-do list application. It has a GUI that displays a list of tasks and also allows the user to add new tasks and mark the tasks as completed. This application uses the following code to create the GUI and to handle the input that the user provides. The GUI is displayed in a form where the user can type in text and click the submit button to add new tasks or the finish button to mark the tasks as completed. This example application is displayed below. In the above example, the input is handled by the requestAddTask() function. The requestAddTask() function takes a taskID and a Task object as input. Once added, the taskID is stored in a list and displayed in the GUI. The GUI is created in the onLoad() function. Steps for Installing wxPythonInstalling wxPython on one's computer is a great way for a beginner programmer to start learning. This tutorial will provide a comprehensive guide for installing wxPython on any computer, including instructions for different operating systems. IntroductionwxPython is an open-source software library that helps to create graphical user interfaces (GUI) in Python programming language. It is built on top of wxWidgets, an open-source C++ framework, and provides users access to a wide range of widgets and other UI elements. The purpose of installing wxPython is to make it easier for users to create GUI applications with Python. Prerequisites Before starting the installation process, there are some requirements that need to be met. Firstly, the user must have Python installed on their computer. It is recommended to have the latest version of Python installed because wxPython is designed to work with the latest versions. The user must also have an appropriate version of pip installed, which can be done by running the command 'pip install -U pip' in the command line. Step 1: Downloading wxPython Once the prerequisites are met, the user can download wxPython from one of the many links available online. The official website for wxPython is https://www.wxpython.org/, from where the user can download the latest version of the software. It is important to download the version that corresponds to the operating system, and the version of Python installed on the user's computer. Step 2: Installation Once the download is complete, the user must install wxPython on their computer. The installation process is slightly different depending on which operating system the user has installed on their computer. For Windows users, they must open a command prompt window, navigate to the location where they downloaded wxPython, and run the command 'pip install ', which should be replaced with the filename of the downloaded file. For Mac users, they must open a terminal window and navigate to the directory where they downloaded wxPython, then run the command 'python setup.py install'. For Linux users, they must open a terminal window and navigate to the directory where they downloaded wxPython, then run the command 'sudo python setup.py install'. Step 3: Verifying Installation Once wxPython is installed on their computer, it is important to verify that it has been installed correctly. This can be done by running simple tests in Python's interactive shell. The first test should be to import the module 'wx' and see if it works correctly. If it does, then it means that wxPython has been installed correctly. The second test should be to call the function 'wx.version()' and see if it returns a valid version number. If it does, then it means that wxPython has been installed correctly and is ready for use. Creating a Skeleton Application in the Process of Building a GUI Application with wxPythonStep 1: Installing wxPython: To get started creating a GUI application with wxPython, you first need to install the library. This can be done by downloading the appropriate binary package from the wxPython website and running the installer. Step 2: Creating a Skeleton Application: Once you have installed wxPython, you can begin to create the skeleton application. This involves creating a frame, adding widgets, and handling events. Step 3: Creating a Frame: A frame is the main window for your application where all of your widgets will be placed. It can be created using the wx.Frame class which takes in arguments such as the parent window, window title, size, and position. Step 4: Adding Widgets: Widgets are elements that can be added to your frame, such as buttons, text boxes, and menus. They can be added using the wx.Frame.AddWidget() method, which takes in an instance of the widget class and any additional arguments such as size and position. Types of widgets used are:-
Dynamic sizing To use a sizer, you first create an instance of the sizer, then add widgets to the sizer using the Add() method. The sizer takes care of positioning and sizing the widgets based on the sizer's layout rules. The sizer is then associated with a frame or panel using the SetSizer() method, which allows the sizer to control the layout of the widgets within the frame or panel. Each type of sizer has its strengths and weaknesses, and the choice of which sizer to use depends on the specific requirements of the application. Sizers are used to size dynamically and position widgets within a frame or panel. There are several types of sizers available, including: -
Handling Events: Events are actions that occur when users interact with your window, such as clicking on a button or typing in a text box. These events can be handled using wx.Frame.Bind(), which takes in an event type and a function to call when that event is triggered. The process of adding and handling events in wxPython involves the following steps: Step 1: Binding an event handler: Once the widget is created, you need to bind an event handler to the widget. An event handler is a function that will be called when the event occurs. The event handler is bound to the widget using the Bind() method. For example, to bind a button click event to a function, you would do the following: Source code: Step 2: Implementing the event handler: The event handler function receives the event as an argument and performs the necessary actions. For example, if the button click event was bound to the function on_button_click, the implementation might look like this: Source code: Triggering the event: Finally, when the event occurs, the event handler function is called and performs the necessary actions. In the example above, when the button is clicked, the on_button_click function is called and prints the message "Button clicked". Step 3: Finishing Touches: The last step is to add functionality and styling to your skeleton application. Step 4: Adding Functionality: This involves adding code to the function that was passed into wx.Frame.Bind() so that it does something when an event is triggered. This could be anything from calling another function to displaying an alert message on the screen. Step 5: Adding Styling: Styling can make your application look more professional and appealing to users. This can be done by setting properties such as font size and color or by using CSS styling techniques. Step 6: Benefits of creating a skeleton application with wxPython: Creating a skeleton application with wxPython allows developers to quickly create cross-platform GUI applications with ease while still providing them with full control over their design and functionality of the applications. Designing a User Interface (GUI)Designing a user interface (UI) is an important step in creating a working GUI application with wxPython. Here are a few things to consider when designing your UI:
Illustration: 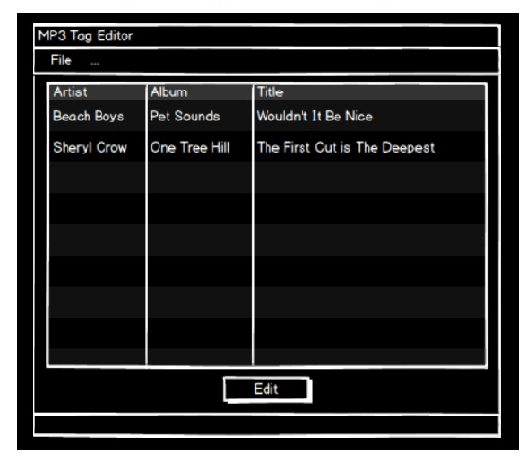
Creating a User Interface (UI)
Here's an example of the code for the "Hello, World!" application:- Output: 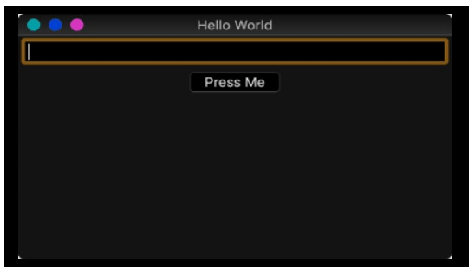
Preparing a Funtional ApplicationAdd menu bar to your code:-The menu bar is a key component of many GUI applications, as it provides a way for users to access the different features of the application. In wxPython, a menu bar is created using the wx.MenuBar class. Here's an explanation of the code that creates the menu bar in a wxPython application: The first line creates the wx.MenuBar object using the wx.MenuBar class and the second line sets the menu bar for the frame using the SetMenuBar method. The argument to SetMenuBar is the menu bar object that has been created. Once the menu bar has been created, menus can be added to it using the Append method. For example, to add a "File" menu, the following code could be used: Source code: The first line creates the wx.Menu object and the second line add the menu to the menu bar using the Append method. The first argument to Append is the wx.Menu object and the second argument is the text that will be displayed for the menu in the menu bar. Create a file menuThe creation of a file menu is a common task in GUI development, and in wxPython, it's achieved by creating a wx.Menu object and adding menu items to it. Here's an explanation of the code that creates the file menu in the previous example: The wx.Menu object is created using the line file_menu = wx.Menu(). Then, the following lines add items to the menu using the Append method: The first argument to the Append method is the ID for the menu item, and the second argument is the text that will be displayed for the item. In this case, the standard IDs wx.ID_NEW, wx.ID_OPEN, and wx.ID_SAVE are used for the "New", "Open", and "Save" menu items, respectively. The line file_menu.AppendSeparator() adds a separator line to the menu, which is used to visually group related items. Finally, the "Exit" menu item is added using the following line: Source code: Once all the items have been added to the menu, the menu is added to the menu bar using the following line: The first argument is the wx.Menu object and the second argument is the text that will be displayed for the menu in the menu bar. Binding eventsBinding events in wxPython is the process of linking a specific action or event (such as a mouse click or a keyboard press) to a specific piece of code that will be executed when that event occurs. This allows the application to respond to user input and perform tasks based on that input. To bind an event in wxPython, you need to use the Bind method. The Bind method takes two arguments: the first is the event you want to bind to, and the second is the function that will be called when that event occurs. For example, to bind a mouse click event to a function, the following code could be used: In this code, the button is a wx.Button object, and self.on_button_click is the function that will be called when the button is clicked. Handling eventsHandling items in a GUI application refers to the process of responding to user interactions with the elements of the user interface, such as buttons, menus, and text boxes. In wxPython, this is typically done by binding events to functions. When an event is triggered, the associated function is executed, allowing the application to perform an action based on the user's input. This is followed by Binding the events. So, in the code that is mentioned to bind the events, the event handling process must be done. When a menu item is selected, a wx.EVT_MENU event is generated. To handle this event and perform an action when a menu item is selected, you can bind the wx.EVT_MENU event to a function using the Bind method. For example: In this code, file_menu is a wx.Menu object item is a menu item that has been added to the menu, and self.on_exit is the function that will be called when the menu item is selected. The frame.Bind line binds the wx.EVT_MENU event to the self.on_exit function. Create an Editing dialog.An Editing dialog is used to allow users to make changes to a piece of data or information in a graphical interface. It provides a separate window or pop-up interface that can be used to enter and modify data in a way that is separate from the main application. Editing dialogs are created to provide a user-friendly way of editing data in a graphical interface. They are used to improve the user experience by allowing the user to make changes to data without having to navigate away from the main application. Editing dialogs provide a clear and focused interface for data entry, which can reduce the likelihood of errors and improve the accuracy of the data. Source code: The text_ctrl member variable is defined, which is a wx.TextCtrl control. The wx.TextCtrl constructor is called with self as the first argument (to specify the parent window) and value as the text parameter. This creates text control with the text to be displayed. Source code: The ok_button variable is defined, which is a wx.Button control. The wx.Button constructor is called with self as the first argument (to specify the parent window) and labeled as the "OK" string. The Bind method is called on the ok_button to bind the wx.EVT_BUTTON event to the on_ok method. This means that when the "OK" button is clicked, the on_ok method will be called. Source code: The sizer variable is defined, which is a wx.BoxSizer object. The wx.BoxSizer constructor is called with wx.VERTICAL as the argument, to specify that the sizer should arrange the controls vertically. The Add method is called on the sizer object to add the text_ctrl and ok_button controls. The proportion parameter for the text_ctrl is set to 1, and the flag parameter is set to wx.EXPAND to indicate that the text control should take up all available space in the vertical direction. The flag parameter for the ok_button is set to `wx.ALIGN_RIGHT | wx Total Editing Dialog codeSource code: Output: 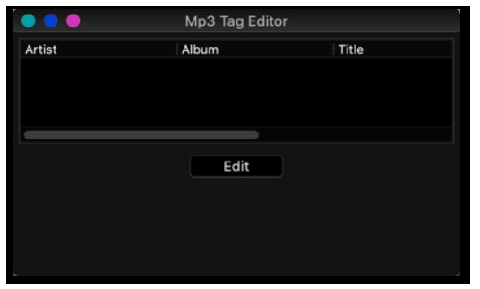
Next TopicHow to read HTML table in Python
|
 For Videos Join Our Youtube Channel: Join Now
Feedback
- Send your Feedback to [email protected]
Help Others, Please Share


