| |

Creating a Keylogger using PythonKeyloggers are a type of monitoring software utilized to record keystrokes made by the user with their keyboard. They are generally utilized to monitor the network utilization along with troubleshooting the technical errors. On the contrary, a lot of malicious software utilizes keyloggers in the attempt to retrieve usernames and passwords for different websites. In the following tutorial, we will understand how to make a simple keylogger using the pynput library in the Python programming language. So, let's get started. Understanding the Python pynput libraryThe pynput library in Python enables the programmers to control and monitor input devices. This library consists of sub-packages for each type of input device supported:
In order to install the Python library, we need 'pip', a framework to maintain packages required to install the modules from the trusted public repositories. Once we have 'pip', we can install the pynput library using the command from a command prompt (CMD) or terminal as shown below: Syntax: All the modules mentioned previously are automatically imported into the pynput package. We can use any of them by simply importing them from the main package. Once the pynput package is installed, we can verify it by creating an empty Python program file and writing an import statement as follows: File: verify.py Now, save the above file and execute it using the following command in a terminal: Syntax: If the above Python program file does not return any error, the library is installed properly. However, in the case where an exception is raised, try reinstalling the library, and it is also recommended to refer to the official documentation of the library. In the following tutorial, we will only discuss the keyboard module of the pynput library that will serve the purpose of creating a simple keylogger. But first, let us understand some basics. Pressing and Releasing Keyboards keys using PythonThe first thing we will learn is to control the keyboard with the help of Python and especially the method of pressing keys on the keyboard. There are two types of keys that we should be concerned about:
In order to start controlling the keyboard, we have to create an object of the Controller() class which will have the press() and release() methods. This class sends the keyboard events to the system. Let us now consider a simple example demonstrating the same: Example 1:Explanation: In the above snippet of code, we have imported the Controller() class from the keyboard module of the pynput library. We have then created an object of the Controller() class. We have then used the press() and release() methods in order to type a letter. As a result, the above code will type "x" wherever the mouse cursor is located. It is also designed to press and release one key at a time. The output of the above snippet of code will look like the following: Output: $ python example1.py $ x Moreover, we can also press and release multiple keys. Let us consider the following example demonstrating the same: Example 2:Explanation: In the above snippet of code, we have now pressed and released multiple keys. As a result, we will see 'xyz' as an output. The output of the above snippet of code is shown below: Output: $ python example2.py $ xyz Now, let us understand the way of handling special keys. Suppose we want to press "x y" (x, space, y). Special keys like space are called with the help of the Key class from the pynput library. The Key class represents different buttons that may not correspond to letters. This class consists of modifier keys and function keys. A complete list of all special keys is available in the following table. The actual values for these entities differ between platforms. Some platforms may consist of additional buttons; however, these are guaranteed to be available everywhere.
Let us now consider the following example demonstrating the use of these special keys. Example 3:Output: $ python example3.py $ x y In the above snippet of code, we have imported the Key and Controller classes from the pynput.keyboard module. We instantiated the Controller class and used the press() and release() methods to type some letters. We have also used the space key with the help of the Key class and printed the space between the two letters - x and y. The above method works for the special keys that we press and release. For example, space, enter, and many more. However, how would we deal with the keys we pressed while typing? Let us take an example of the Shift key, and the objective is to press "Xy" (capital X, y). In order to perform such functionality, the Controller() class offers a useful method known as pressed(). Let us consider the following example demonstrating the same: Example 4:Output: $ python example4.py $ Xy Explanation: In the above snippet of code, we have imported the Key and Controller classes from the pynput.keyboard module. We instantiated the Controller class and used the pressed() method specifying the shift key from the Key class in the with statement. We have used the press() and release() to type the letter 'x' within this statement. We have again used the press() and release() and typed the letter 'y' as it is. There are different combinations of keys available for one to try as per their requirements. One can configure the code as per their needs; however, this is a general overview of how the press and release logic works to control the keyboard. Creating a sample log fileLet us now create a sample log file to store the keys that we press recorded by the keylogger. We can create a sample file and integrate it into the keylogging process. The following snippet of code demonstrates the same: Example 5: Explanation: In the above snippet of code, we have used the open() method to create a new file as "keylog.txt" in the with statement. We have then used the write() method to write some text in this log file. Once we execute the above code, we will get a keylog.txt file containing the text: This is a log file. We would like Python to record the keys that we press and add them to this file in the following. Creating a simple keylogger using PythonWe know how to create a log file with some sample text. We want Python to write the keys we press and store them into this file (rather than having the same text there). So, let us first consider theoretically what we want to perform? We need a list that will keep appending keys that we pressed on the keyboard. And then, once a key is pressed, it will write this list to a file. Let us understand the working of the above statement with the help of the following snippet of code. File: keylogger.py Explanation: In the above snippet of code, we have imported the Key class from the keyboard module of the pynput library. We have then created an empty list in order to store the pressed keys. We have then defined a function as functionPerKey() that provides instructions to perform when a key is pressed. We have used the append() function to append each pressed key to a list within this function. We called another function as storeKeysToFile() to write a list to file after each key was pressed. However, this function is still required to be defined. Remember that the key we pressed comes in the "key" format, and for us to write it to a file, we must have it as a String. Moreover, we will require to remove 'quotation' marks from each key since each key is a string, and we want to join them together. Let us now consider the following snippet of code where we will define another function that will write the keys to the file. File: keylogger.py Explanation: In the above snippet of code, we have defined a custom function as storeKeysToFile() that accepts a key as its parameter. Within this function, we have used the created the keylog.txt file with write mode with the help of the open() method. We have then used the for-loop to iterate through each key present in the list of keys and converted them into strings removing the quotation marks. We then wrote each key to the keylog.txt file using the write() method. As a result, whenever a key is pressed, Python will create a keylog.txt file with the list of keys pressed from the time the script began running up to the last key pressed. If we leave the code like it, it will keep executing all the time. We will define a function consisting of some stop key or a combination of keys that will stop the key logger. Let us consider "Esc" as the stop key for this program. Now we will jump into its implementation. As we already know, whenever we press "Esc", it will be added to the keylog.txt file. Thus, we will define an operation that must take place once we release the "Esc" key after pressing it. Let us now consider the following snippet of code demonstrating such a function's implementation. File: keylogger.py Explanation: In the above snippet of code, we have defined a function to operate on each key release. Within this function, we have used the if conditional statement to check if the released key is "Esc" and return False for the same. As the final step, we will require putting together everything and getting the keylogger running. We will require a listening object to run the keylogger. This object will record the keyboard events. We will be using the Listener() class from the keyboard module of the pynput library to perform this operation. The Listener() class has different arguments; however, we will require only two of them. These arguments are briefly described below:
We will now assign the above custom functions as the Listener() class parameters so that we can join each pressed key with each other. Let us now consider the following snippet of code that demonstrates the implementation of the above statement. File: keylogger.py Explanation: In the above snippet of code, we have imported the snippet of code, and we have imported the Listener() class from the keyboard module of the pynput library. We have then used the Listener() class specifying the parameters as on_press = functionPerKey and on_release = onEachKeyRelease. At last, we have joined these specified functions using the join() method. The coding of the 'Python Keylogger' program is finally completed. We can now save the file and run the program to see if it works. To run the program, we can type the following command in the command-line shell or terminal: Command: But before we see the output, here is a complete project code. The Complete Program CodeThe following program file is a complete code for the 'Python Keylogger' program. File: keylogger.py Output: $ python keylogger.py # type something and press enter to print something on Command prompt $ This is a simple keylogger program. # press "Esc" key to stop the keylogger Output in 'keylog.txt' file: 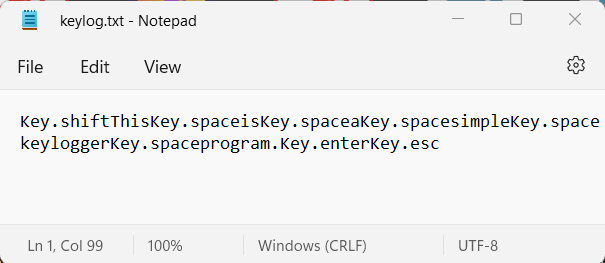
Next TopicQuandl package in Python
|
 For Videos Join Our Youtube Channel: Join Now
Feedback
- Send your Feedback to [email protected]
Help Others, Please Share


