| |
Python Tutorial
Python OOPs
Python MySQL
Python MongoDB
Python SQLite
Python Questions
Plotly
Python Tkinter (GUI)
Python Web Blocker
Python MCQ
Related Tutorials
Python Programs

Image Filter with Python | OpenCVIn this tutorial, we will learn how to apply a filter on the given image using Python. To do so, we will use the OpenCV module. An image has various scales, contrasts, bit depths, and qualities. There is millions of variety of images across the internet, and manipulating these images for a particular reason can lead to several exciting results. Python provides the OpenCV module to perform various operations on the image. We will develop a simple image filter application responsible for modifying a particular image's brightness and contrast. Image processing and computer vision require manipulating images to achieve desirable outcomes in various tasks. It involves performing tasks on images to create modified versions that can be used for tasks such as data augmentation, which is important for computer vision and deep learning applications. If you need to become more familiar with the OpenCV library, you can learn from our Python opencv tutorial. Let's start with our starter code. Get Started With OpenCvThis section will examine the introductory code that will help us become familiar with basic image filtering. Using the OpenCV library, we will adjust the brightness and contrast of the original image. To do so, we will take a sample image to analyze and understand the fundamental working. We save an image with the name sample_image in the working directory. The only essential step is to mention the appropriate name and its respective format while reading the pictures. First, we will install the OpenCV module using the following command. After the installation is completed, we import the opencv module to ensure our installation is successfully. Once the library is fully functional, we will read the image we recently saved in the working directory. The cv2 module provides the cv2.imread () function to read the image; we must pass the image name as an argument. In the above code, we define the alpha and gamma parameters which will use as the contrast and brightness modifiers accordingly. These two parameters will help to increase or decrease the image qualities. The point is to be remembered; we can define the contrast parameter range of 0 to 127 while the brightness parameter can exceed 0 to 100. After this, we will use the addWeighted function of the OpenCV library, which helps us to compute the alpha and gamma (the brightness and contrast values) accordingly. This method will help us blend the image with alpha, beta, and gamma values. Working with a single image, we can obtain the desired outcomes by setting the beta value to zero. 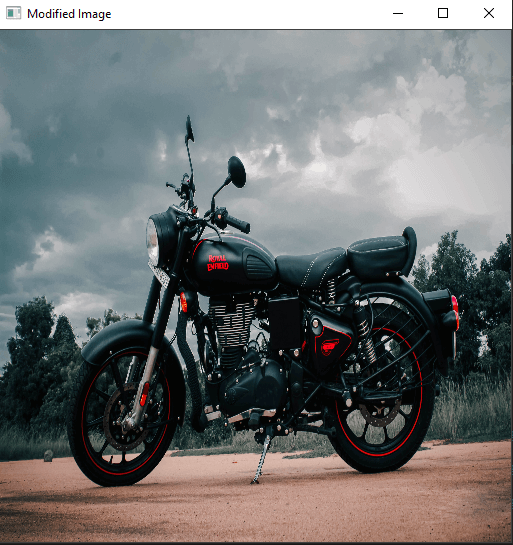
When we execute the given starter code sample, the alpha parameter represents contrast, and the gamma parameter serves as the brightness modifier. Although adjusting these parameters can produce various effects, modifying them manually for each image variation can be impractical. Therefore, a more feasible approach would be to develop a graphical user interface (GUI) and determine the optimal values for each parameter of the desired image filters. We will extend our project and create an application with the Open CV and GUI to optimize the brightness and contrast parameters and adjust the image result. Brightness and Contrast Controlling ApplicationWe can follow the initial steps mentioned in the previous section for this section as well. Firstly, we need to import the OpenCV library, load the relevant image, and resize it to the required dimensions. The code snippet for this process is provided below. Please note that you may adjust the image size as per your specific needs. Example - The subsequent step involves creating a function to adjust the brightness and contrast of the image. This function will utilize the OpenCV library's getTrackbarPos() function to retrieve the current positions of the brightness and contrast elements. The addWeighted() function will be employed to calculate a combined output of both these elements to achieve the desired effect. The following code block demonstrates this process. After defining the trackbar function, the subsequent step is to create a named window and the trackbars to adjust the required parameters. We will design two trackbars, one for brightness and another for contrast, as illustrated in the code block below. The waitKey() function will terminate the program once both the original image window and the trackbar window are closed. 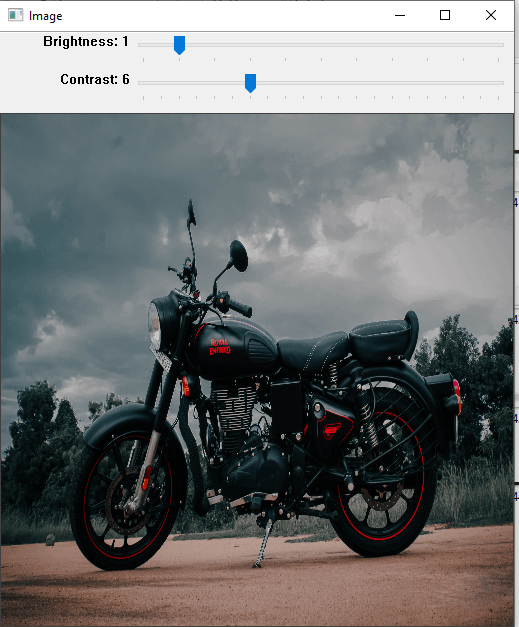
To adjust the brightness and contrast of the image, we can modify the trackbar positions for the brightness and contrast sliders, changing the range of values from 0 to 10 and 0 to 20, respectively. By adjusting the positions of the sliders, we can observe the resulting variations in the image. However, there is still considerable scope for improving this project and scaling the parameters to a greater extent. For instance, we can adjust the brightness values on a scale of 0 to 255 and the contrast on a scale of 0 to 127 to obtain more refined and detailed images. ConclusionThis tutorial is included a basic understanding of modifying the image using the Open CV library. We have also implemented a simple application where we can adjust image brightness and contrast by the trackback.
Next TopicImportant Python Decorator
|
 For Videos Join Our Youtube Channel: Join Now
Feedback
- Send your Feedback to [email protected]
Help Others, Please Share


