GUI Calculator using PythonIn the following tutorial, we will learn how to build a simple GUI calculator using the Tkinter library in Python. We will be learning the entire snippet of code stepwise. So, let's get started. Getting started with the GUI Calculator using TkinterThe Tkinter library offers the fastest and easiest way to develop applications based on Graphical User Interface (GUI) in the Python programming language. The Tkinter package, also known as the "Tk interface", is the standard Python interface to the Tcl/Tk GUI toolkit. Both Tk and Tkinter are available on most Unix platforms and Windows systems. In case someone is working on Linux/Ubuntu, installing the Tkinter package on their machines is required to run programs; however, it comes pre-installed with the Python installation on Windows. If Tkinter is not pre-installed in Python, then we can install it using the 'pip' installer by typing the following command in the Windows Command Prompt: Syntax: What is Tkinter Messagebox?Messagebox is a widget in Python's Tkinter library. This widget is utilized to show the message boxes in Python applications. We can use this module to display a message utilizing several functions. Syntax: Parameters:
Understanding the Structure of the GUI CalculatorIn order to start building the GUI calculator, it becomes necessary for us to understand its structure. This analysis will make the work much more efficient and effective. The following is the structure of the GUI Calculator that we will build. 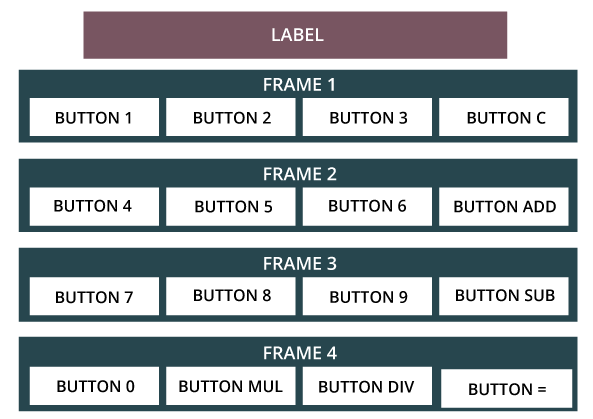 The above structure consists of Labels, Frames, and Buttons. Let us briefly discuss these widgets: Python Tkinter Label: The Label widget is utilized to specify the container box where the user can set the text or images. This widget is utilized to provide the message to the user related to the other widgets utilized in the Python application. Python Tkinter Frame: The Frame widget is a type of widget only. Frames in Python act as the containers for its child elements. These widgets provide the mainframes to the child elements and allow us to divide the entire layout of the application frame by frame. For example, we run the application having a structure consisting of a label at the beginning and then some buttons on a root window. We can divide this root window section by section. Suppose the label as one segment and then the buttons into a different segment. If we put these segments in one frame, this frame will act as a parent element. This will allow us to simplify the complex design. Once we include the frames in the structure of the GUI calculator, its structure will look like this:
Python Tkinter Buttons: The Button widget is utilized to insert buttons in a Python application. These buttons can show text or images that express the objective of the buttons. We can attach a method or a function to a button called automatically whenever we click the button. Now that we have understood the structure of the GUI calculator that we are going to build, we can head onto the code section. Code Implementation of the GUI calculator in PythonIn the following section, we will see the code implementation of the GUI calculator in the Python programming language. This implementation of the project will be carried out stepwise: Step 1: Defining Functions Step 2: Creating the window for the GUI calculator Step 3: Setting up the label formatting Step 4: Packing the button on the window Step 5: Adding the buttons to the GUI calculator Defining FunctionsWe will now start by importing the required libraries and modules. Let us now consider the following snippet of code demonstrating the same: File: guiCalci.py Explanation: In the above snippet of code, we have imported the necessary library like Tkinter along with all the widget classes, including the messagebox module. We will now define the functions that will operate the working of the buttons. Let us now consider the following snippet of code illustrating the implementation of the function that is called whenever the user presses button '1'. File: guiCalci.py Explanation: In the above snippet of code, we have defined some variables and initialized them with initial values. We have then defined a function that will be called whenever the user presses the button '1'. We have then used the global keyword along with the var variable within this function. This will allow us to modify the value of the var variable inside this function. We have then concatenated 1 to the var variable and set this variable in the StringVar using the set() method that we will define later in the tutorial. Whenever a user clicks on the number '1' button, this function will be called. This function will display the clicked number on the label and store it in a different variable so that it becomes easy to calculate. We will now follow the same steps for all the Tkinter buttons. Here is the snippet of code demonstrating the implementation of the same. File: guiCalci.py Explanation: In the above snippet of code, we have defined different functions to append the required value or operator to the string. For the values ranging from 0 to 9, we have used the global keyword along with the var variable and append the required digit to the final string. For the operators like +, -, *, /, =, and C, we have used the global keywords along with the A, var, and operator variable and append the required operator to the final string. At last, we have defined a function to calculate the result. Within this function, we have again used the global keyword to modify the values of A, operator, and var variable. We have then declared and initialized a new variable setting its value to var. We have then used the if-elif-else conditional statements to operate as per the requirement and stored the result. Creating the window for the GUI CalculatorWe will now create a window using the Tk() class of the Tkinter library. This window will consist of a title bar and other decorations. The root window is the main application window in the programs. It must be created before any other widgets. This window consists of a title bar and borders. These decorations are offered by the window manager. The geometry method of the Tk() class allows the programmers to set a size for the window and position on the screen. The first two parameters of this method are the width and height of the window, whereas the last two parameters are x and y coordinates to locate the window on the screen. The resizable method of the Tk() class allows the users to change the size of the window as per their needs. We will set the parameters of this method to 0, disabling the resizing option from the window. It is better to utilize the resizable(0, 0) method as it will make the calculator look proper in place. Let us now consider the following snippet of code demonstrating the same. File: guiCalci.py Explanation: In the above snippet of code, we have created an object of the Tk() class. We have then set the size of the window using the geometry() method. We have also used the resizable() method and set the parameters to 0 in order to disable the resize option for a better User Interface. At last, we have used the title() method and added a title to the calculator. Setting up the label formattingThe Label widget allows us to create a display box where we can place text or images. This widget allows us to update the text displayed at any time as per the requirement. It is also possible to emphasize part of the text (like identifying a keyboard shortcut) and limit the text across multiple lines. The parent of the label is the root which means it won't be limited to a single frame however, an entire root window. Then we will place a simple text that we will dynamically alter throughout the code until the number buttons we click get displayed on the label. The Tkinter StringVar allows us to manage the value of a widget like a Label or Entry more efficiently. The container is a widget that the StringVar object is related to. If we skip the container, it defaults to the root window, and the value is the initial value that defaults to an empty string.
File: guiCalci.py Explanation: In the above snippet of code, we have created an object of the StringVar class. We have then created the label for the window using the Label widget specifying some parameters like the object of the Tk() class, text, anchor, font style and size, textvariable, background color, and foreground color. We have then used the pack() method with the Label's object and set the value of the expand parameter to True. The expand parameter is responsible for the expansion of the parent widget. Packing the buttons on the windowTkinter offers a widget called Frame. This widget has a great significance in grouping and arranging other widgets in one way or another friendly manner. Frames work like the containers, which are accountable for organizing the position of the other widgets. It utilizes the rectangular areas in the screen to organize the layout and offer the padding of these widgets. We can also use a frame as a foundation class to implement the complex widgets. The syntax for frame is shown below: Syntax: Parameters:
Let us now consider the following snippet of code demonstrating the implementation of the frames in the GUI calculator project. File: guiCalci.py Explanation: In the above snippet of code, we have used the Frame() widget to create a frame for the window. We have also included the bg parameter to beautify the frame and add a background color. We have then used the pack() method with the Frame's object so that the frame can expand as it gets some space. We have then repeated the same procedure for the other three frames. Adding Buttons to the GUI CalculatorThe Tkinter library in Python provides a widget known as Button. This widget will allow us to add buttons to the GUI calculator. These buttons can display text or images that carry out the objective of the buttons. We can also attach a function or a method to a button called automatically when we click the button. Let us now consider the following snippet of code illustrating the implementation of the Button widgets. File: guiCalci.py Explanation: In the above snippet of code, we have created different buttons using the Button() widgets. For each button, we have specified the destined Frame's object, set the text to be displayed, font style and size, relief, border, and command. We have then used the pack() method to place each button side by side. At last, we will include the mainloop() method to run the window. File: guiCalci.py Explanation: In the above snippet of code, we have used the mainloop() method along with the object of the Tk() class to run the window. The coding of the 'GUI Calculator' project is finally completed. We can now save the file and run the program to see if it works. To run the program, we can type the following command in the command-line shell or terminal: Command: But before we see the output, here is a complete project code. The Complete Project CodeThe following program file is a complete code for the 'GUI Calculator' project. File: guiCalci.py Output: 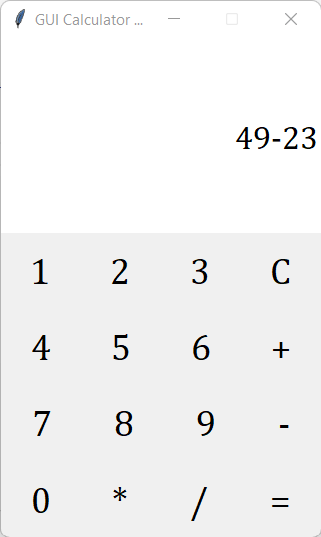 Next TopicSympy module in python |
We provides tutorials and interview questions of all technology like java tutorial, android, java frameworks
G-13, 2nd Floor, Sec-3, Noida, UP, 201301, India


