| |

Creating an MCQ Quiz Game in PythonPython programming language offers a standard Graphical User Interface (GUI) framework called Tkinter, which is utilized to develop fast and easy GUI applications. In the following tutorial, we will develop a simple Multiple-Choice Quiz game in Python with the help of GUI. We will be using the Tkinter GUI framework to create a quiz. So, let's get started. Steps to create MCQ Quiz Game in PythonThe following are the steps to create a Multiple-Choice Quiz Game in Python: Step 1: We will create the JSON file to store the data Step 2: We will create the GUI using the Tkinter framework Let us now understand the above steps. Creating the JSON fileIn order to create the Multiple-Choice Quiz Game, we will need some data. We can define this data in a JSON file, called data.json, with JSON data which are name/value pairs and consist of an array of values. This data will represent the questions with their answers along with multiple choices. Let us consider the following sample data for the quiz as shown below: File: data.json Explanation: In the above JSON file, we have stored data in the form of the name/value pair along with the array of values. As we can observe, we have included the questions with their answers and different options to select from. Now, let us create the Graphical User Interface (GUI) in the next step. Creating the GUI using TkinterWe will now create the GUI using the Tkinter framework in Python. These are some steps that we will follow: Step 1: Importing the module: Tkinter and JSON Step 2: Creating the main window (container) of the application Step 3: Adding widgets to display data Step 4: Adding the functionalities to the button Step 5: Using the data in the quiz Note: Both the Python and JSON files will be created in the same directory defined above.Now that we have created the JSON file for storing the data, we are about to create a python file that will contain the program for the quiz. Importing the modulesWe will start by importing the required modules for the project. In this case, we are importing the Tkinter framework and the JSON module. Let us consider the following snippet of code demonstrating the same: File: myQuiz.py Explanation: In the above snippet of code, we have imported everything from the tkinter along with the json module. Creating the main Window of the applicationNow that we imported the required modules, we will create the main Window of the application using the Tk class. Let us consider the following snippet of code demonstrating the same: File: myQuiz.py Explanation: In the above snippet of code, we have instantiated the Tk class of the tkinter module to create a GUI window. We have also set the size and title of this GUI window using the geometry() and title() functions. Creating the components of the GUIWe will now define a class where we can create the components of the GUI and add functionalities to them. We will start by defining the __init__() method, which we will use to initialize a new object of the class. Within this method, we will set the question count to zero and initialize all the methods that are required to display the content and make the functionalities available. Let us now consider the following snippet of code to understand the same: File: myQuiz.py Explanation: In the following snippet of code, we have defined a class as myQuiz. Within this class, we have defined the __init__() method to initialize the functions and attributes for the project. We have started by setting the value of the question number to zero and assigning the question the displayQuestion() function in order to update it later. We have then initialized the optSelected attribute that holds an integer value used for the selected option in a question. We have then displayed the radio button and options for the current question and the button for next and exit. We have then defined the attribute to store the number of questions. At last, we have initialized the attribute to keep a counter of right answers. Let us now define another method that allows us to display the result. This method will count the number of right and wrong answers and then show them at the end as a message box. Here is the snippet of code that demonstrates the same: File: myQuiz.py Explanation: In the above snippet of code, we have defined the method as displayResult(). We have then calculated the value for the wrong count. We have then calculated the percentage of right answers and, at last, shown a message box to display the result. We will define a method that helps us check the answer once we click on Next. Let us consider the following snippet of code demonstrating the same: File: myQuiz.py Explanation: In the following snippet of code, we have defined a method as checkAnswer() that helps us check whether the selected option is correct. For this, we have used the if conditional statement that returns True if the value of the selected option matches the answer. Now, we will define the method for the next button. File: myQuiz.py Explanation: In the above snippet of code, we have defined a method as nextButton(). Within this method, we have used the if conditional statement to check whether the answer is correct and increment the total correct answer count by 1. We have then used the if-else statement to check whether we reached the end of the questions or not and displayed the output accordingly. Now we will define the method that stores the properties of the button that we will be using in this project. Specifically, there are two buttons that we will be needing - the first one is the next button, and another one is the exit button. Let us consider the following snippet of code demonstrating the same: File: myQuiz.py Explanation: In the above snippet of code, we have defined the method as buttons(). We have created two objects of the Button() class of the Tkinter library within this method. We have specified different attributes for the buttons and used the place() function to place them in position within the GUI. We will now define a method that will allow us to deselect the radio button on the screen. This method will display the options available for the current question, which we get through the question numbers. Moreover, this method helps update each of the options for the current question of the radio button. Let us consider the following snippet of code to understand the same: File: myQuiz.py Explanation: In the above snippet of code, we have defined the method as displayOptions(). Within this method, we have set the value to zero. We have then deselected the options using the set() function, specifying its parameter to zero. We have then used the for-loop to iterate through the options available for each question and increased the value by 1. We will now define the method to display the current question on the screen. Let us consider the following snippet of code demonstrating the same: File: myQuiz.py Explanation: In the above snippet of code, we have defined the method as displayQuestion(). Within this method, we have used the Label() class of the Tkinter library to create an instance, specifying different attributes to it. We have then used the place() function to set the location of the label on the screen. Now, let us define the method to display the title to the screen. Here is the following snippet of code that demonstrates the same: File: myQuiz.py Explanation: In the above snippet of code, we have defined a method as displayTitle(). Within this method, we have defined the label for the title using the Tkinter's Label() class and placed it using the place() function. At last, we will create the radio buttons to select the Question on the screen at a particular position. This method also returns a list of the radio button, which we will use later to add the options to them. File: myQuiz.py Explanation: In the above snippet of code, we have defined the method as radioButton(). Within this method, we have initialized an empty list and set the position of the first option. We have then used the while loop to add options to the list. We have created an object of the Tkinter's RadioButton() class, used the append() function, set the button's position, and incremented the position of the y-axis by 40 inside this loop. At last, we have returned the radio button. Using the data in the QuizSince we have added the required widgets and their functionalities to the program, let us use the data stored in JSON. Here is the following snippet of code, demonstrating the same: File: myQuiz.py Explanation: In the above snippet of code, we have used the open() function to open the JSON file and load its data to the main program. We have then created different variables to store the data from the JSON file in the form of the question, its options, and its answer. We have successfully built our project. We will instantiate the myQuiz() class and use the Tkinter's mainloop() function before executing the program. Let us consider the following snippet of code demonstrating the same: File: myQuiz.py Explanation: We have instantiated the myQuiz() class in the above snippet of code. At last, we have used the Tkinter's mainloop() function to display the GUI window. The complete project code can be found below. Complete Project CodeFile: myQuiz.py Output: 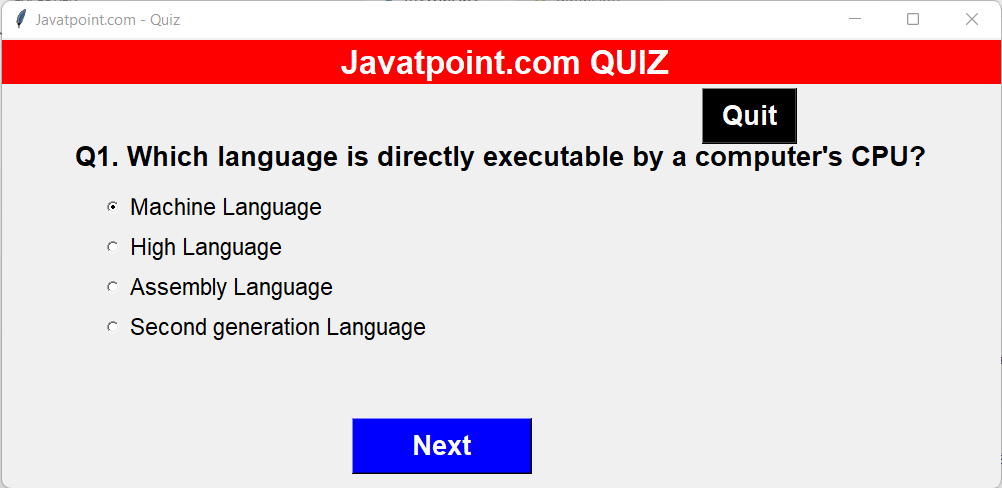 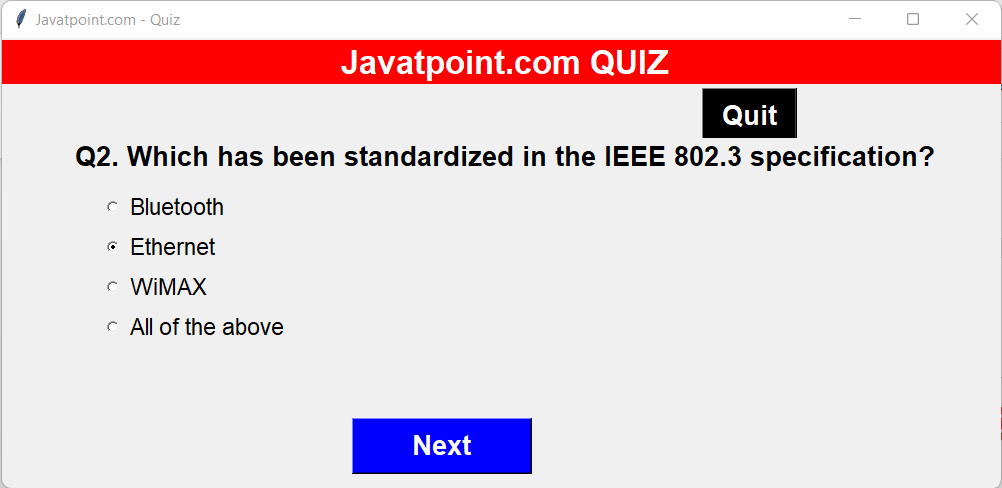 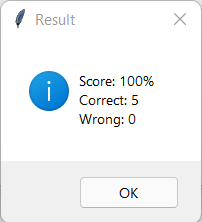
Next TopicStatistic with Python
|
 For Videos Join Our Youtube Channel: Join Now
Feedback
- Send your Feedback to [email protected]
Help Others, Please Share


