| |
Python Tutorial
Python OOPs
Python MySQL
Python MongoDB
Python SQLite
Python Questions
Plotly
Python Tkinter (GUI)
Python Web Blocker
Python MCQ
Related Tutorials
Python Programs

Alarm Clock with GUI in PythonThis is not a wonder that an alarm clock has always been useful to warn us while we sleep, take a brief nap, or remind us about some important days that we might forget. An alarm clock is a clock that is created in order to alert us at a specified time. The primary function of these clocks is to awaken people from their night's sleep or short naps; they are sometimes used for other reminders. In the following tutorial, we will develop a basic Alarm Clock using the Tkinter library in the Python programming language. An Introduction to the Python ProjectIn this Python project, we will consider using some Python libraries, namely, Tkinter and datetime. We will be using the current date and time in this project along with a feature of setting the alarm as per the current date and time found. Let us now start building the Alarm Clock using Tkinter. Building the GUI Alarm ClockThe procedure for this Python project is divided into several steps. Step 1: Importing the required modules Step 2: Creating a function for the alarm Step 3: Creating the Tkinter window We will now understand these steps in detail. Importing the required modulesBefore we start building any project, the primary step is to import all the important libraries and modules that we need for the project. In this case, we will need the Tkinter library along with the datetime, time and winsound modules.
Let us now consider the following snippet of code illustrating the importing of the required modules. File: alarmClock.py Explanation: In the above snippet of code, we have imported the required modules. Creating a function for the alarmOnce the importing is done, we will move on to the next step, which includes the creation of the functions for the alarm clock. Let us consider the following snippet of code demonstrating the same. File: alarmClock.py Explanation: In the above snippet of code, we have defined a function as an alarm with a parameter as setAlarmTimer. Within this function, we have used the while loop for True. Inside this loop, we have used the sleep function of the time module to stop the execution of the program until it gets the time values entered by the user. We have then gotten the current date and time using the help of datetime.now() function of the datetime module and stored it in a variable. We have then stored the time and date into separate variables with the specific format using the strftime function. We have then printed a message representing the current time. We have then used the if conditional statement to check if the current time is equivalent to the set alarm timer and play the sound for the same using the winsound module, or else the timer continues. We have then defined another function as getAlarmTime(), which accepts the time from the user to be set for alarm and passes it to the previous function. Creating the Tkinter WindowNow that we have created the function for the alarm clock, let us head onto the final step of creating the main window of the application with all the widgets and features defined. Let us consider the following snippet of code demonstrating the same: File: alarmClock.py Explanation: We have created a GUI window using the Tk() class in the above snippet of code. We have then set the title for the window and specified the dimensions using the title() and geometry() methods. We have then used the bg attribute in the config() method and set the background color to #87BDD8. We have also fixed the window's geometry by setting width and height to False in the resizable() method. We have then defined different labels using the Label class that will display the texts on the window and provided some parameters to decorate the texts. We have then defined some variables that hold the value of Strings. We have then added three text boxes using the Entry class, where we will enter the time for the alarm and provide some parameters to decorate them. We added a button using the Button class linked to the getAlarmTime() function we created earlier and used some parameters to decorate it. At last, we have used the mainloop() method to display the window. The coding of the 'Alarm Clock with GUI' project is finally completed. We can now save the file and run the program to see if it works. To run the program, we can type the following command in the command-line shell or terminal: Command: But before we see the output, here is a complete project code. The Complete Project CodeThe following program file is a complete code for the 'GUI Alarm Clock' project. File: alarmClock.py Output: Current Time: 16 : 23 : 46 Current Time: 16 : 23 : 47 Current Time: 16 : 23 : 48 Current Time: 16 : 23 : 49 Current Time: 16 : 23 : 50 Current Time: 16 : 23 : 51 Current Time: 16 : 23 : 52 Current Time: 16 : 23 : 53 Current Time: 16 : 23 : 54 Current Time: 16 : 23 : 55 Current Time: 16 : 23 : 56 Current Time: 16 : 23 : 57 Current Time: 16 : 23 : 58 Current Time: 16 : 23 : 59 Current Time: 16 : 24 : 00 *ALARM* 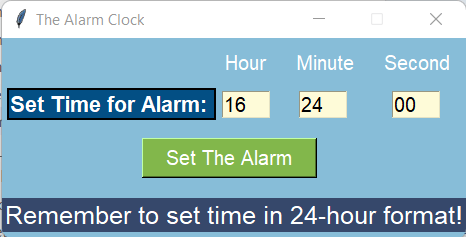
Next TopicRock Paper Scissors Game in Python
|
 For Videos Join Our Youtube Channel: Join Now
Feedback
- Send your Feedback to [email protected]
Help Others, Please Share


